Elements
Size
Age
Levels
Note: Map location may not be exact. Click to open in Google Maps.

The South Bloomingville Container Cabin is an example of how determination and a bit of DIY skills can transform a couple of containers into a secure weekend retreat. This Ohio Container Home is simple and not luxurious by any means, but it gives the owners exactly what they needed.
Bill and Becky are an ordinary couple, but a few years ago they had a container-sized problem. The RV camper they kept on their beautiful 12-acre weekend retreat property was robbed, and they knew that their dream cabin would have to be more secure than they had initially planned.
Eventually, they settled on shipping containers as the best way to build their cabin while keeping it locked and protected when they were gone. We’re excited and grateful to have Bill and Becky share their container home journey with us, including some non-traditional design and material choices that you may not have seen before.
We love hiking in the glacier-carved hills of Southern Ohio, so we decided to build a cabin in the area and bought twelve acres of land. We then staged an RV camper to use as temporary housing during the construction process. Initially, we planned to build an A-frame cabin. However, thieves broke into the camper and stole anything remotely of value—including the toilet. Locals later told us that thievery was a common occurrence in this impoverished area. In light of the robbery, we decided that an A-frame would not be a wise choice.
Bill started looking into more secure housing options. We even considered a bunker. Thanks to television shows about tiny houses, we were also aware of shipping containers being converted into homes. As we explored our options, Bill found a blog called Tin Can Cabin that described the author’s journey of building his own container home in the Northern US. The author also had security as a primary focus, which led us to investigate a shipping container cabin more thoroughly.
We combed the internet looking at shipping container homes and building techniques. We were amazed to find that a large number of shipping container cabins had been built all over the world. When we found Discover Containers (which at the time was called Container Home Plans), we immediately ordered your container home building eBook. This book was invaluable in helping us to understand the building phases and important considerations for the project.
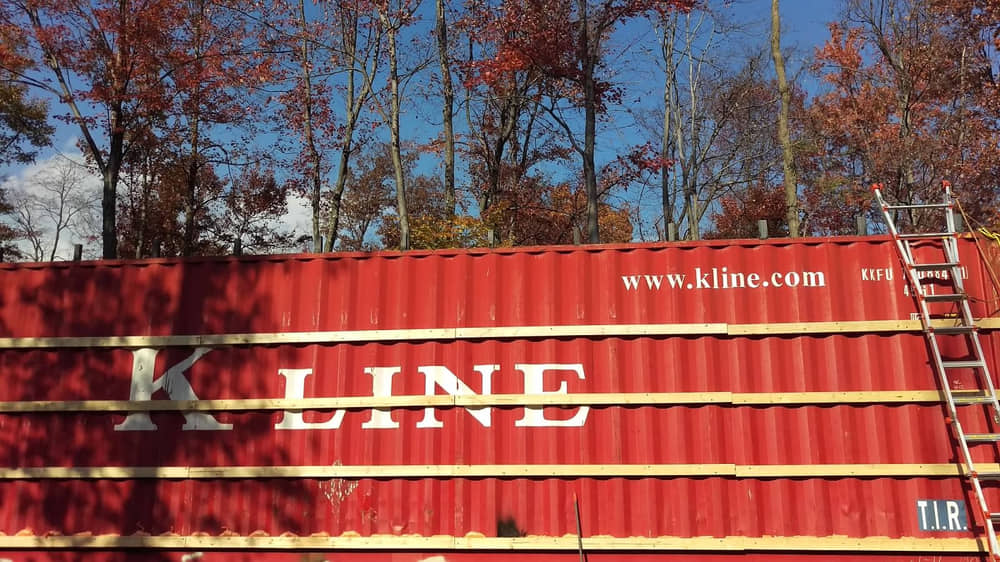
At this point we got serious. We discussed what type of container we wanted to use, where we might get one, whether we wanted to use new or used containers, and most importantly, how to pay for the project. After reading the Discover Containers’ How to Build a Shipping Container Home, we knew that we wanted to buy high cubes and we decided that two 40’ containers would provide plenty of space for our small get-away-from-it-all cabin. Via Craigslist, we were delighted to discover a container depot in Obetz, Ohio which is fairly close to our land. We made contact and visited the terminal to see a container for ourselves before committing to the project.
We were very pleased with the results of our visit and contracted for two 40’ high cube containers and one 20’ container to be delivered to our property. The 20 footer is used as a storage shed. We also paid for a marine inspection of the 10 year old containers prior to accepting shipment. The inspection certified that the containers were seaworthy (i.e., did not leak and were structurally sound) and included pictures both inside and out. We planned to have a steel shell and roof built around the containers, so using old containers allowed us to spend only $6400 including delivery and have the green benefit of reusing surplus containers.
Bill worked in the building trades for many years and is a journeyman electrician, welder, plumber and mechanic. Becky was a project manager for complex software releases prior to her retirement and is a chemist. Between Bill’s skill set and Becky’s organization abilities, we knew that we could manage this DIY project. We also knew that we would learn a LOT in the process!
We did most of the construction ourselves. We did get several weekends of assistance from our good friend, Jeremy. His two sons often accompanied him and they also learned some good skills during the process. We outsourced a couple of things including the sheet metal shell and roof, blown-in insulation and hanging the drywall. We could have done the drywall ourselves, but it would have taken at least a month of weekends. By hiring it out to professionals, it was completed in a week and frankly looked better than what we could have done.
Besides the Discover Containers eBook and the Tin Can Cabin blog, another book we found extremely useful was “Intermodal Shipping Container Small Steel Buildings” by Paul Sawyers. It contained a lot of the critical dimensions and guidance that affected our construction and purchasing decisions.
We planned to use the cabin for weekend visits and vacations. Therefore, it did not need to be large. Our focus was primarily on functionality and security.
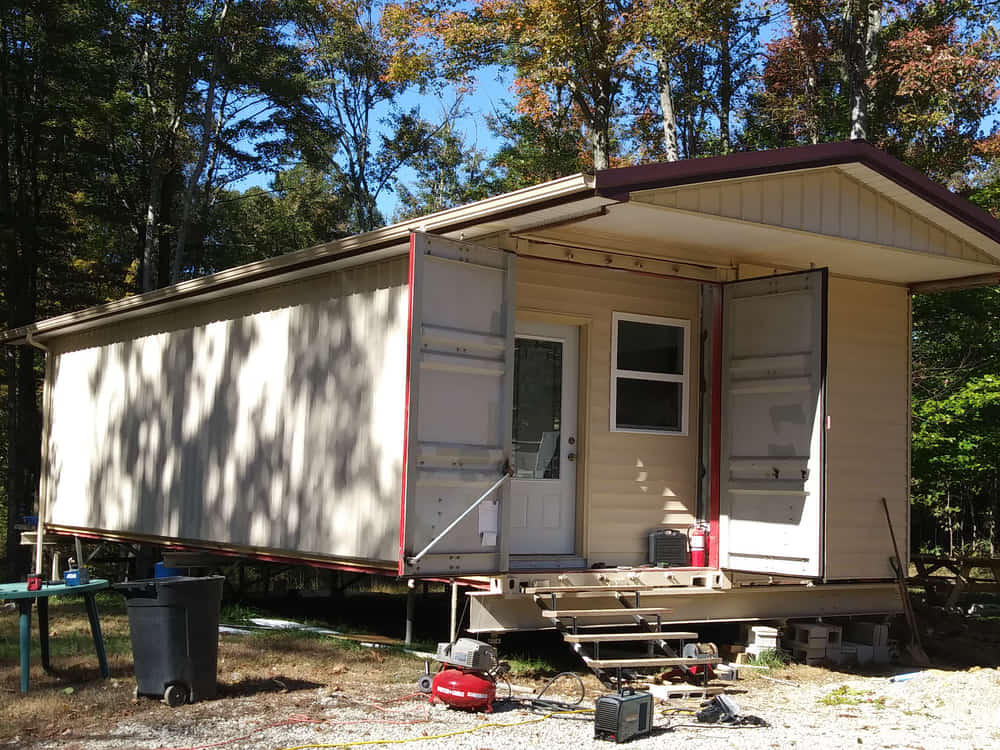
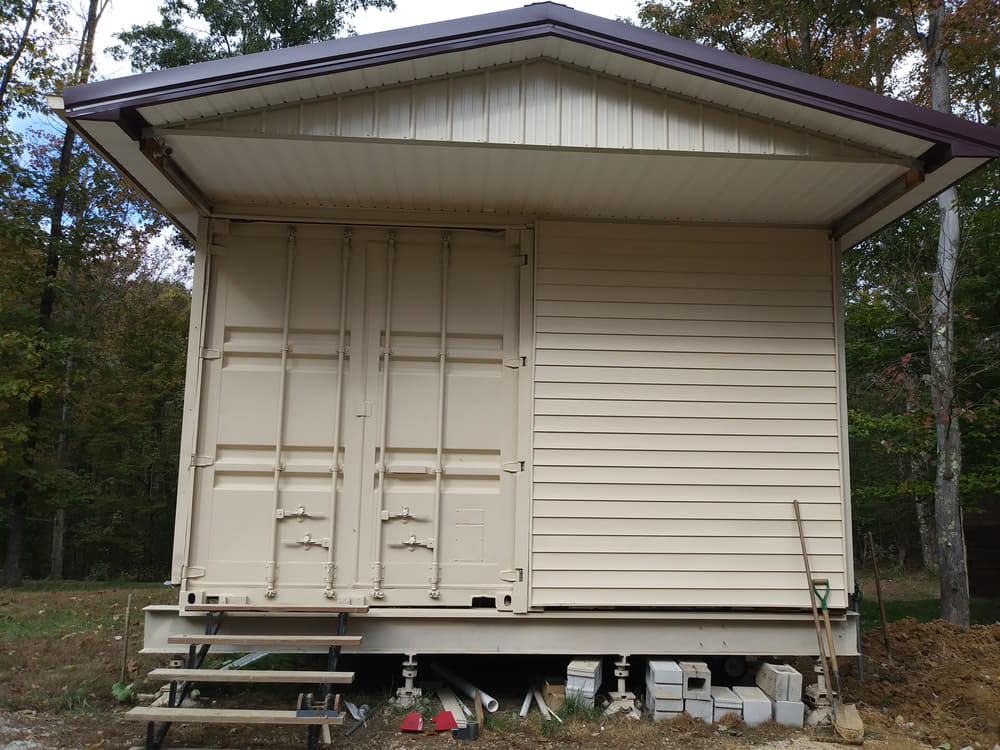
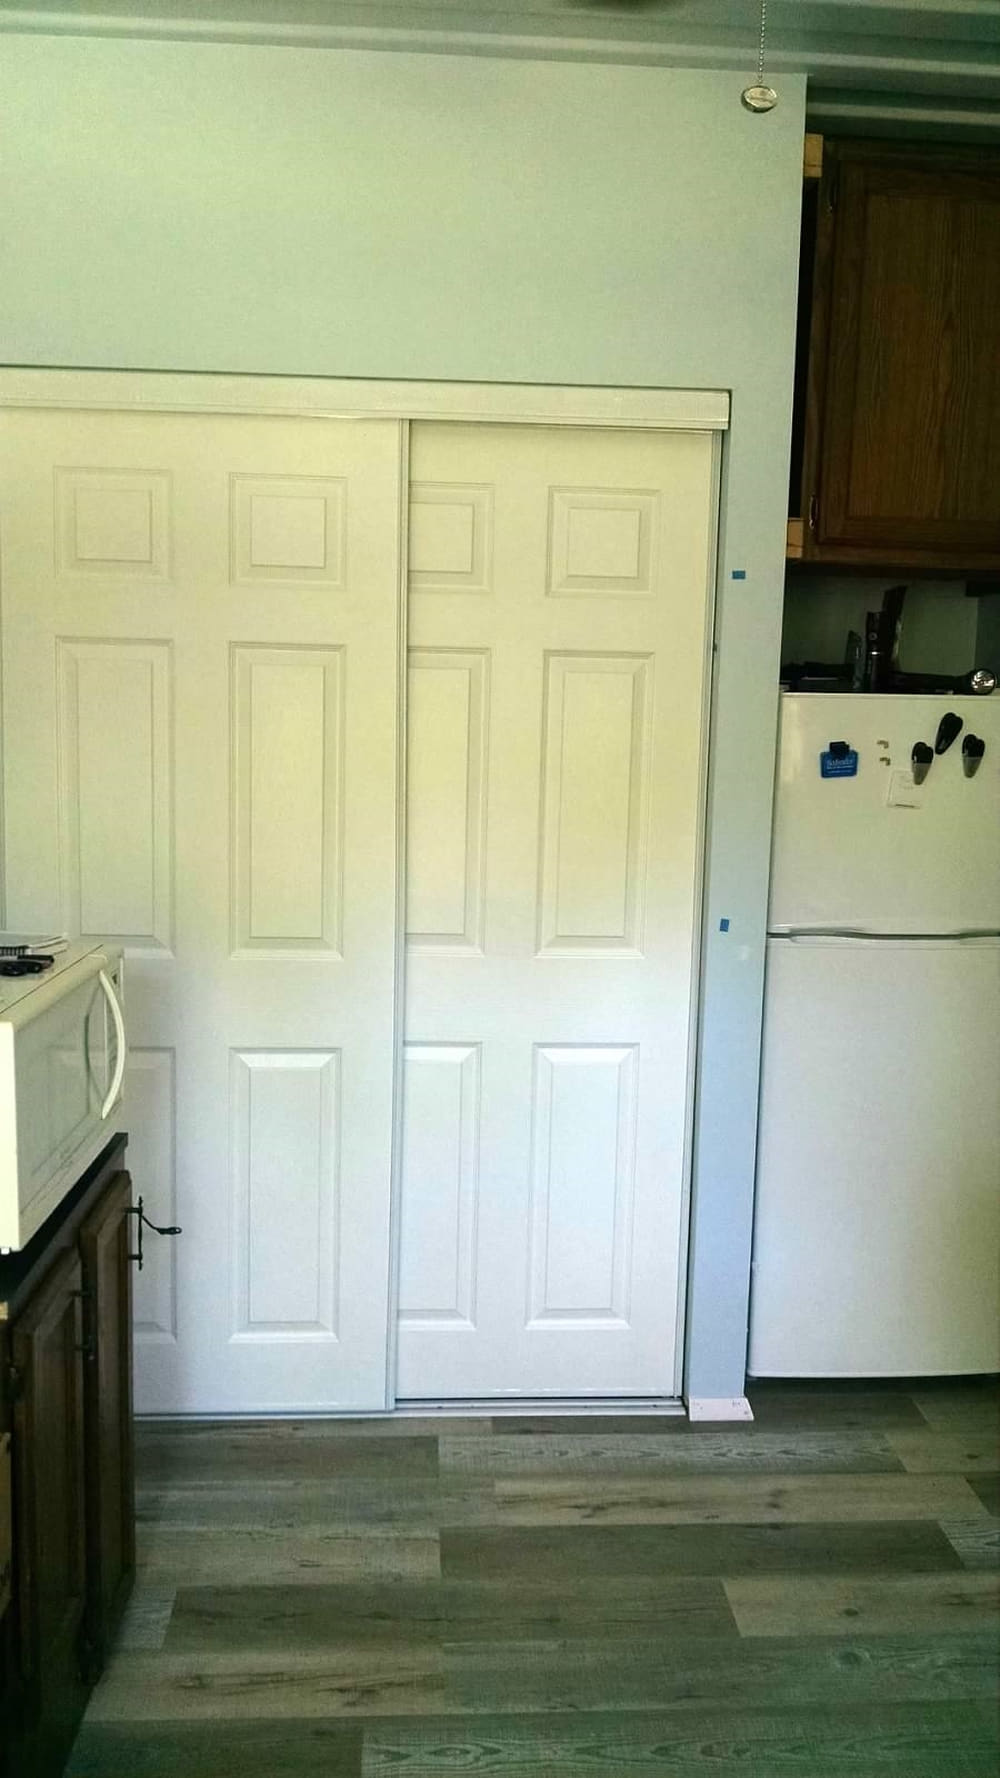
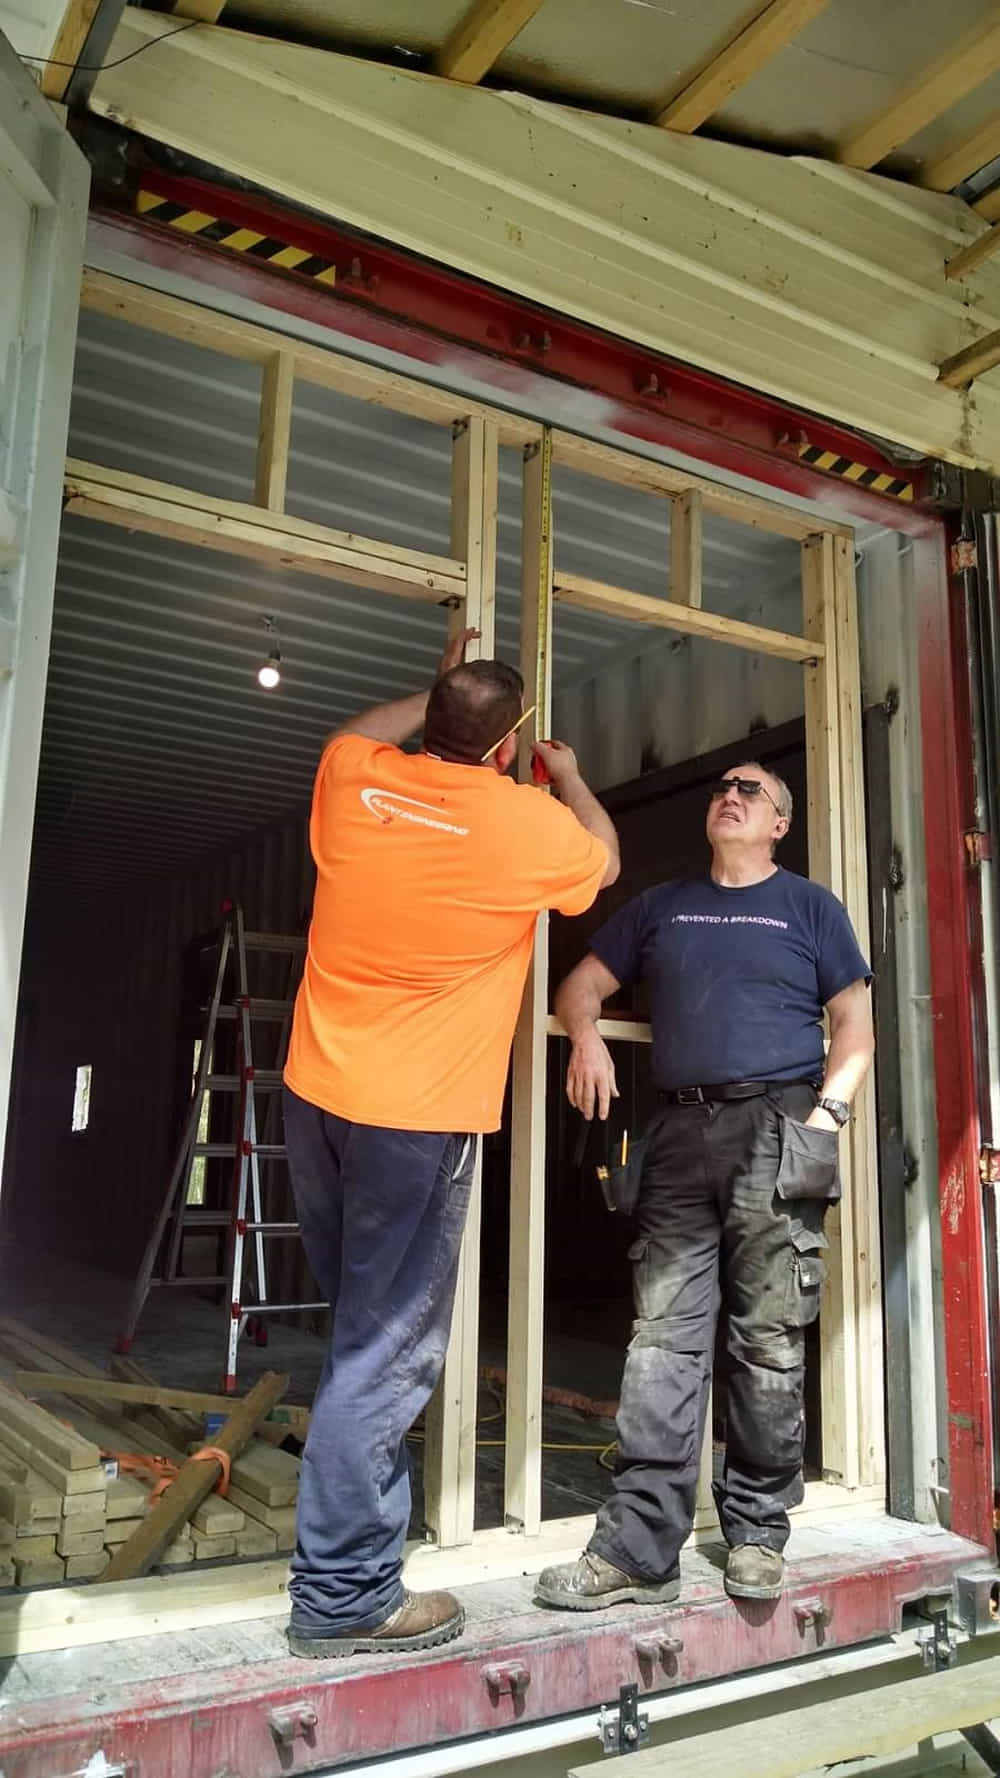
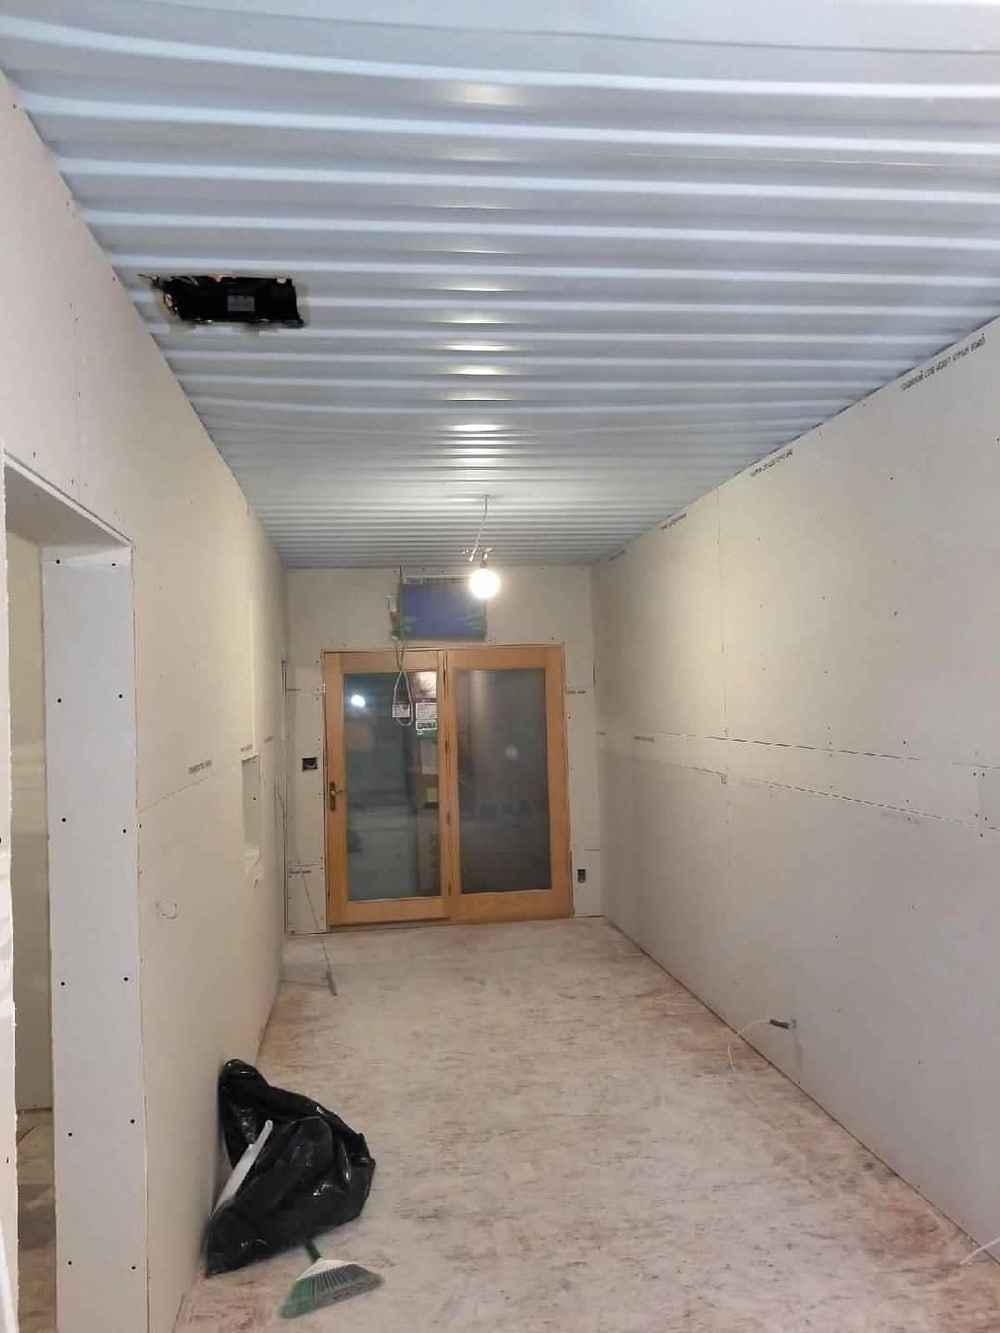
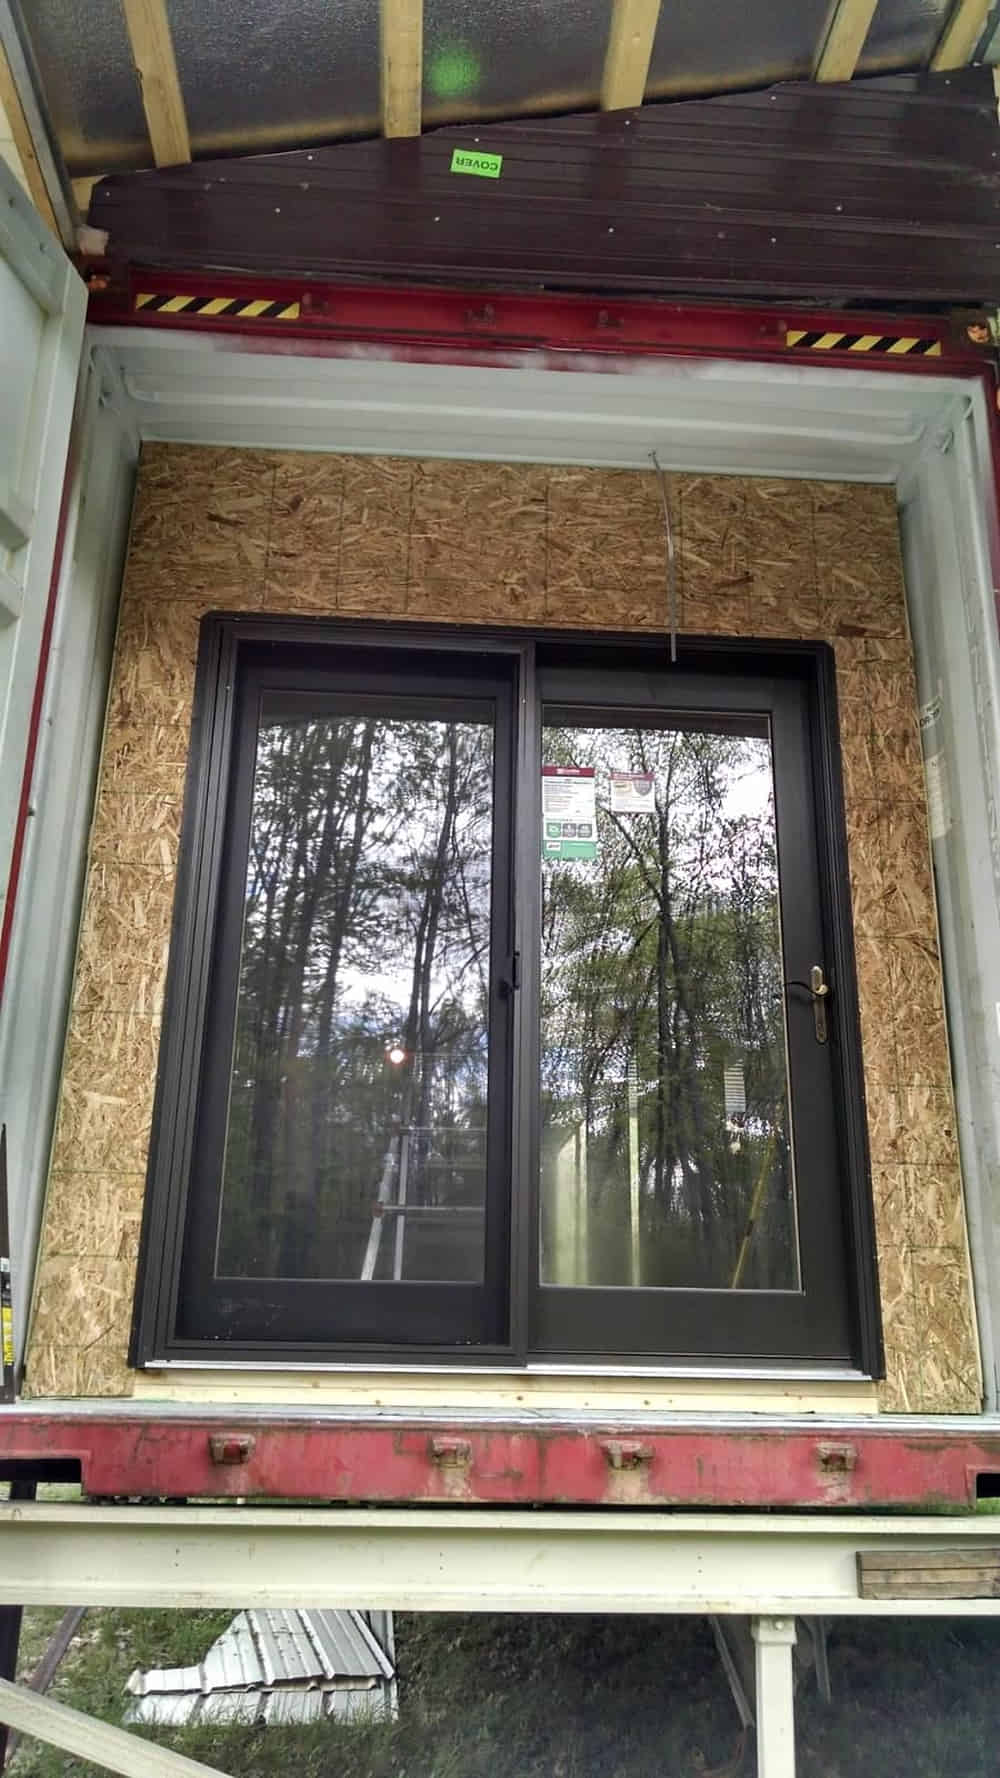
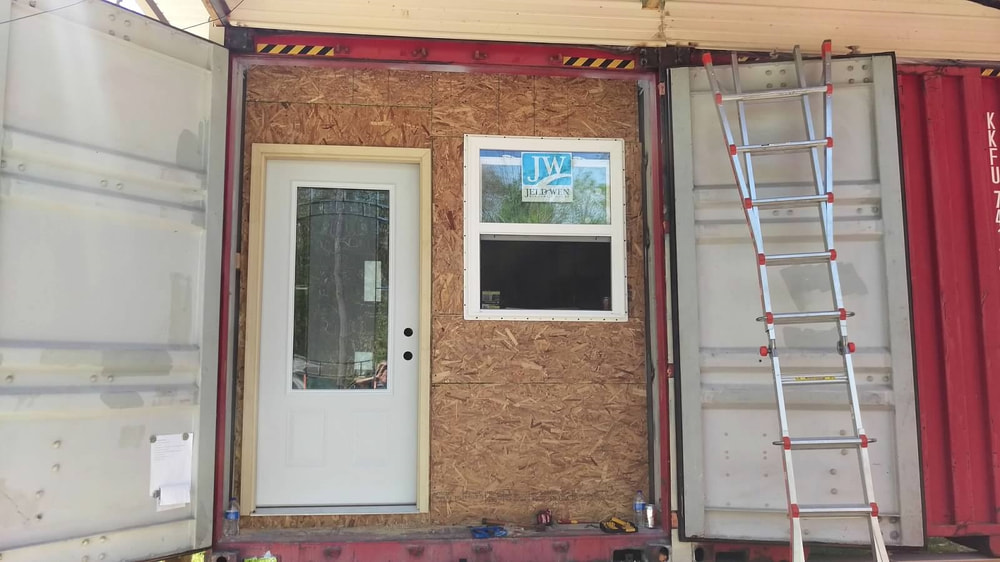
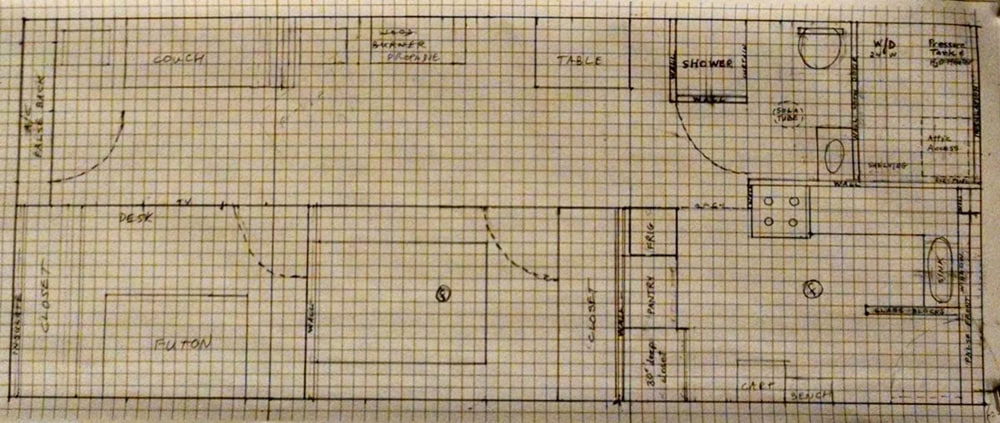
For security reasons, we have no windows or doors cut into the container walls. Instead, we installed all windows and doors behind the access doors on each container. Due to this choice, we have the open ends of each container facing in opposite directions, giving us front and rear entrances.
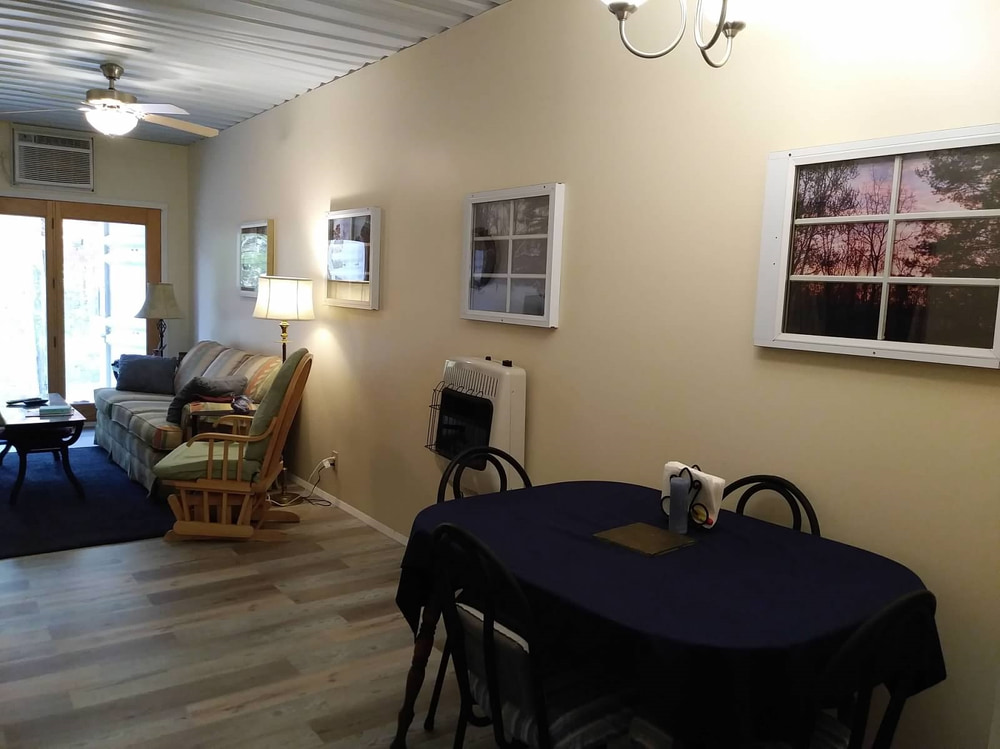
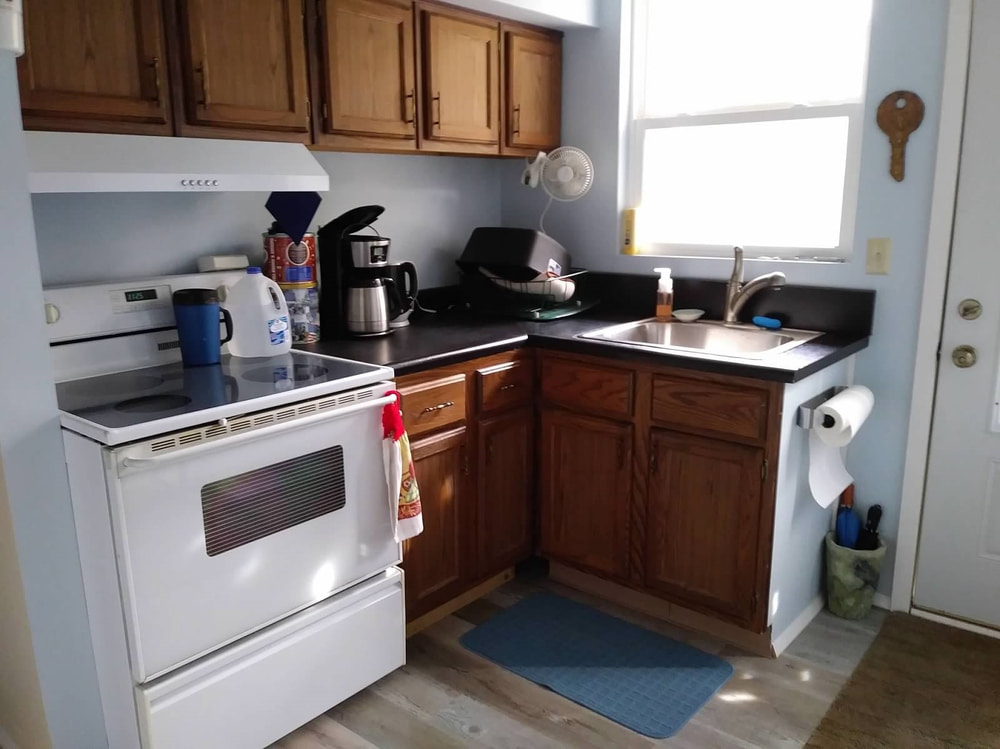
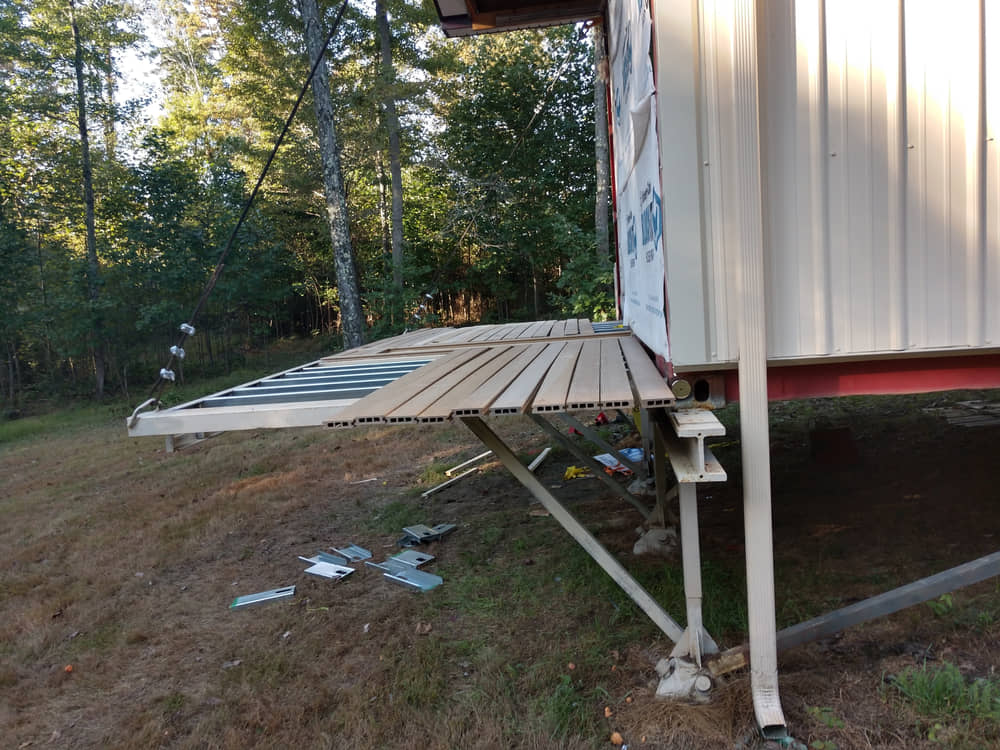
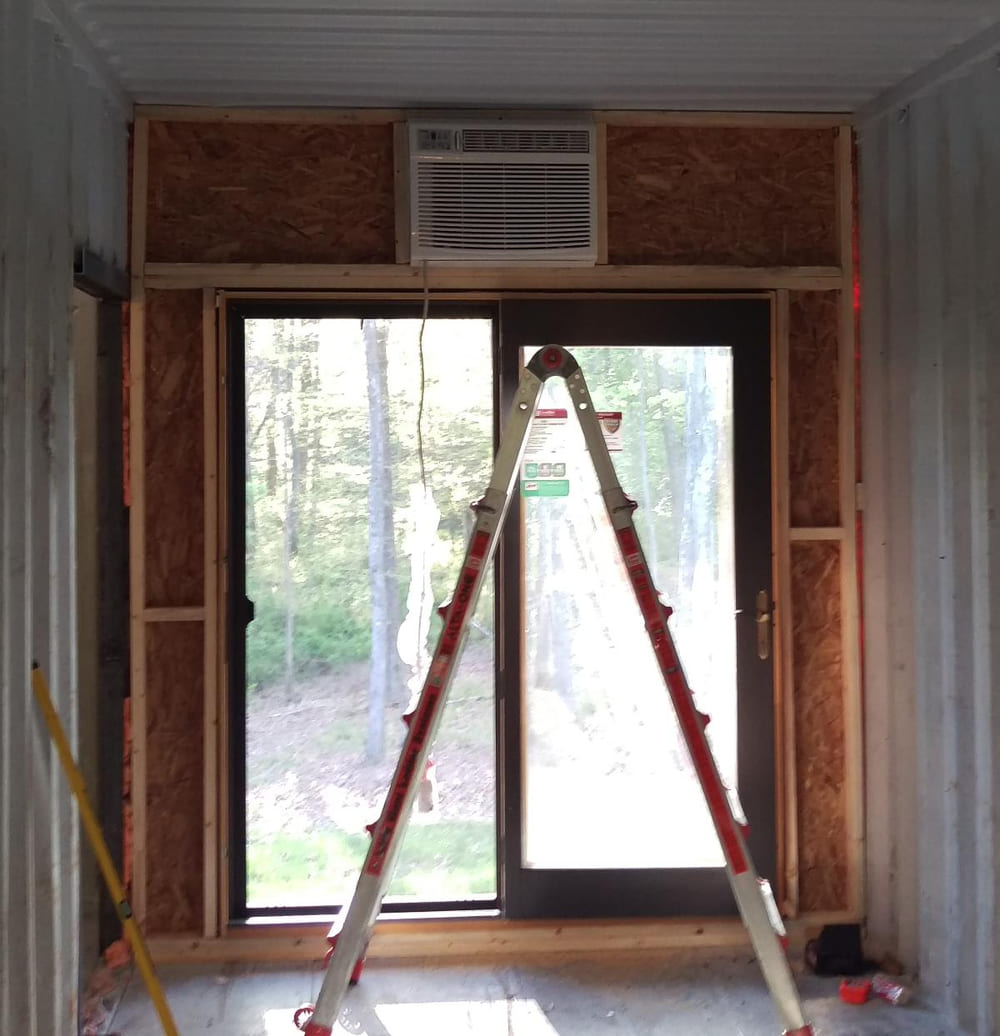
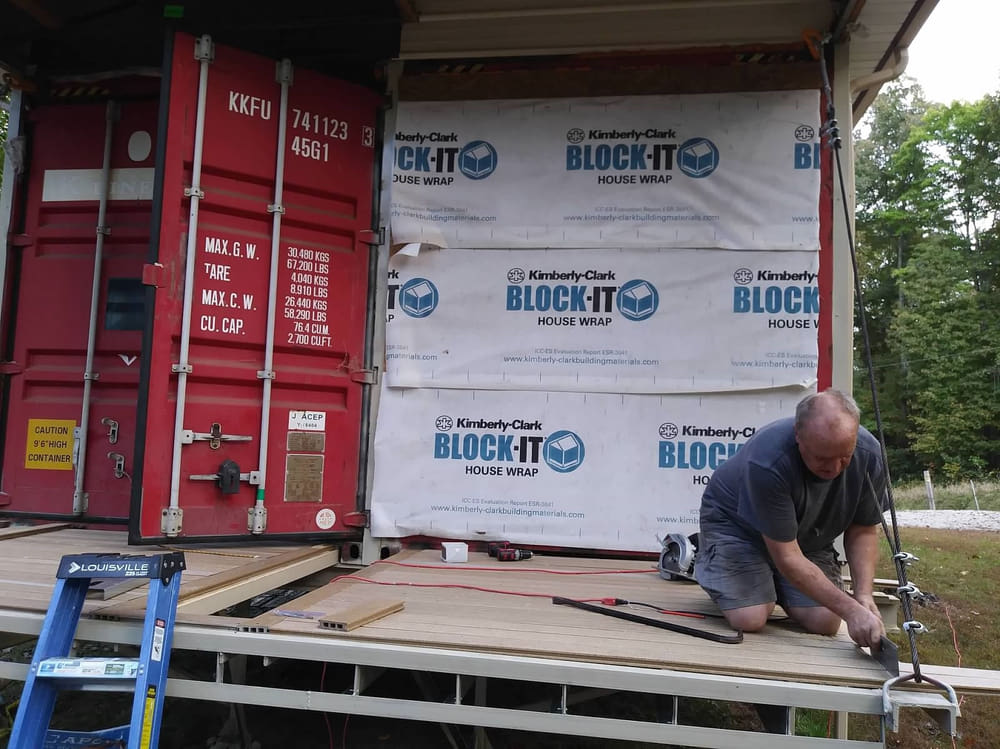
When the container doors are closed and have the tamper-resistant locks in place, a thief would need steel-cutting tools to get inside. When you open the doors of one container, you see a normal screen door and window which are in the kitchen. The doors of the other container are in the back and open over a composite deck which we added in the Fall of 2018. The AC/heat pump is installed over the recessed rear patio door (but inside main container doors) so that it could not be stolen. These doors and window on both ends of the home provide a surprising amount of light.
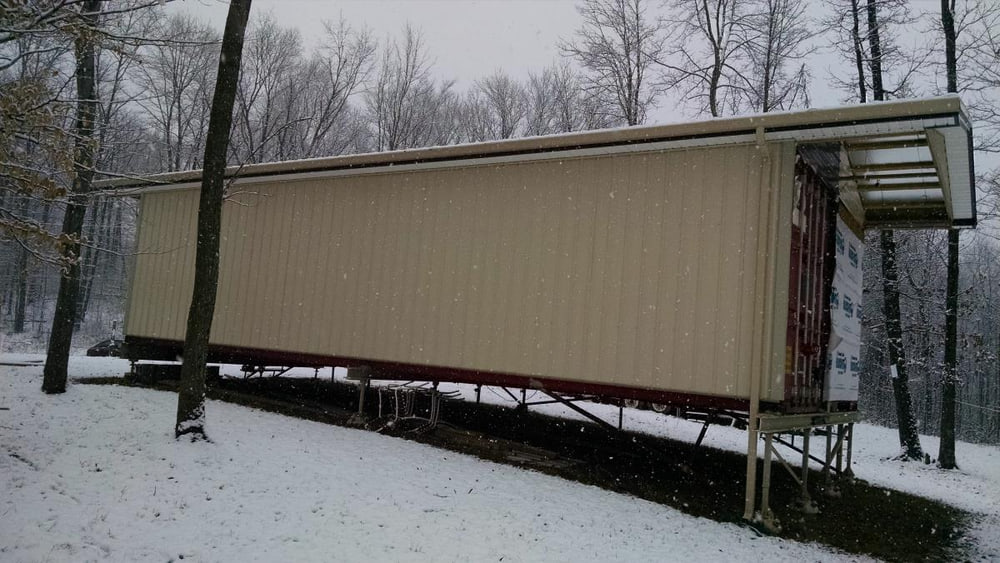
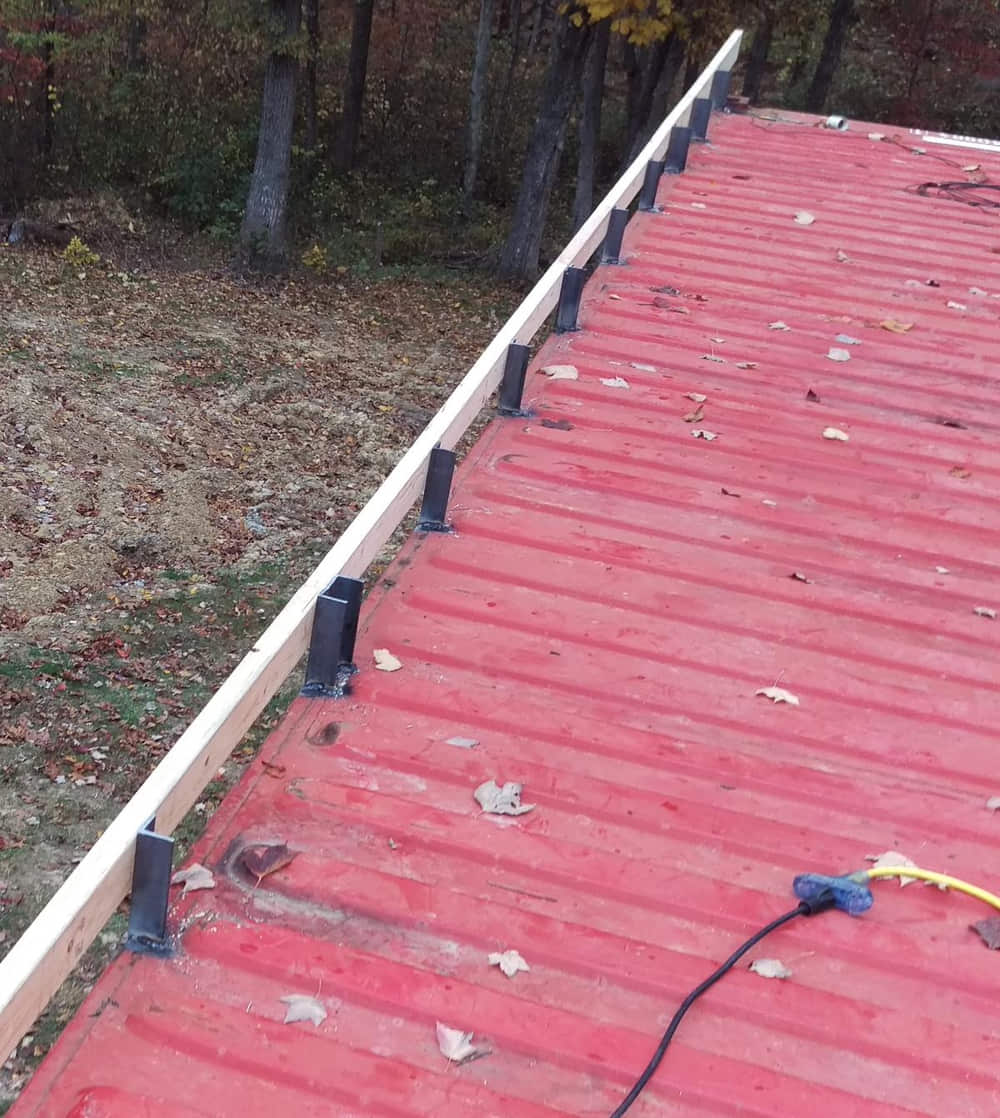
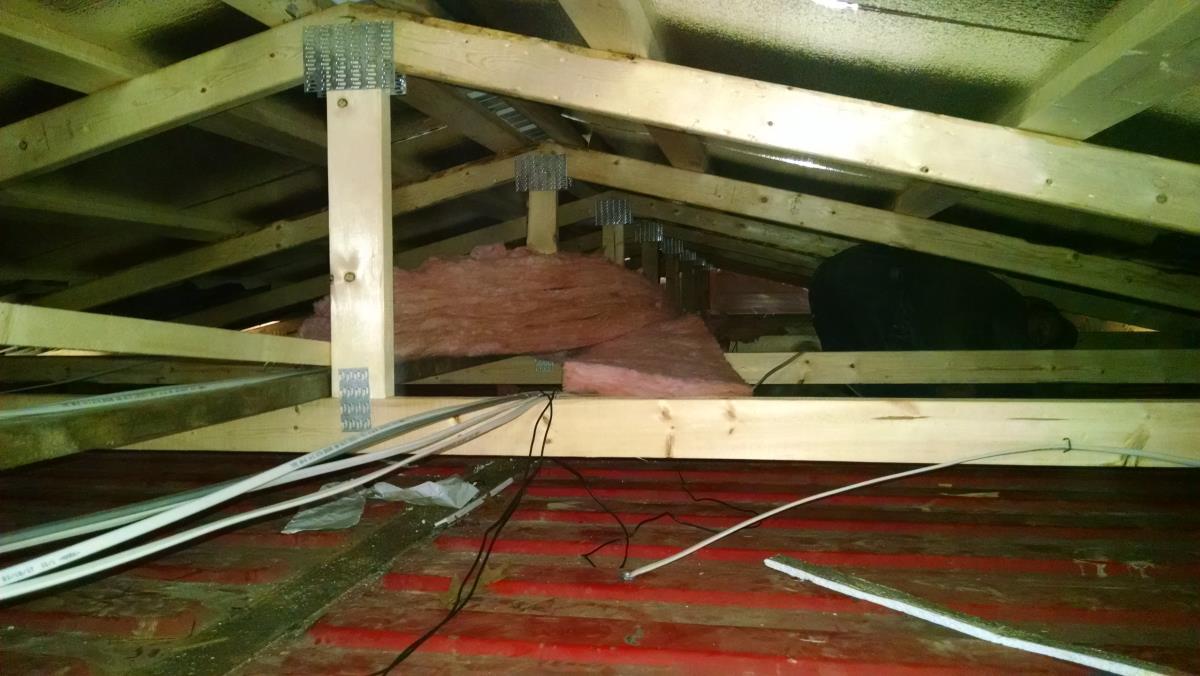
We surrounded the sides of both containers with a steel shell that includes a gable steel roof, for both insulation and water control purposes. The attic under the gabled roof and above the containers is insulated and provided a (relatively) convenient way to run the electrical wiring. The roof design also enabled us to include four foot overhangs on the front and back as porch roofs. The front and rear of the home have vinyl siding in the areas not taken up by the windows and doors.
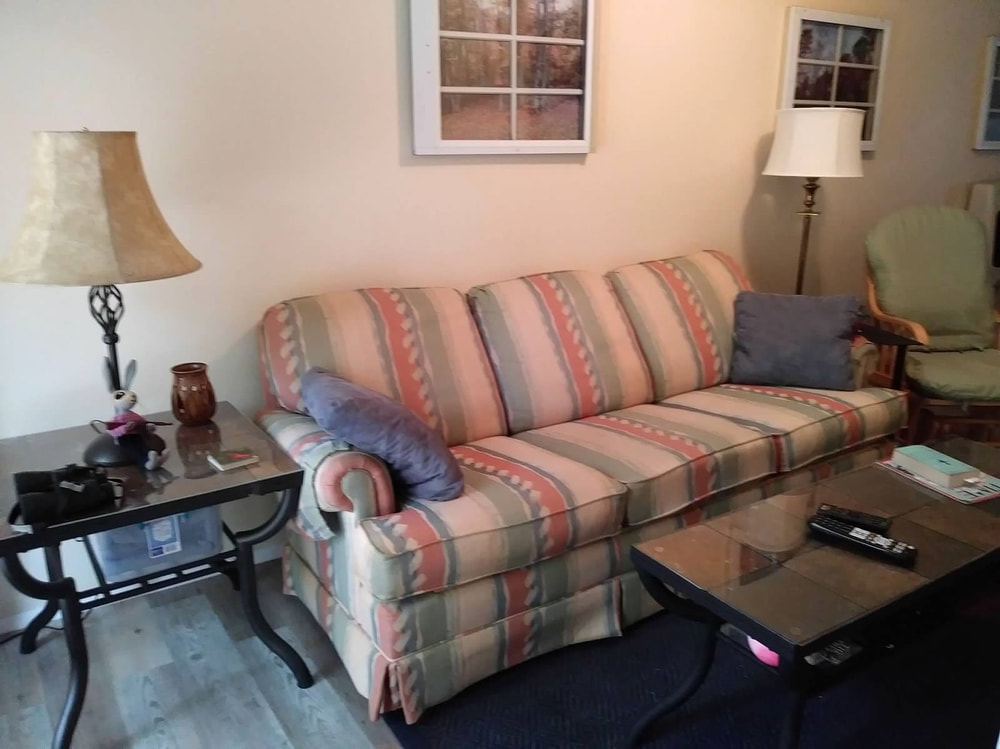
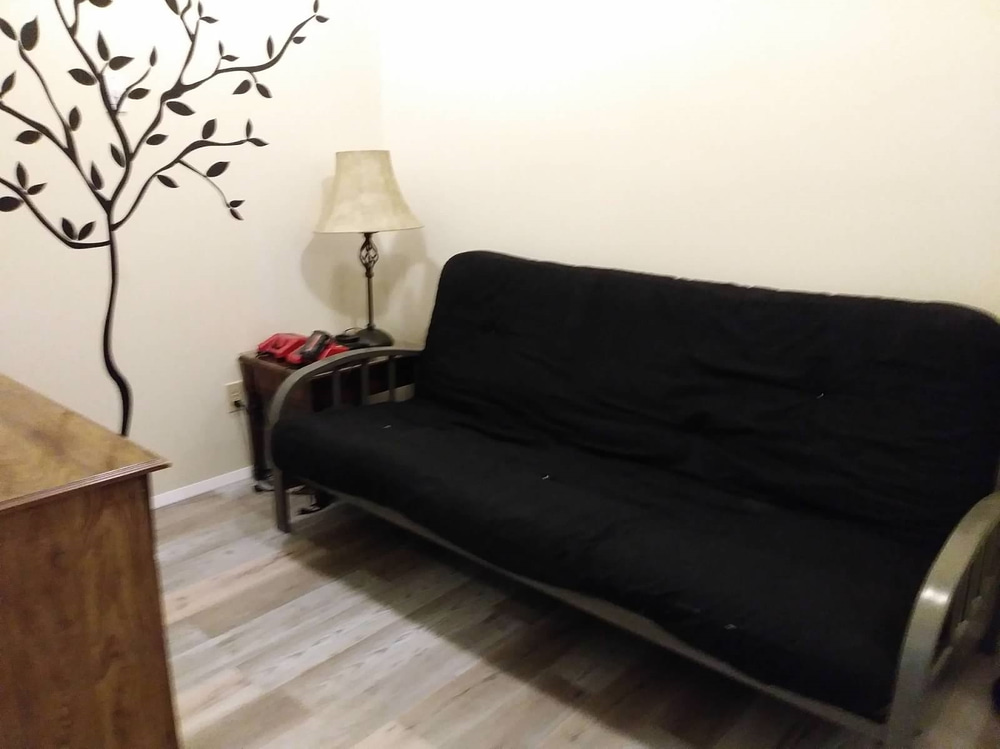
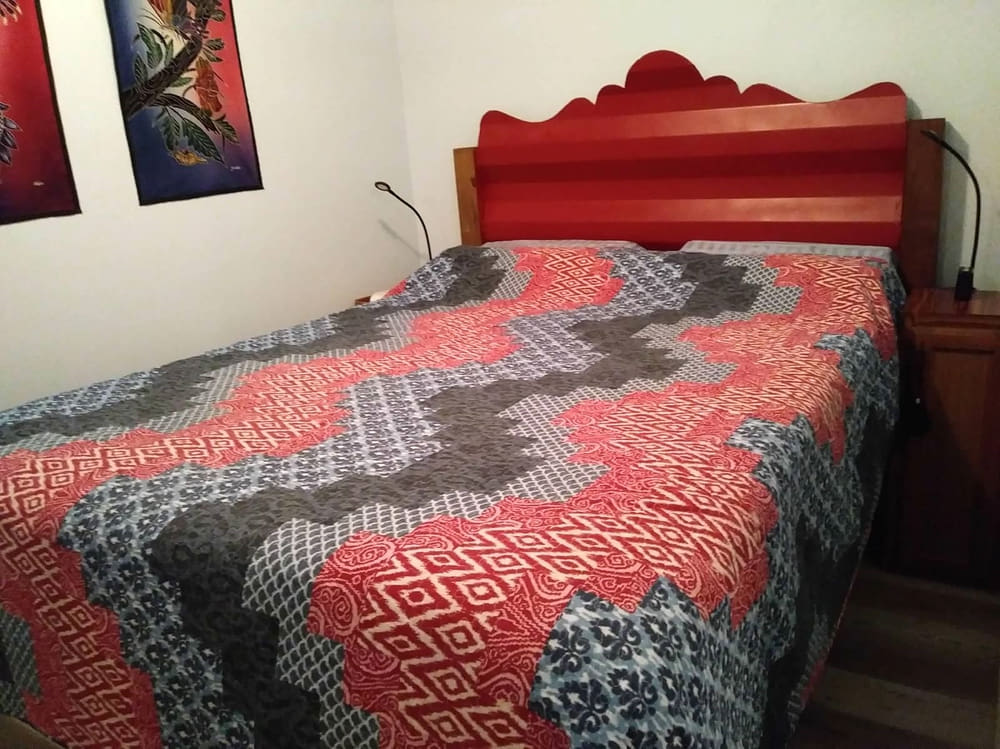
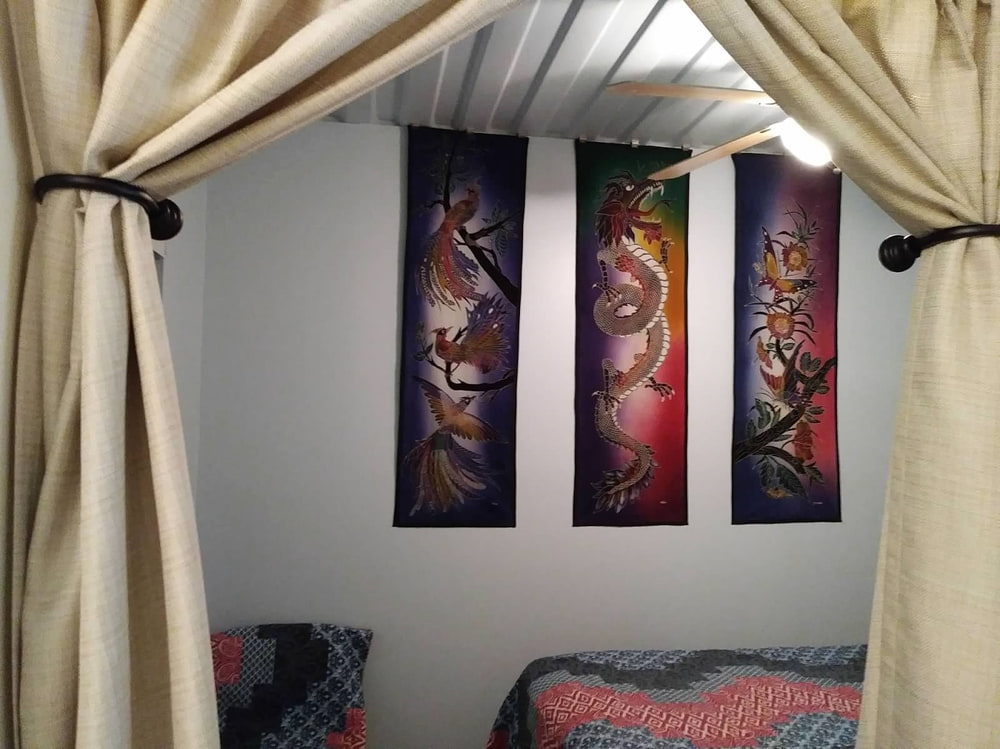
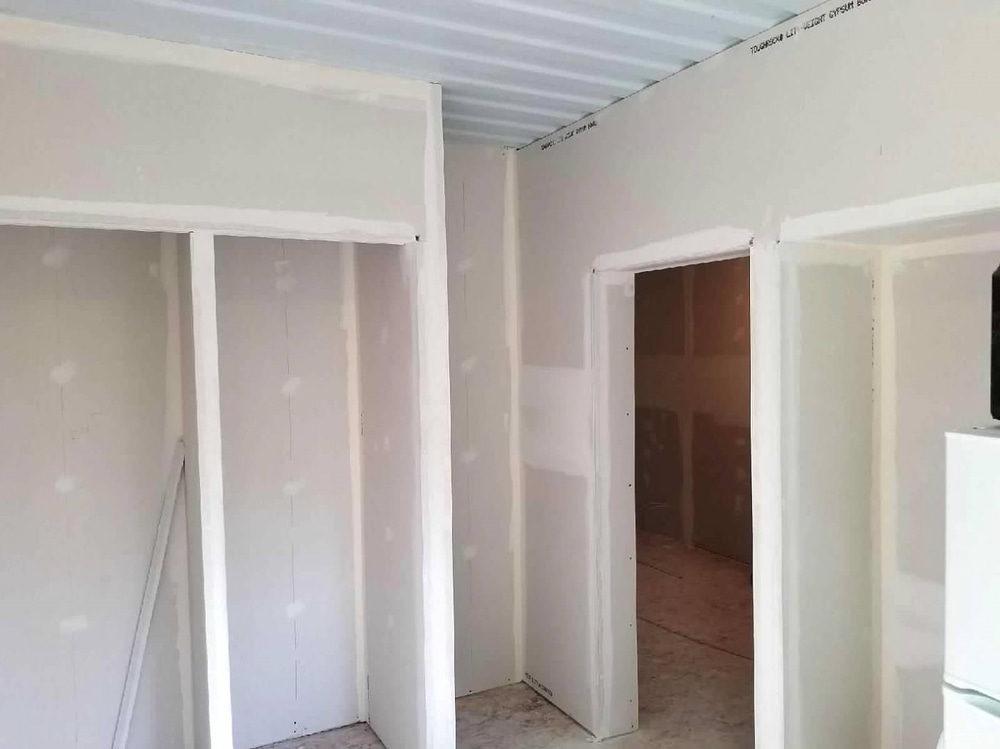
With the two 40’ containers placed side-by-side, we have 640 square feet of gross floor area. One side of the cabin contains the kitchen and two bedrooms. The other side contains a small utility room, bathroom, dining room and living room. Becky designed the layout and after discussion with Bill, we decided to move the kitchen wall an additional 18” into the container next to it. Bill installed a metal pole to further support this area and framed all doorways with angle iron.
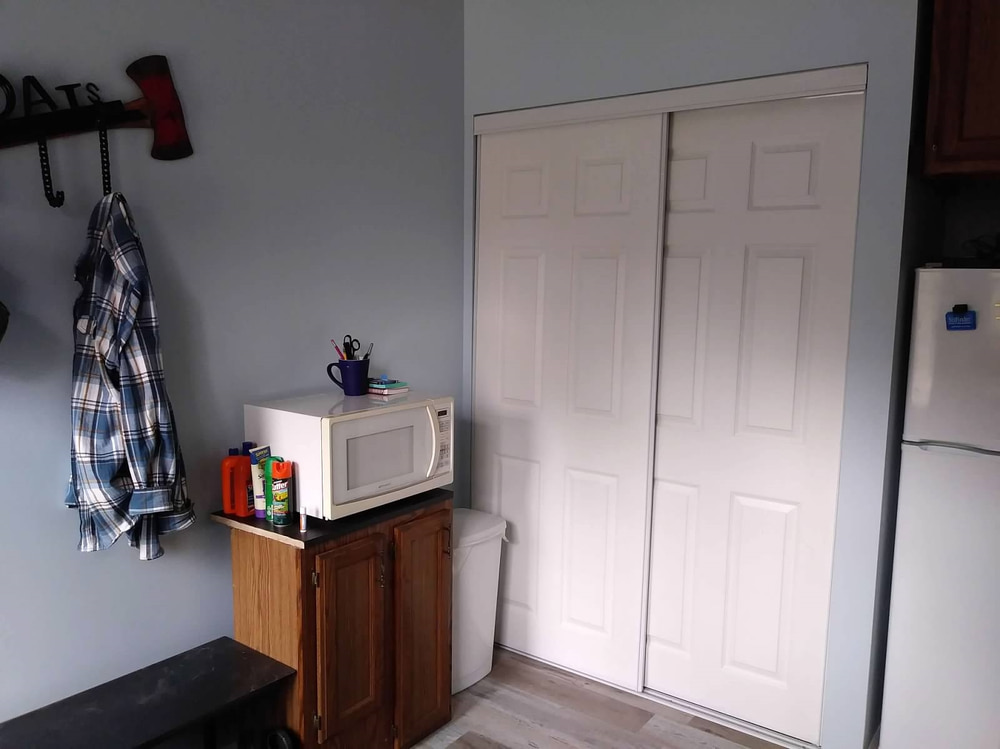
To optimize space, we put shelves into the ends of each closet. Therefore the bedrooms basically just contain a bed and side tables. In the living room, we made a shelf for the TV by cutting a hole in the wall between the two containers. For air flow, we also added ventilation fans between bedrooms and between the bathroom and dining room.
We bought the land in April 2015. During that summer, we built a small storage shed and a picnic table. We also put the previously mentioned RV camper on the land and installed temporary power. The RV camper was robbed in December 2015. We spent that winter exploring secure building options.
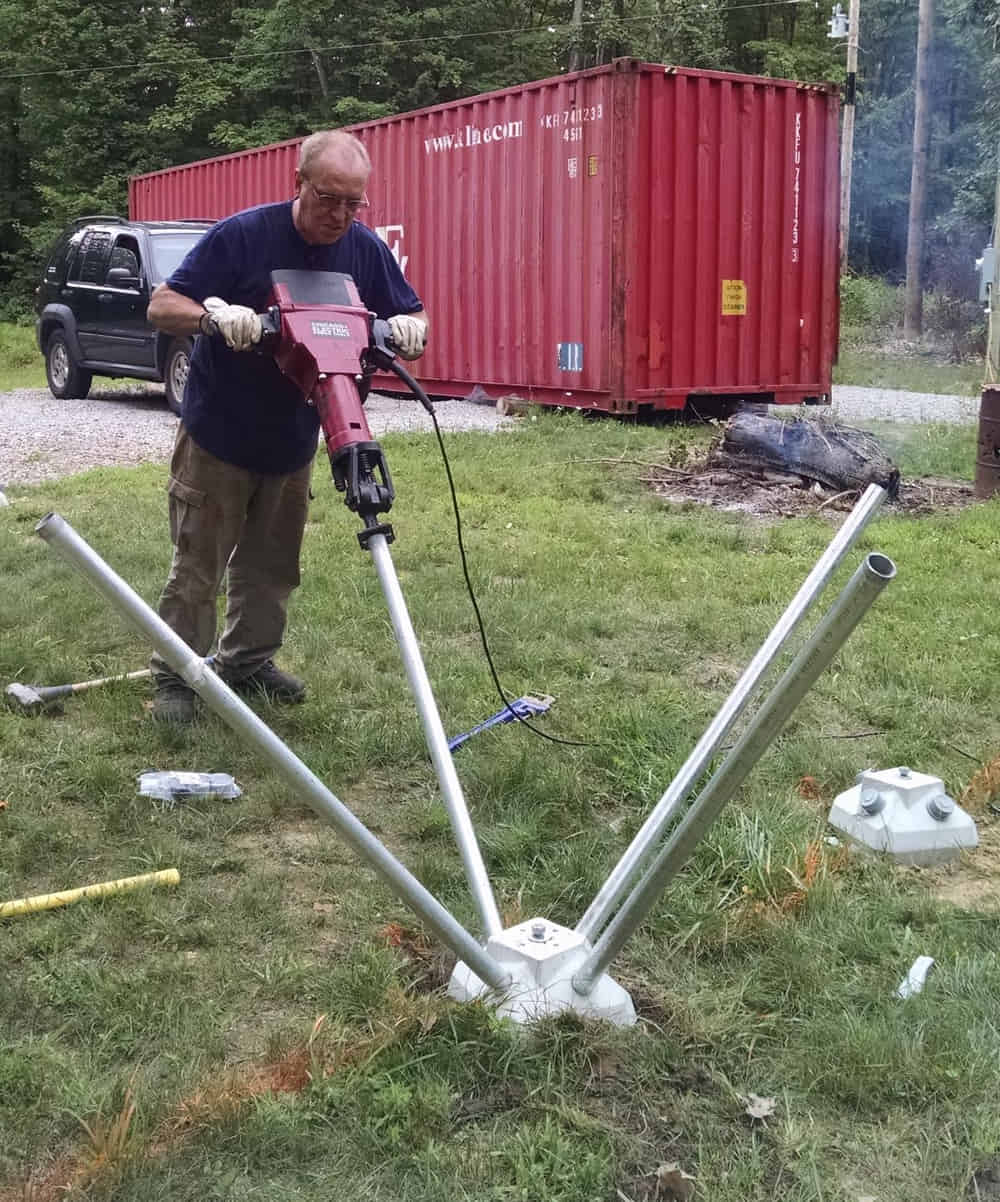
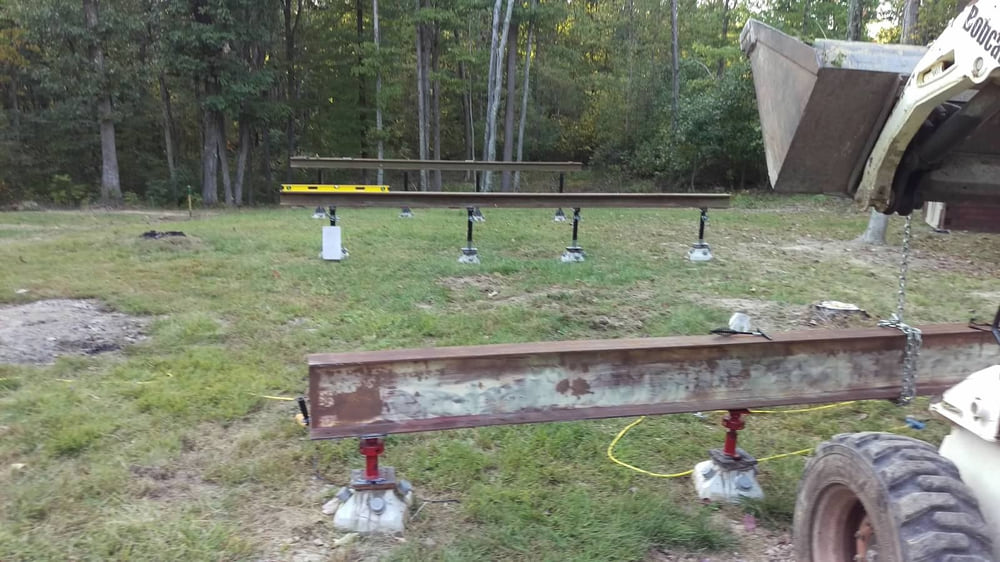
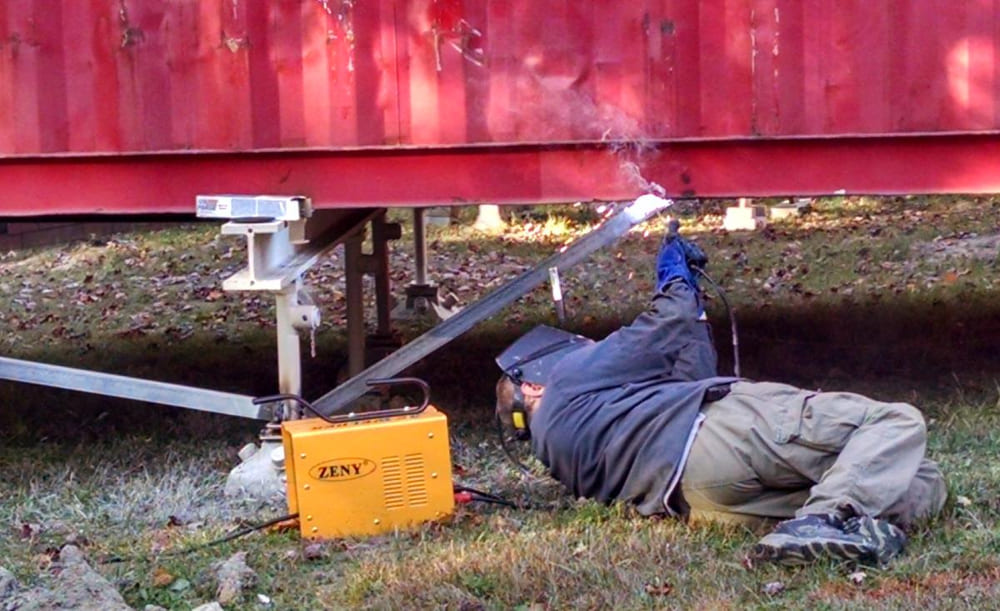
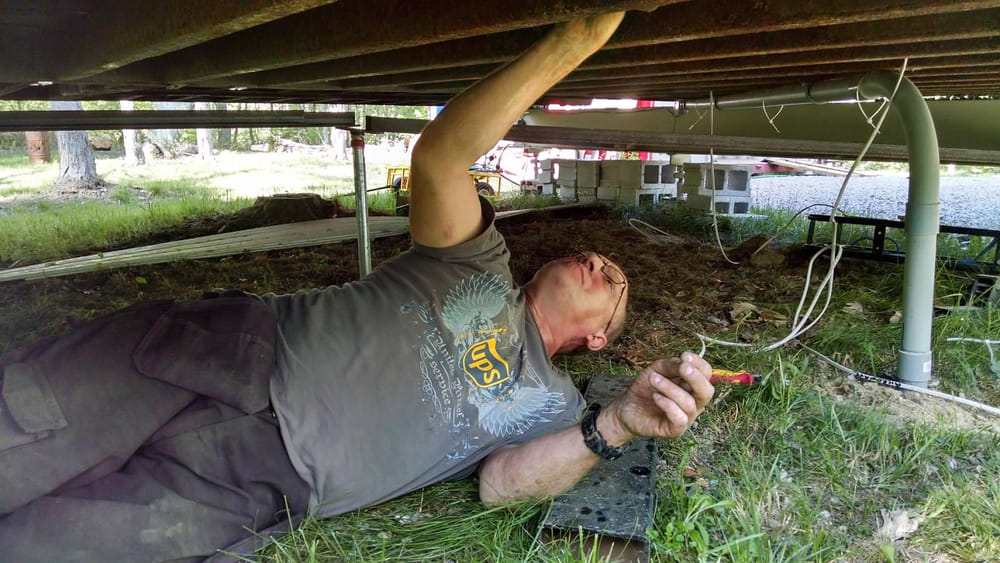
After deciding to build a shipping container cabin, we had the containers delivered in late February 2016. We spent that Spring and Summer putting in the foundation. We made a non-traditional choice for the foundation and used Diamond Piers since we did not want to disturb the clay soil and did not yet have a well. The Diamond Piers only need minimal soil excavation and they don’t require mixing or placing concrete. Instead, they rely on four strong metal pins that are driven at angles into the ground through a precast concrete head that comes as part of the system. We used a jack hammer to drive in the 72″ long pins and the entire Diamond Piers system was DIY-friendly.
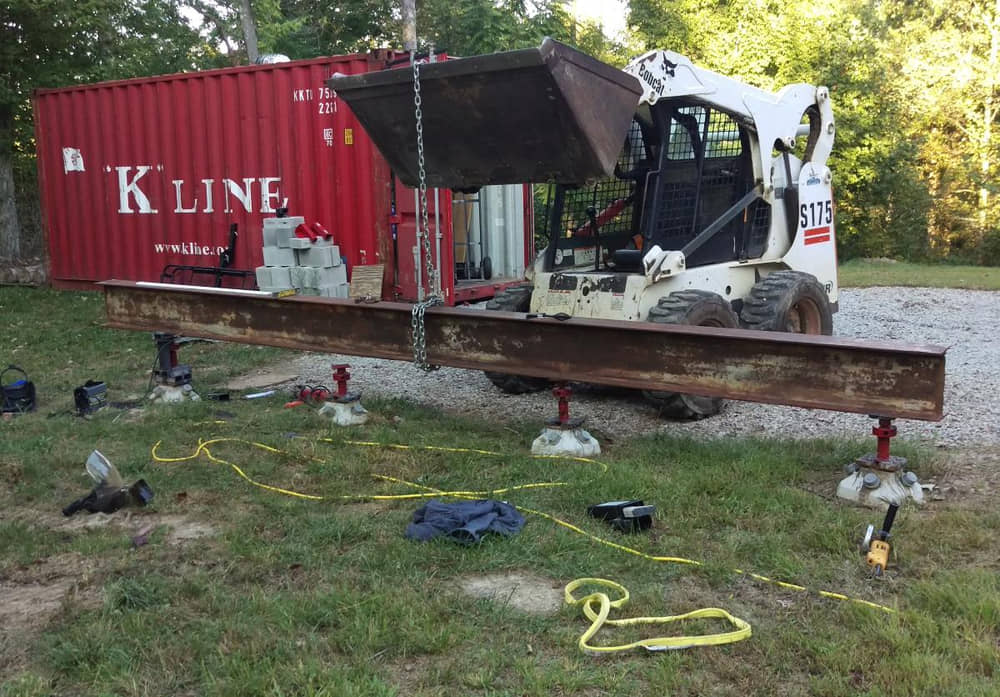
We installed twelve Diamond Piers for our project and then welded trailer jacks on top to help with leveling. Afterwards we placed I-beams across the jacks and leveled the entire system. A sacrificial aluminum anode helps to prevent corrosion of the foundation.
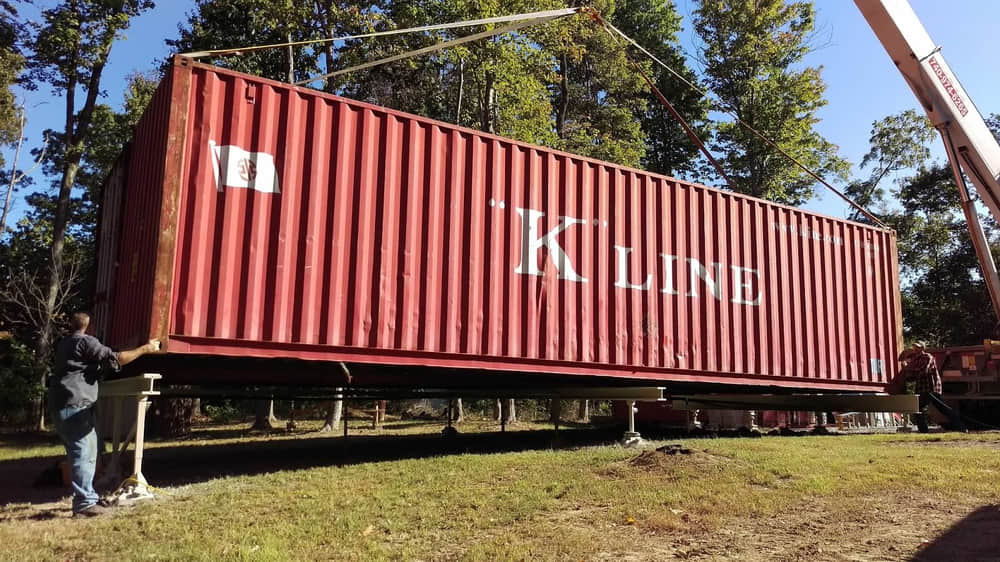
We then hired a crane company to place both containers on the I-beams in September 2016. The crane operator made an error and essentially whacked the foundation system with a “9000 lb wrecking ball” that is, a container. The foundation stood up to this abuse without incident. Fortunately, we grossly over-engineered the foundation. It could easily withstand double the load of the containers and has not moved in two and half years—even withstanding a minor earthquake.
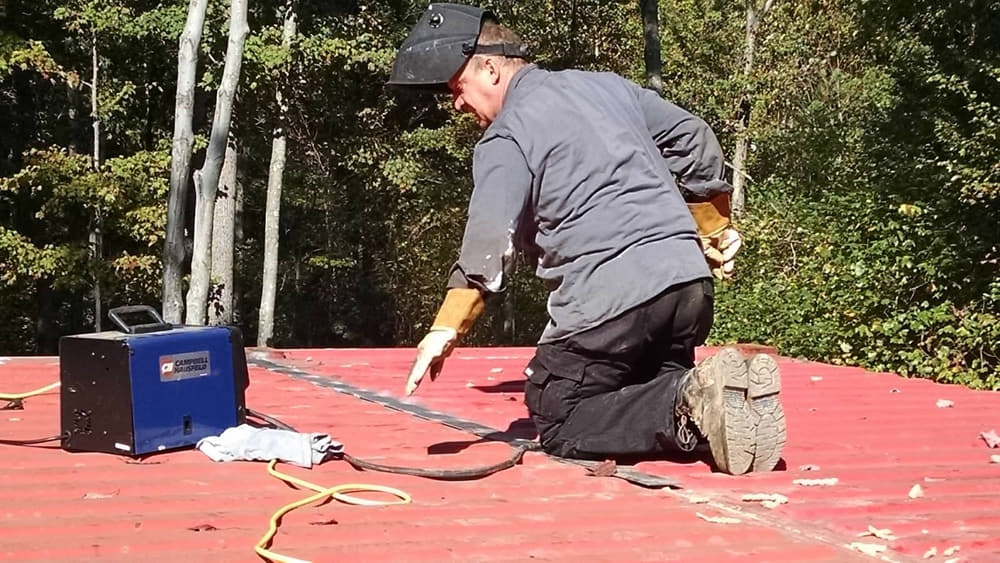
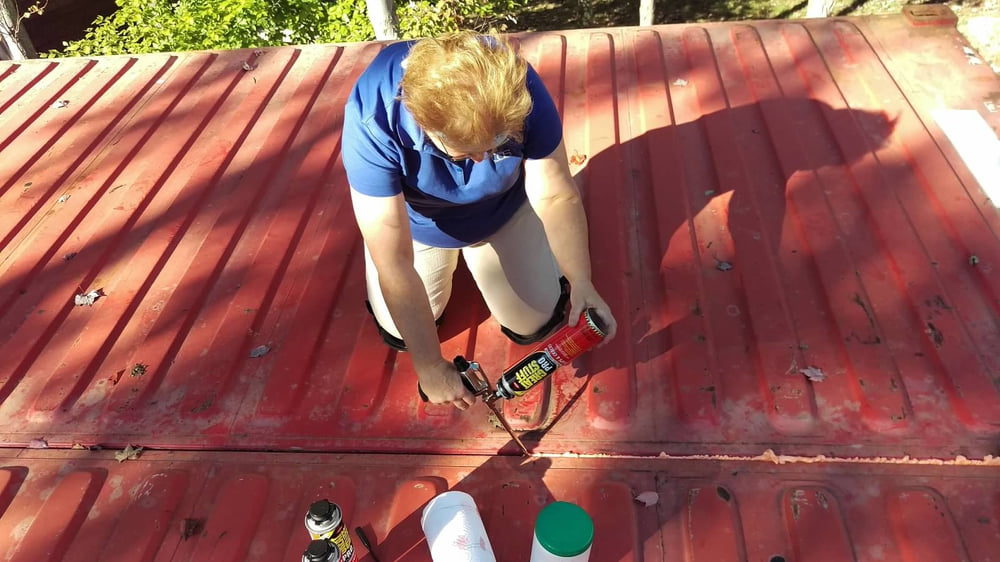
With the containers now in place, Bill welded them to the foundation while Becky began spraying foam insulation between them with a small ‘spray foam in a can’ product. Bill then connected the two containers to each other with a 4” wide strip of steel.
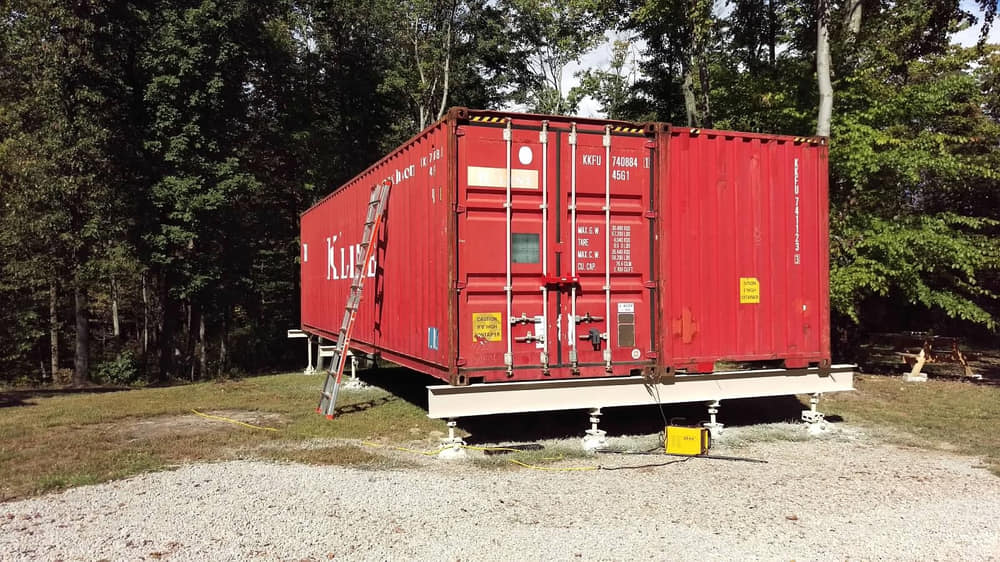
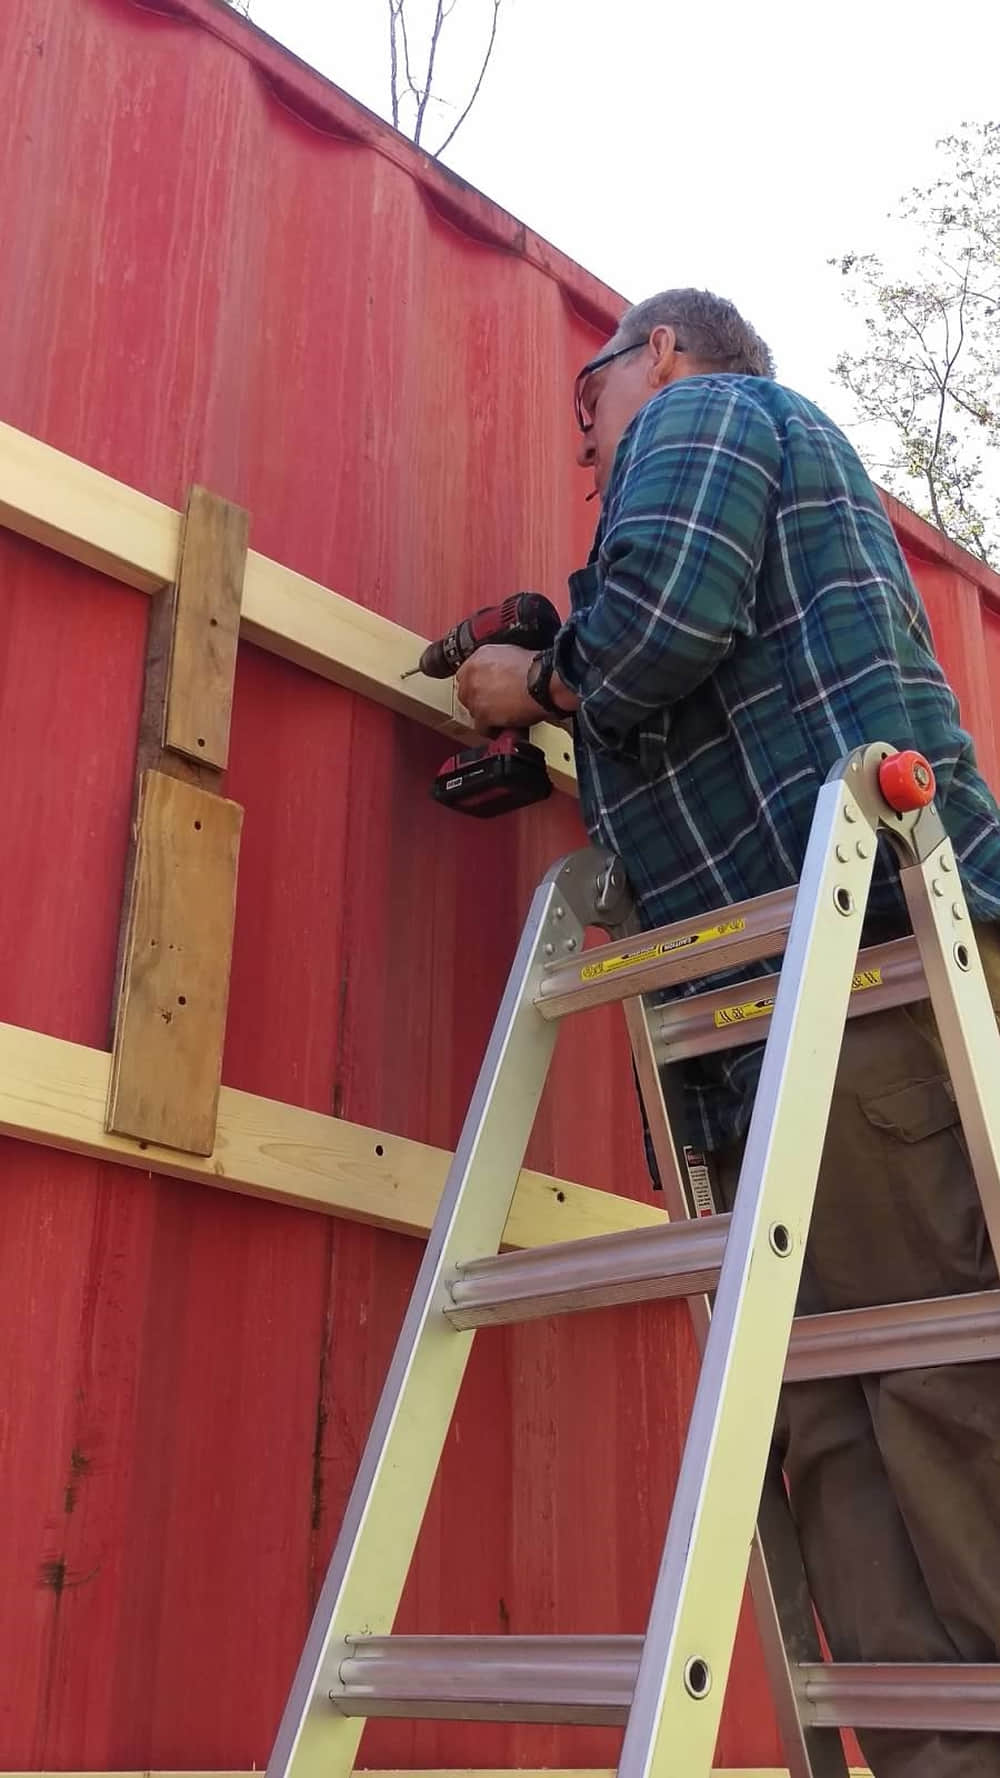
The next project was affixing horizontal wooden studs to the outside of the containers for attaching sheet metal for the steel shell that surrounds both containers. We found a very customer-service oriented lumber company, Mike’s Lumber in Logan, Ohio and ordered 2” x 4″ studs for the outside and inside framing. We also ran electric service underground to the cabin to give us temporary power inside during the building process.
To complete 2016, we had the sheet metal shell and roof put in place.
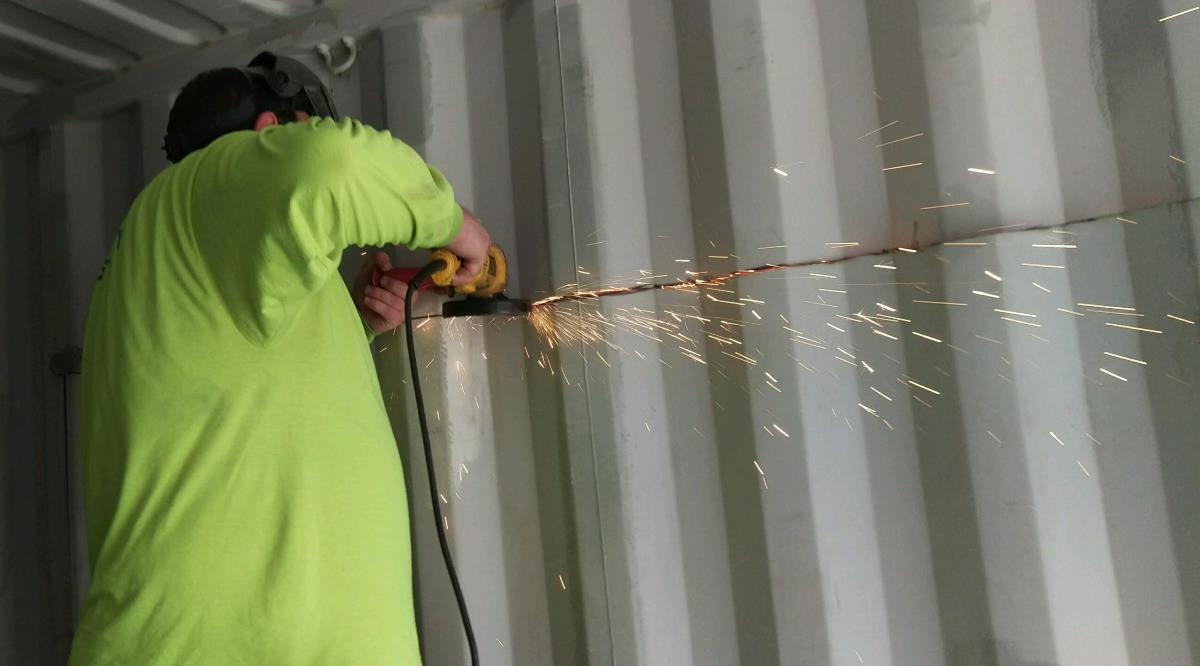
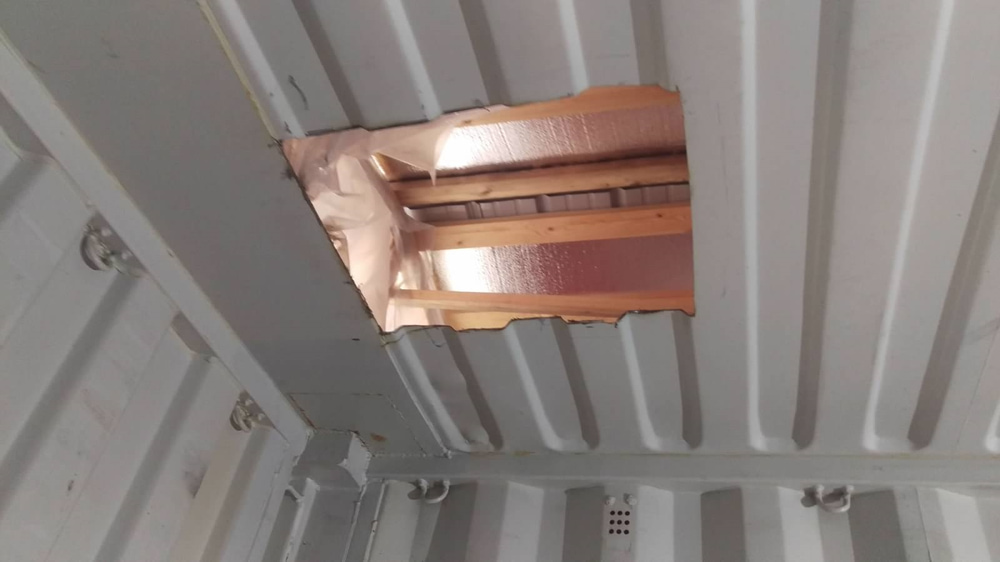
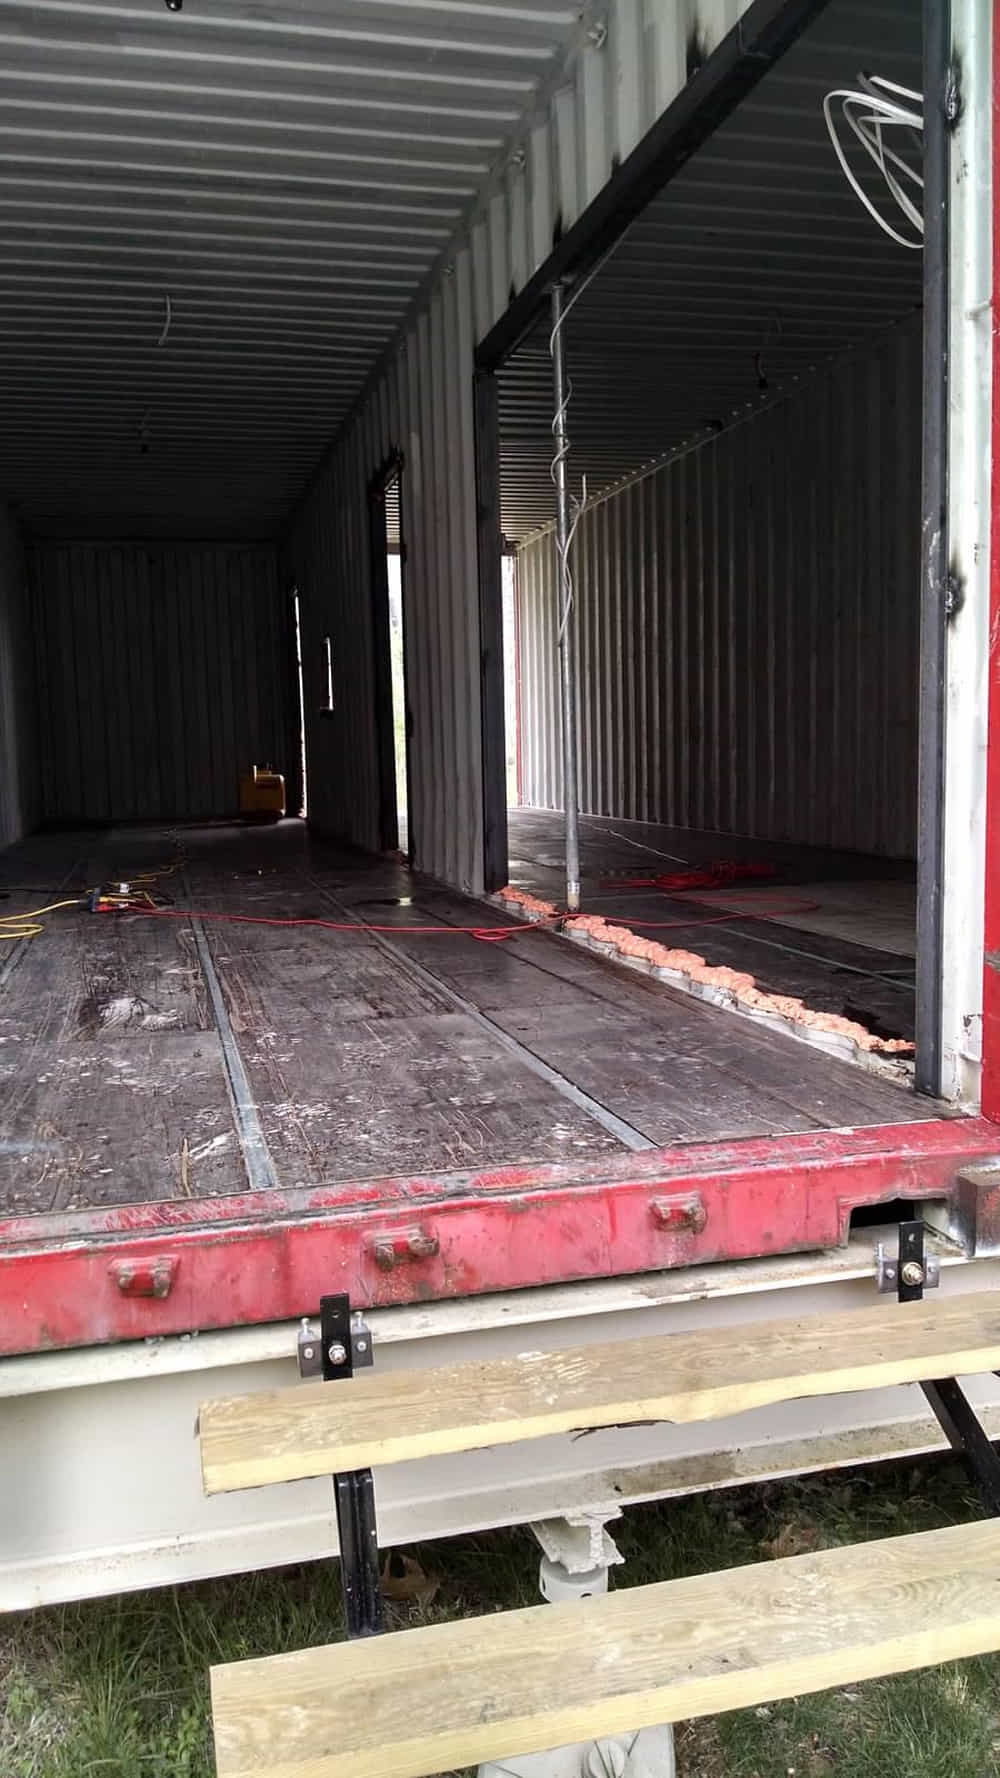
To kick off 2017, we had a deep water well drilled. With the floor plan in hand, Bill and Jeremy spent the next eight weekends cutting the openings between the two containers with a 4-1/2″ angle grinder and abrasive cut-off wheel. They also cut an attic access and several openings for fans and light fixtures. To move and maneuver the heavy cuttings, they had to cut some of the sections into smaller, more manageable pieces.
After finishing all the container cuts, they framed the openings with 1/4” x 2” angle iron.
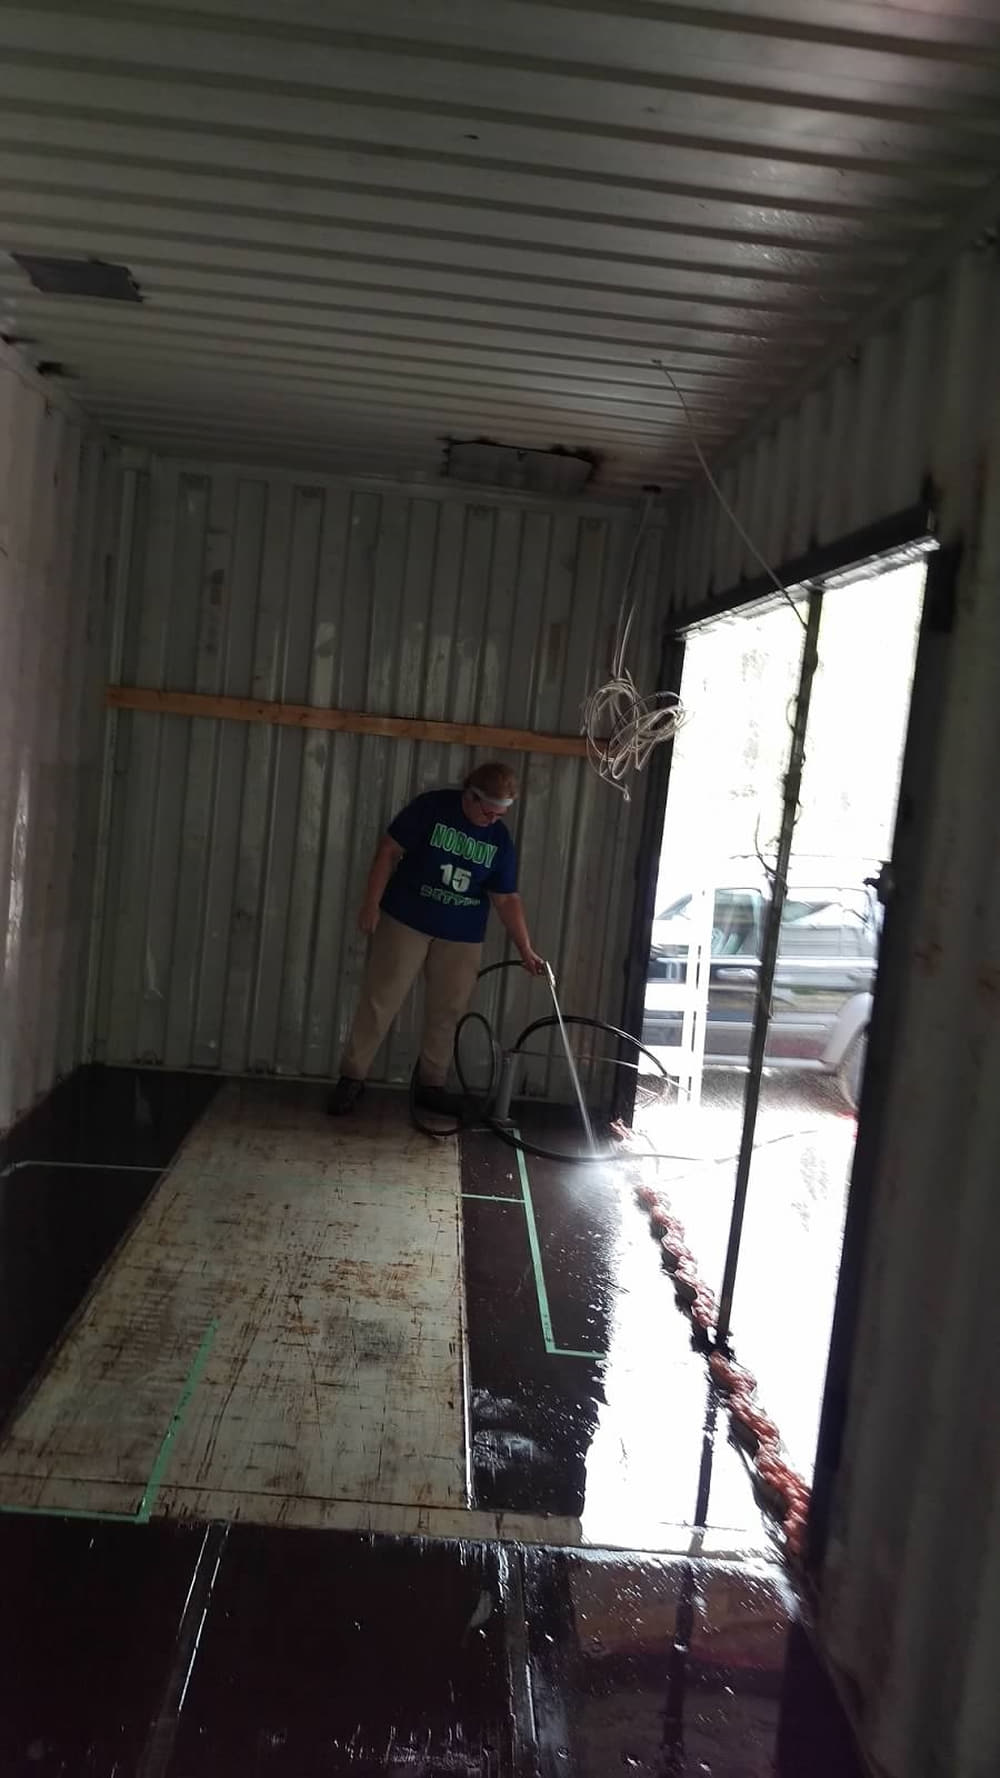
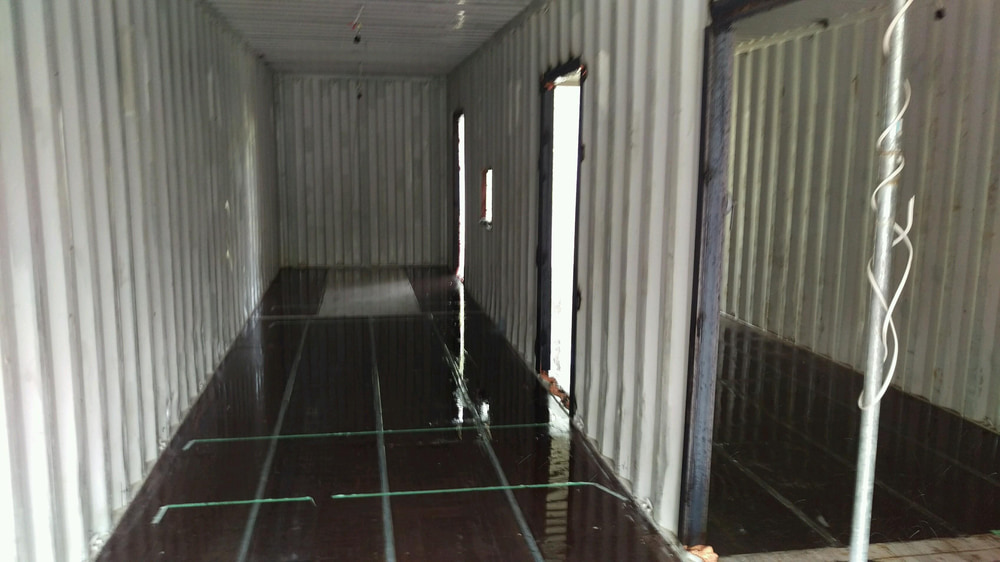
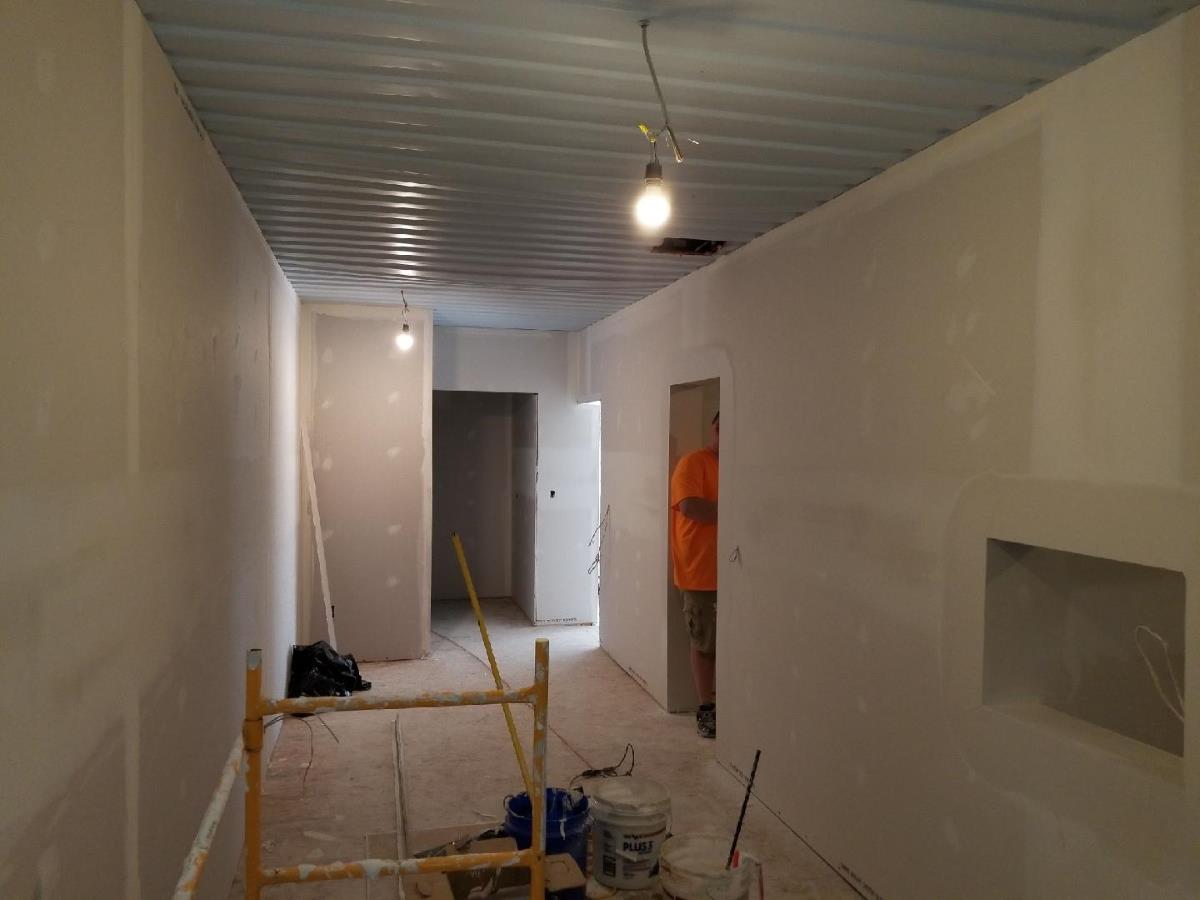
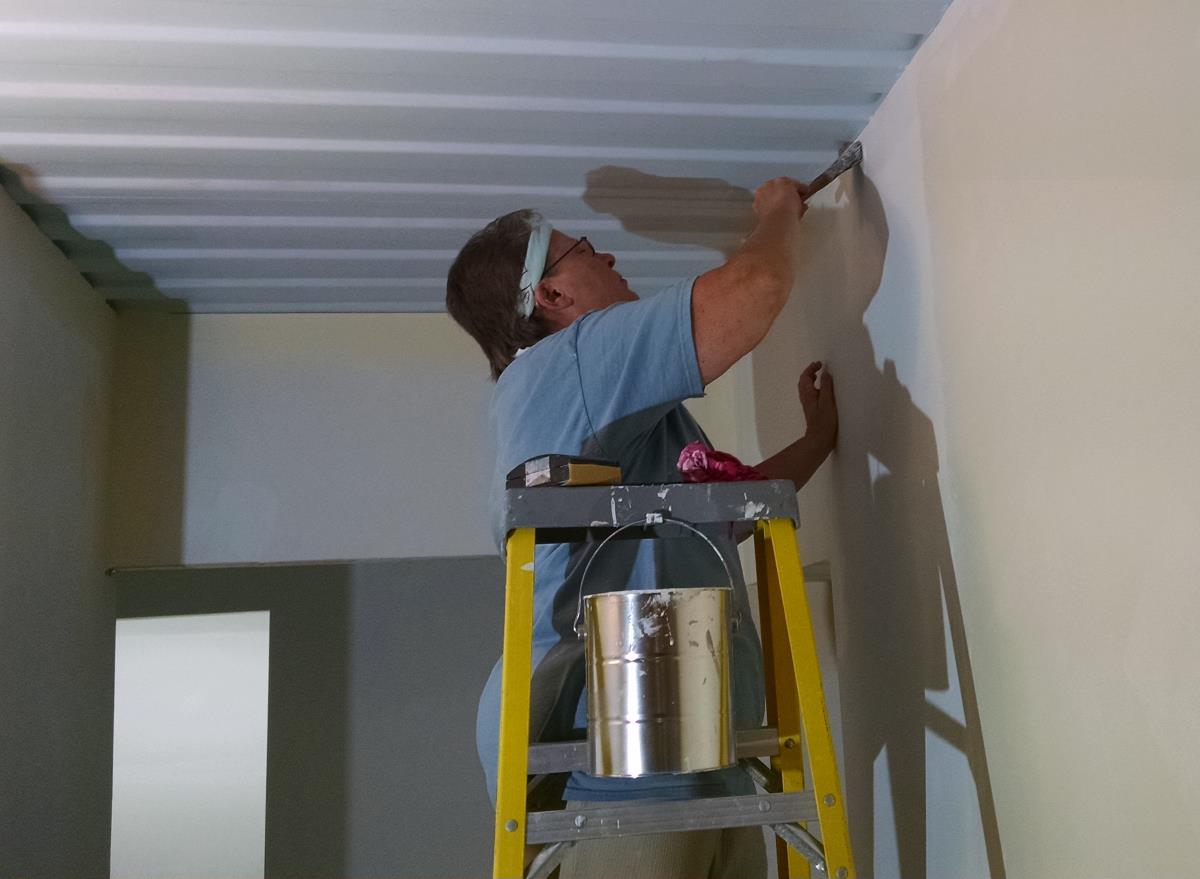
After a thorough cleaning, Becky used a paint sprayer to paint the ceiling. We decided to leave the bare container ceiling exposed since we like how it looks.
The next step was building the recessed front and back doors in the ends of each container. The outside was covered in house wrap pending the addition of vinyl siding when it was time to finish the outside.
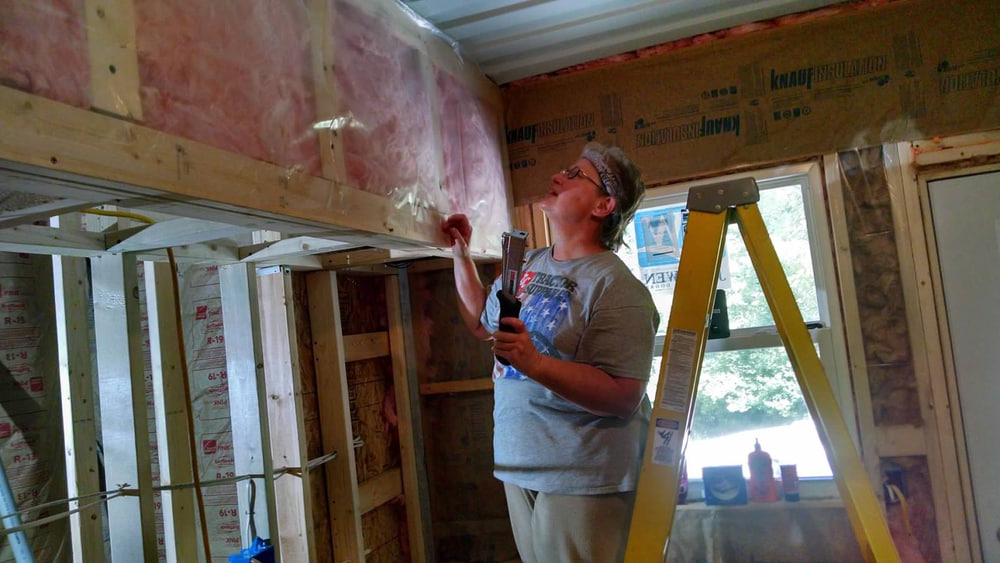
Since Bill has asthma, we hired an insulation company to blow brown cellulose insulation between the containers and the steel shell and to place fiberglass batting in the attic. We decided to insulate the containers both inside and out due to the large temperature variability in Ohio and to prevent condensation.
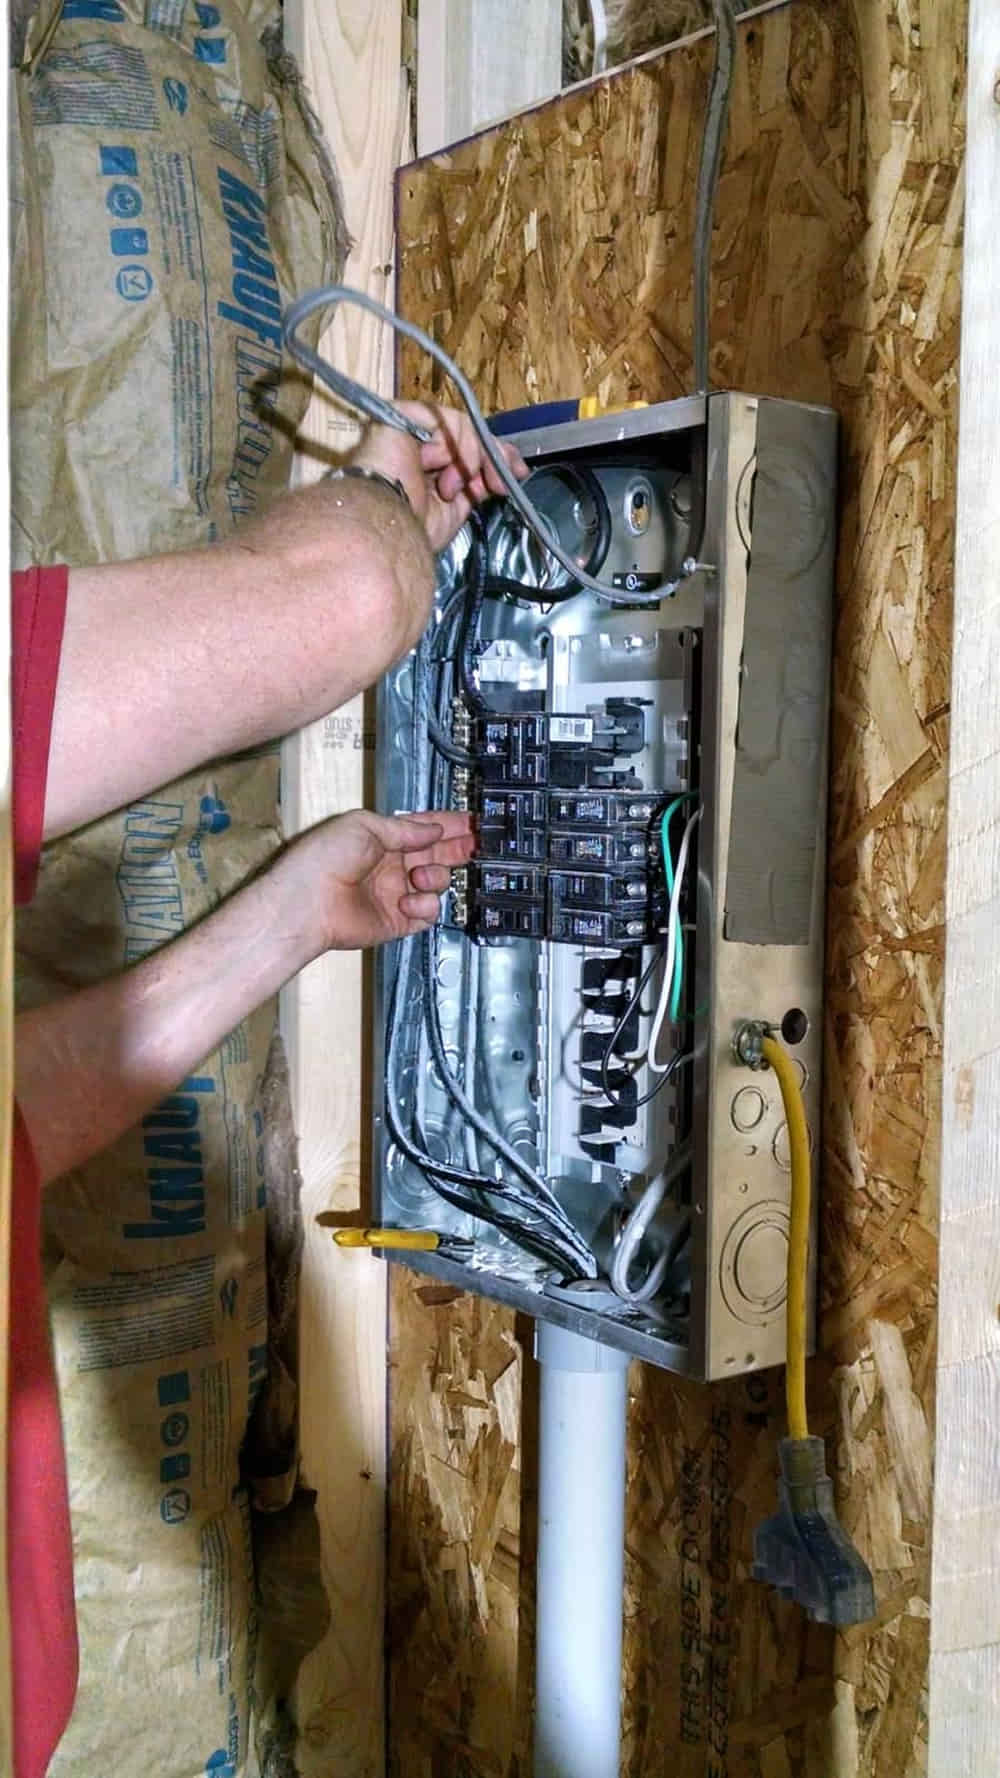
Then, Bill did the plumbing and electrical rough in. We also bought a refrigerator so that we had a supply of cold liquids readily available.
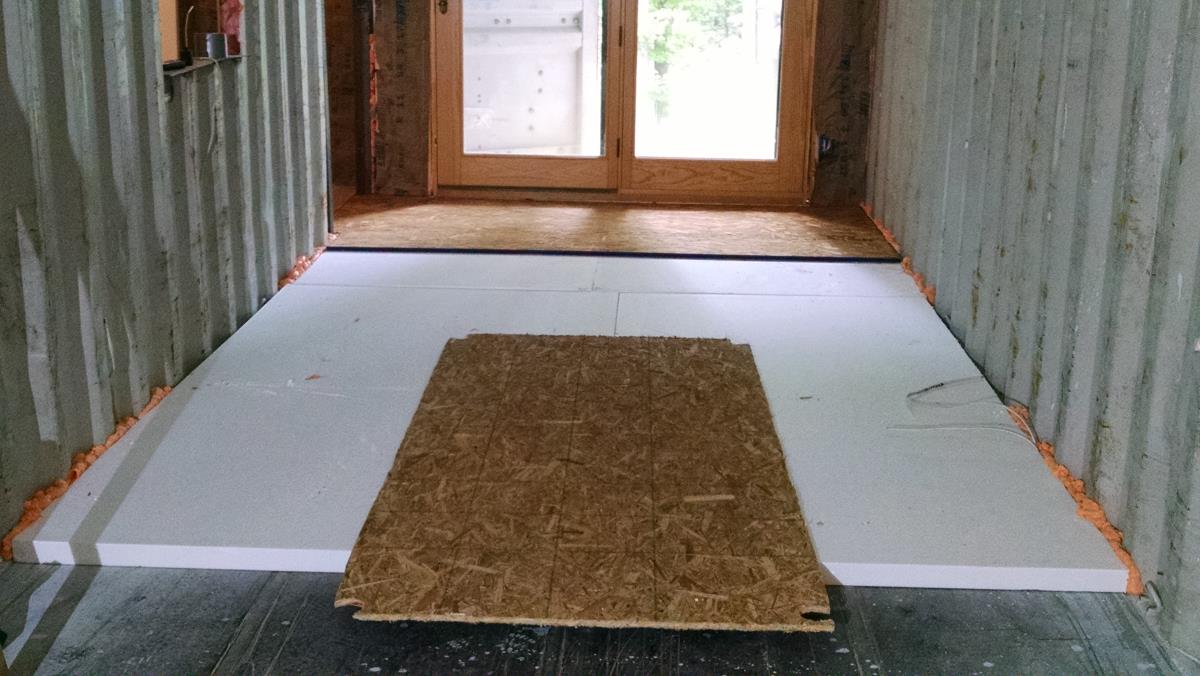
Subflooring was the next step. We did consider removing the original plywood floor, but after reviewing the safety data sheets (SDSs) for the active compounds, we determined that we were well below the exposure limits. Becky’s experience as a chemist certainly came in handy with reviewing the technical information, and we felt even more comfortable knowing that we had 2″ of EPS foam insulation, the OSB subfloor and the vinyl floor protecting us (plus, we loved the idea of having a rodenticide!)
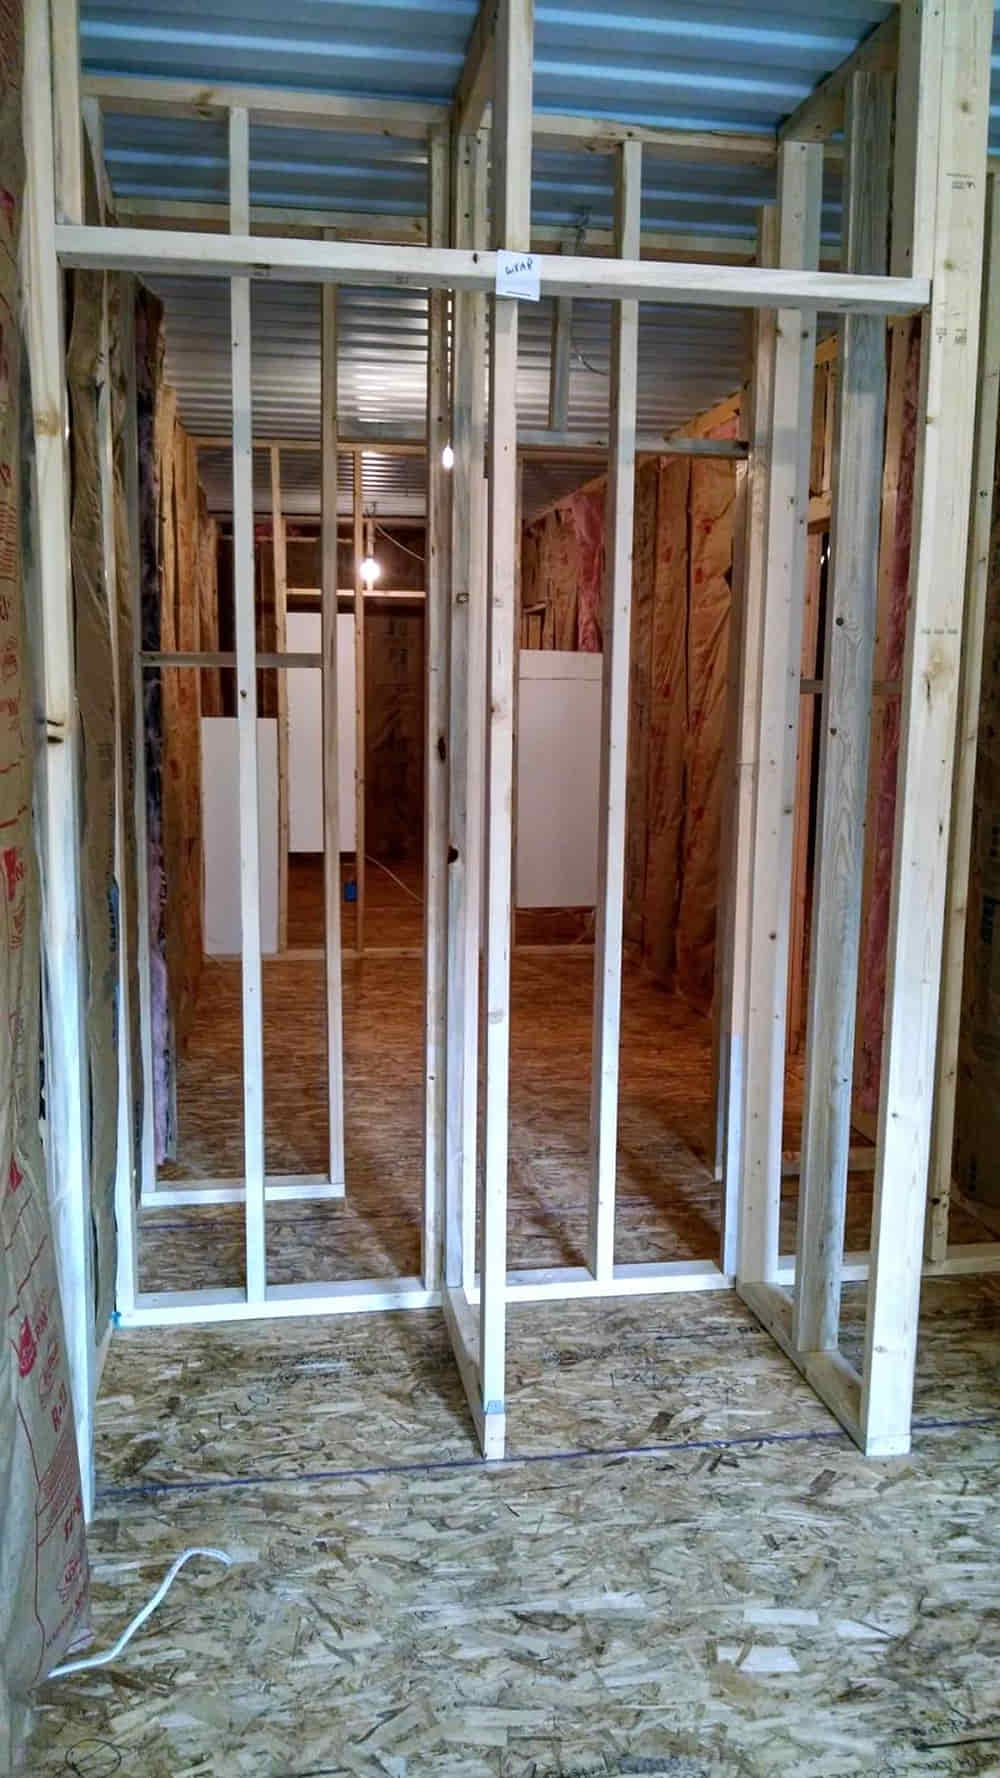
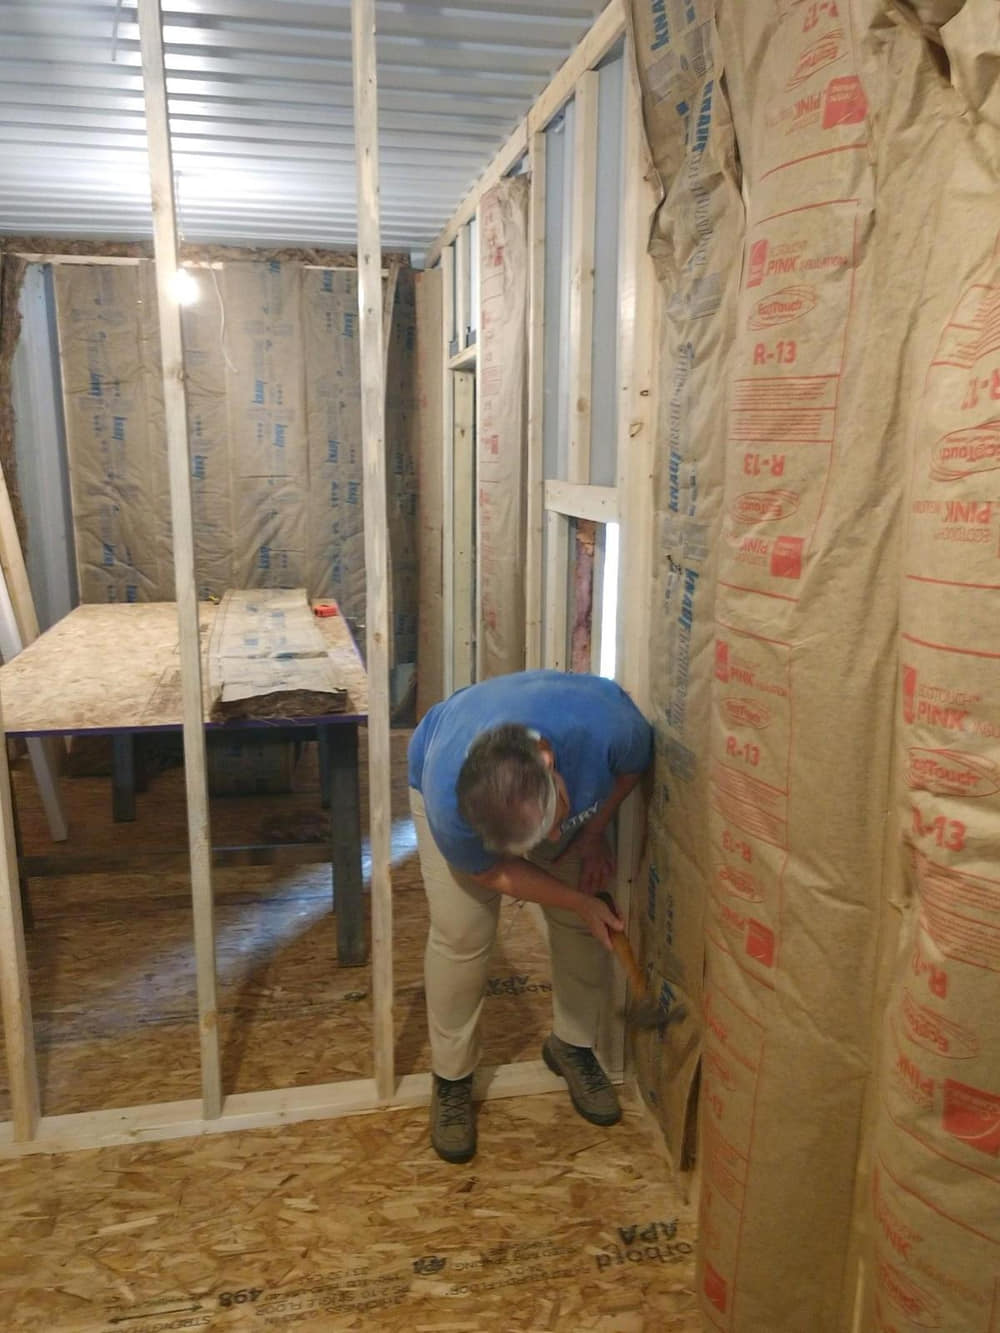
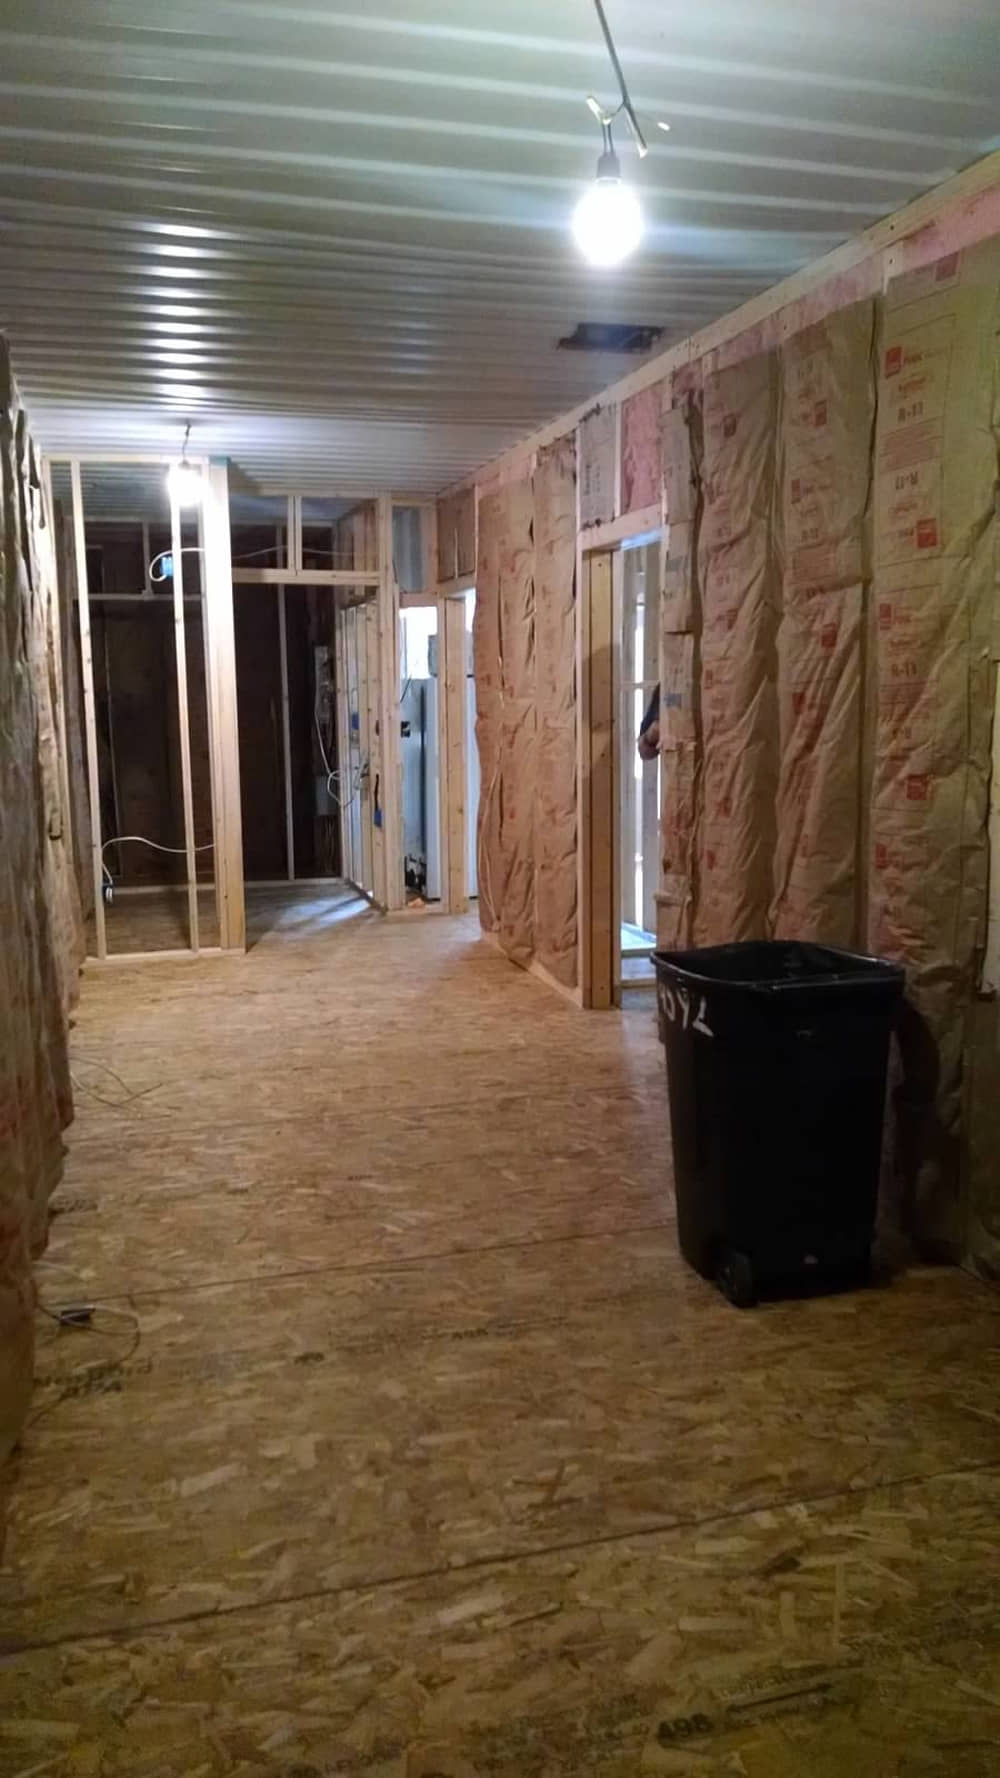
We next spent several months framing the entire inside of the two containers. To optimize room, Bill laid the 2” x 4”s flat against the steel containers. The lumber had to be placed on a convex rib, so they ended up being a non-standard width apart but did not cause any problems. We did have to plan every outlet in advance and mark where the wires were. In addition, we hung fiberglass insulation batts prior to the installation of the drywall.
We bought a primary residence in another location in July, 2017. The process of moving and modifying this house took up the remainder of 2017.
As 2018 began, we worked on framing and insulating the walls and installing the 100 amp electric box, finishing in late June 2018. To keep the project moving, we hired drywall installers. They got the work finished in one week! Then we began priming and painting. We were grateful for the help of family and friends during this time because it was a lot of work.
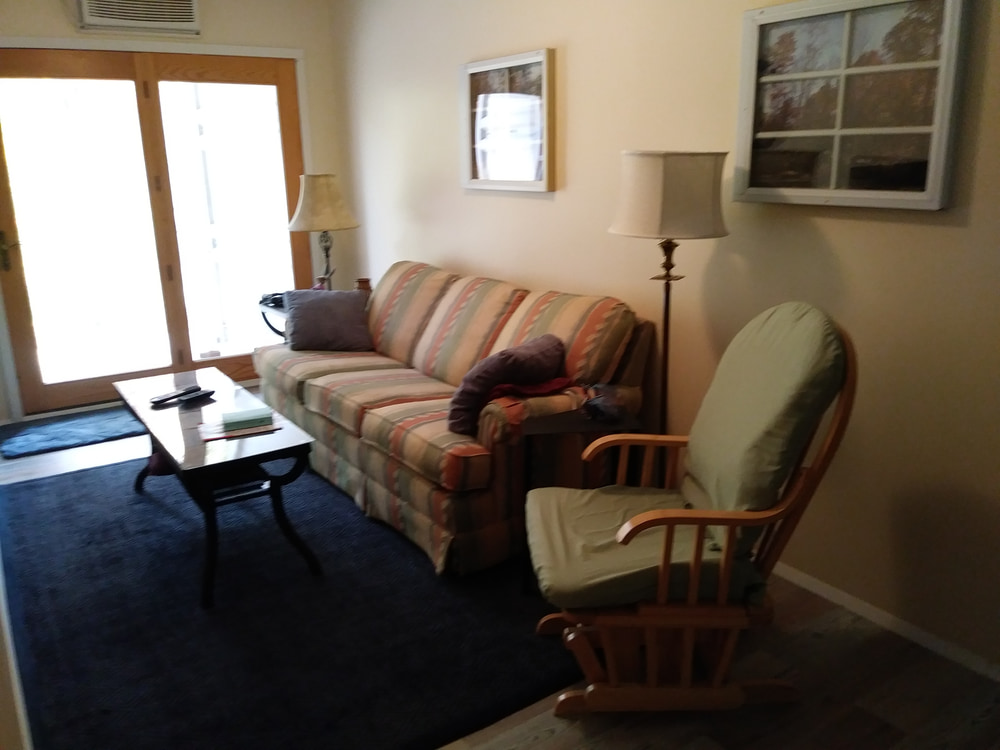
In the spirit of reduce, re-use and recycle, we decided to furnish most of the cabin with pre-owned items. We bought many items from the Habitat for Humanity Restore and also got items from several thrift stores, garage sales, Craigslist, and family members. For instance, the kitchen cabinets and counter top cost $220 from the Restore. Bill and Jeremy hung the cabinets, placed the countertop, installed ceiling fans and light fixtures, and put in the light switches while the painting was underway.
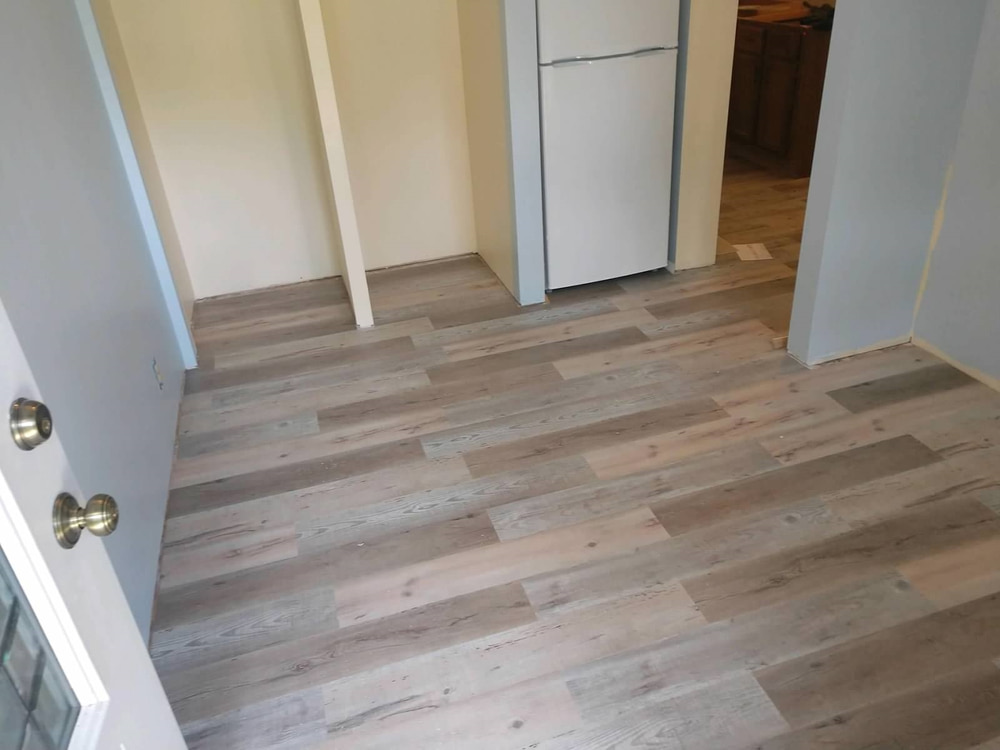
With the kitchen set up, Becky cleaned everything and lined shelves while Bill laid the vinyl floor on top of the subfloor. We then sold the camper because we were able to move a few critical items into the container cabin: our bed, a couch, the stove, the bathroom vanity and a dining room table.
At this point, you might think we were nearly finished. But we actually still had a lot to do. In September 2018, Bill and Jeremy added closet doors in three rooms and hung the bathroom door. Bill placed all of the trim, added ventilation fans between rooms, and added the back deck.
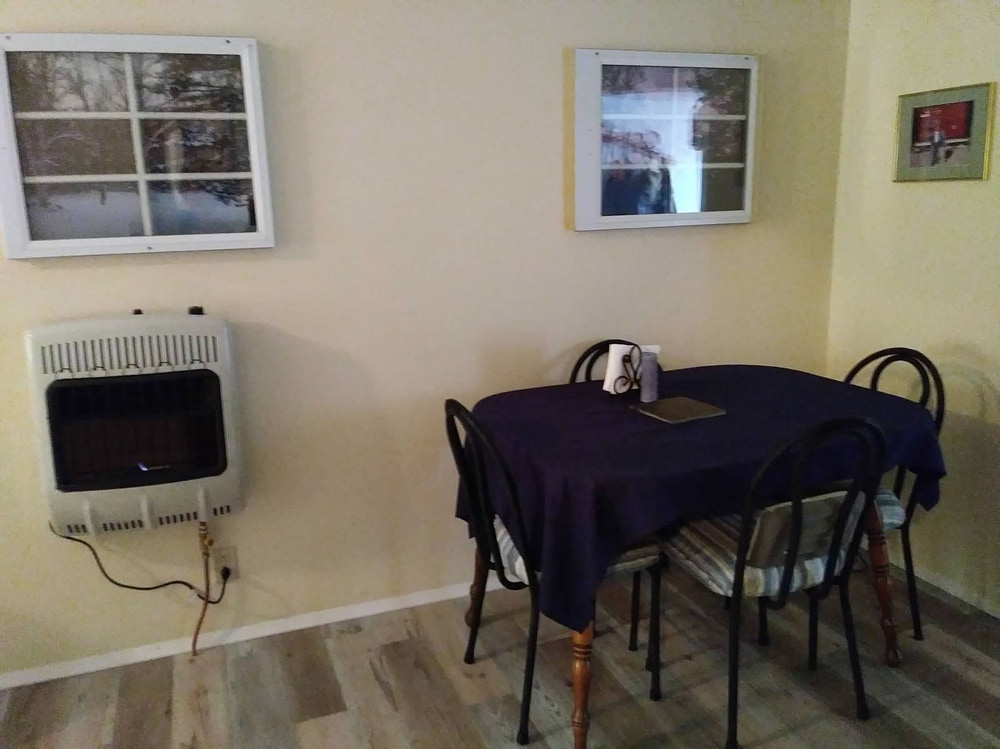
In October, Becky painted the outside of the containers and Bill put up the vinyl siding on the front and back of the home. He also put the soffets under the porch roofs. In the meantime, Becky was furnishing the inside and decorating. Bill also installed a ventless propane heater as an additional heat source. Along the living room and dining room walls we hung old windows and put outdoor scenes printed on vinyl behind them. The total cost was $65 since we got the windows free on Craigslist.
A holding tank for waste water and a bulk Propane tank will be installed during the Spring of 2019. After that, Bill will complete the plumbing in the bathroom and kitchen. Also scheduled for 2019 is a front porch, outdoor lighting, more painting, and skirting to hide the foundation. The project took a little longer than we had anticipated, but we paid for it as we went along so that no debt was incurred. And in our area, very few permits are needed so they were never an issue. We did take a week of vacation each year to make serious progress, but most of the work has been done on weekends.
Building a container home can be done inexpensively, but we took no shortcuts other than re-using furnishings. We did most of the labor ourselves and our focus was security. We also had substantial costs for drilling our well, using extra insulation, and installing the outer steel shell, as shown below. In total, it cost about $50,000 in materials and out-of-pocket costs.
Here’s where the money went:
- Purchase and delivery of containers (including the 20ft storage container) $6,400.00
- Foundation $5,221.37
- Welding $415.91
- Roof, insulation and sheet metal $8,565.00
- Paint $1,431.23
- Electric and plumbing $2,892.75
- Well $6,517.77
- Framing, trim and cutting doors $2,474.85
- Floor $1,593.49
- Appliances $5,010.64
- Drywall hanging and finishing $4,680.00
- Vinyl siding, skirting, and soffets $1,688.12
- Deck $1,441.70
- Miscellaneous $1,202.21
During 2019 we will incur additional expenses associated with a front porch.
Container homes can be built hundreds of different ways. If you want to build one, do your research. It’s the only way to make informed choices that apply to your situation. In other words, do it your way. You are the one who gets to live with what you create.
We looked into insurance, but due to the rural location and it being a non-traditional build, insurers quoted utterly ridiculous rates. We therefore have not insured the cabin.
We do recommend installing twice as many electric outlets as you think you need. Otherwise, we are extremely pleased with how the cabin turned out and are looking forward to spending some relaxing weekends there.
Thanks again to Bill and Becky for sharing the details of their DIY container home build. Let us know what you think in the comments below.
Interested in Container Homes? You need our FREE cheat sheets to help decide if containers are right for you!