Elements
Size
Age
Levels
Note: Map location may not be exact. Click to open in Google Maps.

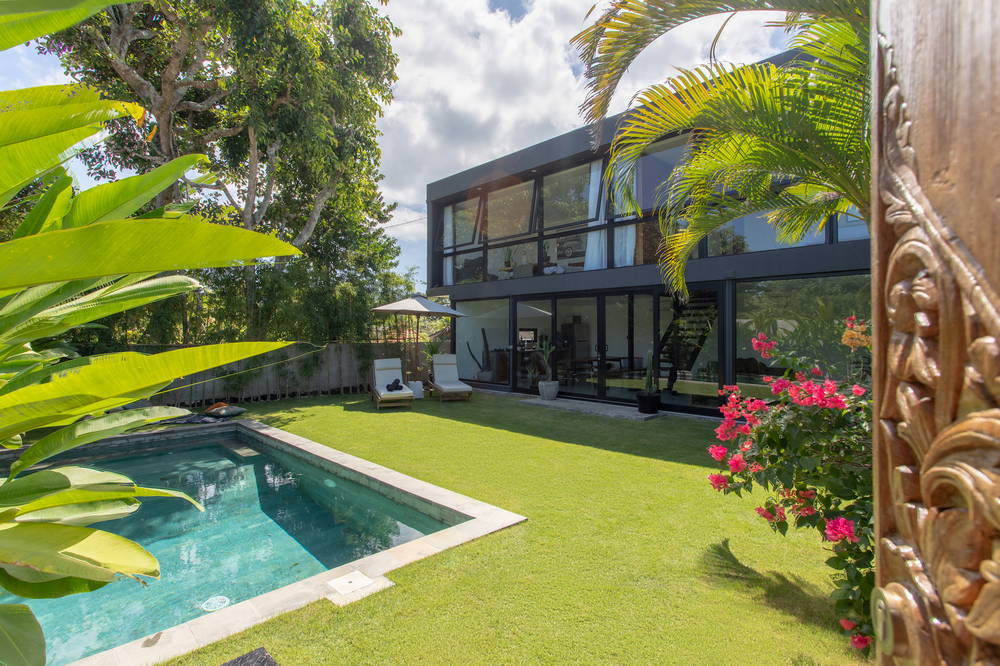
Set on the “Island of the Gods” in Bali, Indonesia in between mainland Asia and Australia, Villa Mola includes two lavish shipping container villas that are available for rent separately. We’ve shared countless container homes over the years but this is our first time to highlight shipping container villas.
What separates a villa from a house is subtle: usually more luxurious accommodations and often a more tropical location. These two Bali container homes definitely fit the bill on both counts.
In our interview below, we heard from Giorgio and François. These two friends (who come from Italy and France, respectively) designed and built the two shipping container homes with a little help from some outside contractors.
You’re definitely going to be inspired by their tenacity in getting the project completed as well as the grand design. Keep reading to hear all about how they did it!
We both have previous experience with short-term rentals (STRs) in both Bali and in Boracay, Philippines. We own a guesthouse and hotel in Boracay and have worked with other villas in Bali. So, we knew from the beginning that STRs were definitely our objective.
Bali is already very big in terms of tourism, especially the area north of the airport. In the last two years, we realized the potential of the Southern strip and decided to build there as the destination was growing more and more. The area is famous for its world-class surf spots and nice beaches.
We both saw documentaries on YouTube and on TV about container homes in the past and were seduced by the concept. So, when Giorgio proposed it for this new project, we naturally opted for that option. We loved the idea of recycling and saving time and money.
At some point, we considered other materials like wood. But we quickly abandoned the idea as the price of good wood for structural use is very prohibitive in this part of the world. We also thought about “dressing up” the container construction with bamboo cladding on the exterior to make it look nice. But, in the end, decided to leave it raw (just painted).
Our aim was to create a model of a house we could reproduce anywhere, quickly and cheaply. We don’t yet know if we will copy this project elsewhere, though we do now have that ability. Time will tell.
Building our two container homes was very challenging, to say the least. To start off, we had to acquire the containers themselves.
We flew about one hour away from Bali to buy the containers at the Port of Surabaya on the island of Java. There we found thousands of containers of very different quality. We chose the best ones we could find and had them sent by truck (and via ferry) to Bali.
Bringing the shipping containers to our land in Bali was challenging. First, we had to pay the police for escorting the trucks. Then we had to cut trees for the trailers to pass in the narrow, winding roads leading to our land. We had to fix an electric pole and a gate that was broken by one of the trucks. Great way to meet your neighbors!
Later, when the trucks left, one of them could not make it past the steep hill. It drifted backward and sideways due to very old tires and blocked the street for two days. The truck company sent a backhoe to put the truck back in position and ended up damaging the road surface… our project had not yet started and it had already attracted a lot of attention!
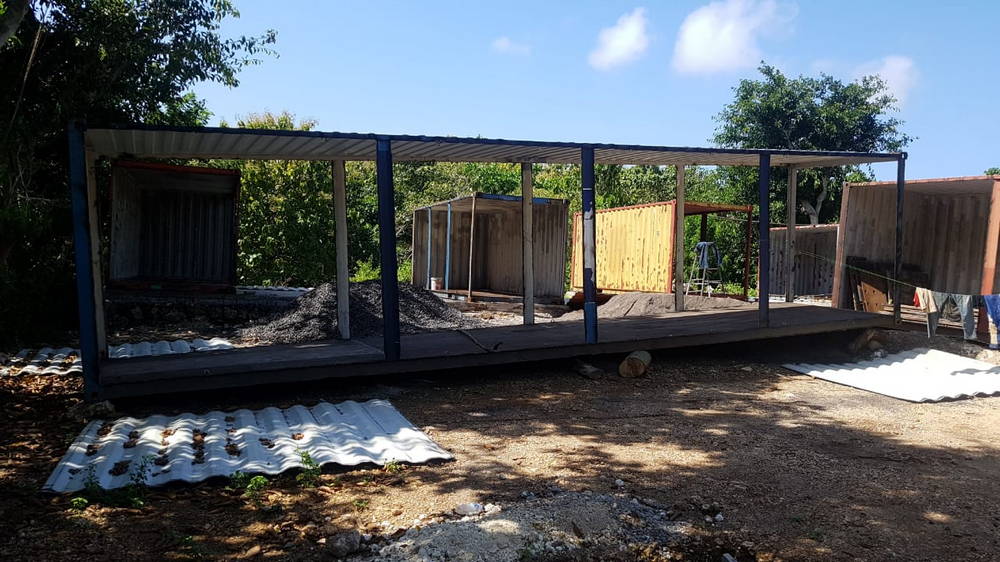
With the containers finally onsite, we had to get to work converting them to villas. Initially, we hired a contractor who had experience in steel construction. It turns out he was a crook and ran away with part of our money after about six months. All we had to show for it was a few cut containers stacked on top of each other.
We then hired various contractors for specific jobs. We were very hands-on, acting as architects and contractors on a daily basis, even though these weren’t skillsets in our backgrounds. The project took longer and cost more than we expected. But we are very happy with the end result for the first project of our own.
In hindsight, we should have hired an architect and checked credentials before hiring a contractor. Due diligence is always recommended. As discussed above, we ended up overseeing it ourselves as we tried to keep our budget tight.
It ended up costing more at the end so it was not the wisest choice. Having a contractor experienced in steel construction was very important though. This part of the structure was well done by our first contractor before he left, despite his under-performance in subsequent stages.
For us, the metal fabrication phase was the most important part of building our container homes. We cut a lot of the metal and needed to reinforce the structure a lot. After that, the work was much easier and many contractors were able to do it.
Thanks to YouTube and other resources, we got great tips on the mistakes to avoid when building a container home. It definitely helped a lot in terms of insulation, reinforcement of the structure, and preparing the containers (sanding, anti-corrosion paint, etc).
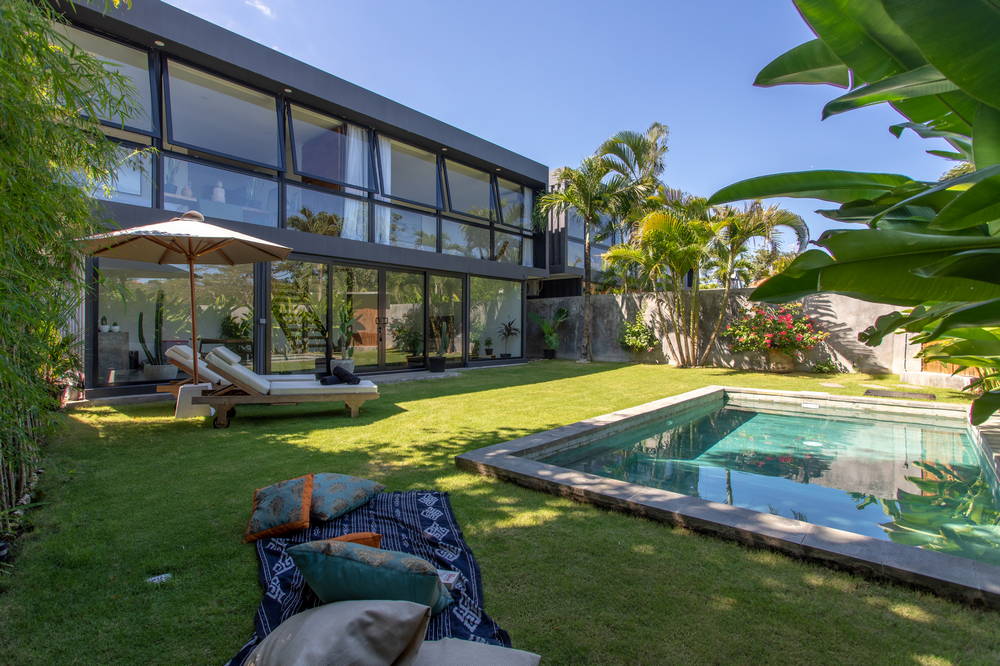
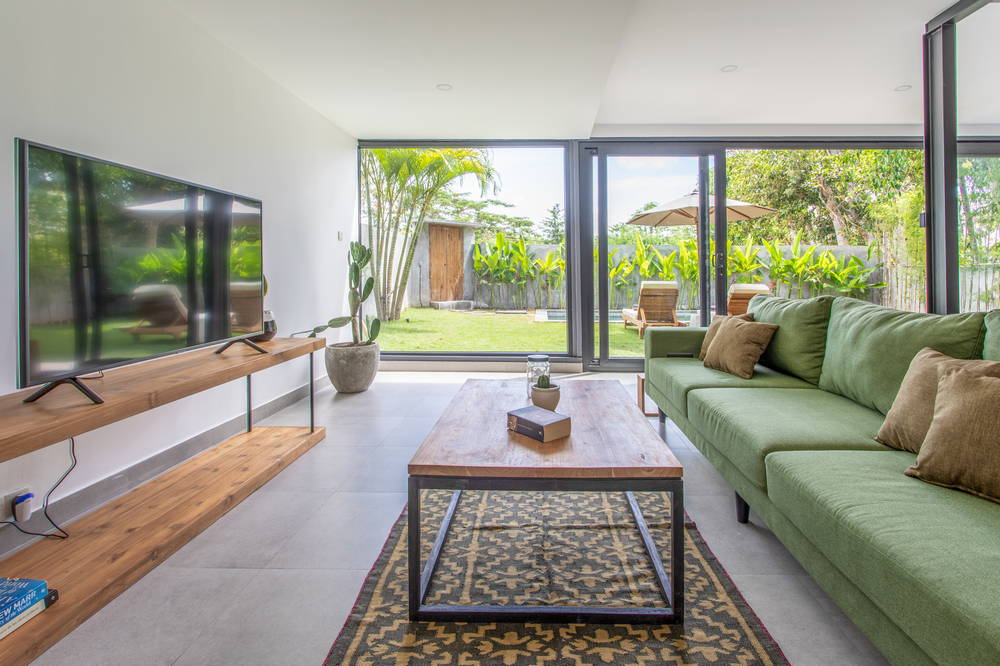
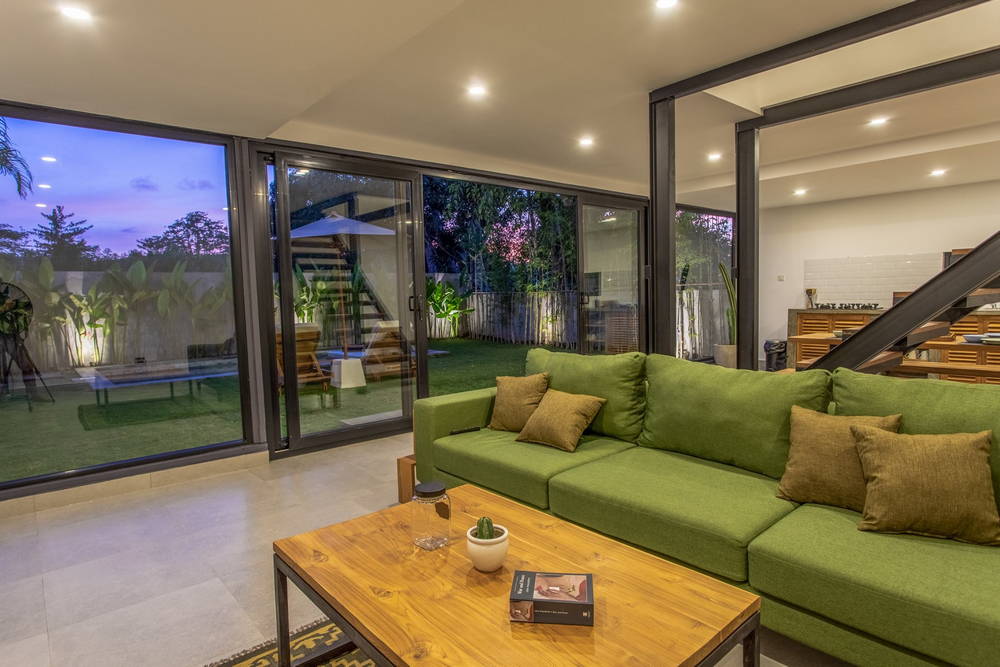
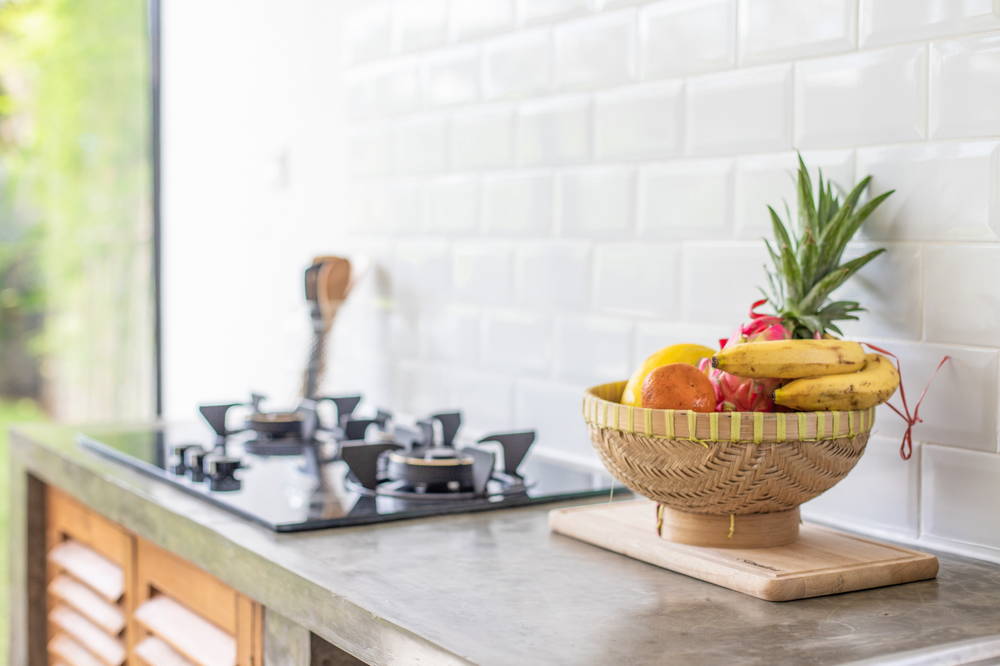
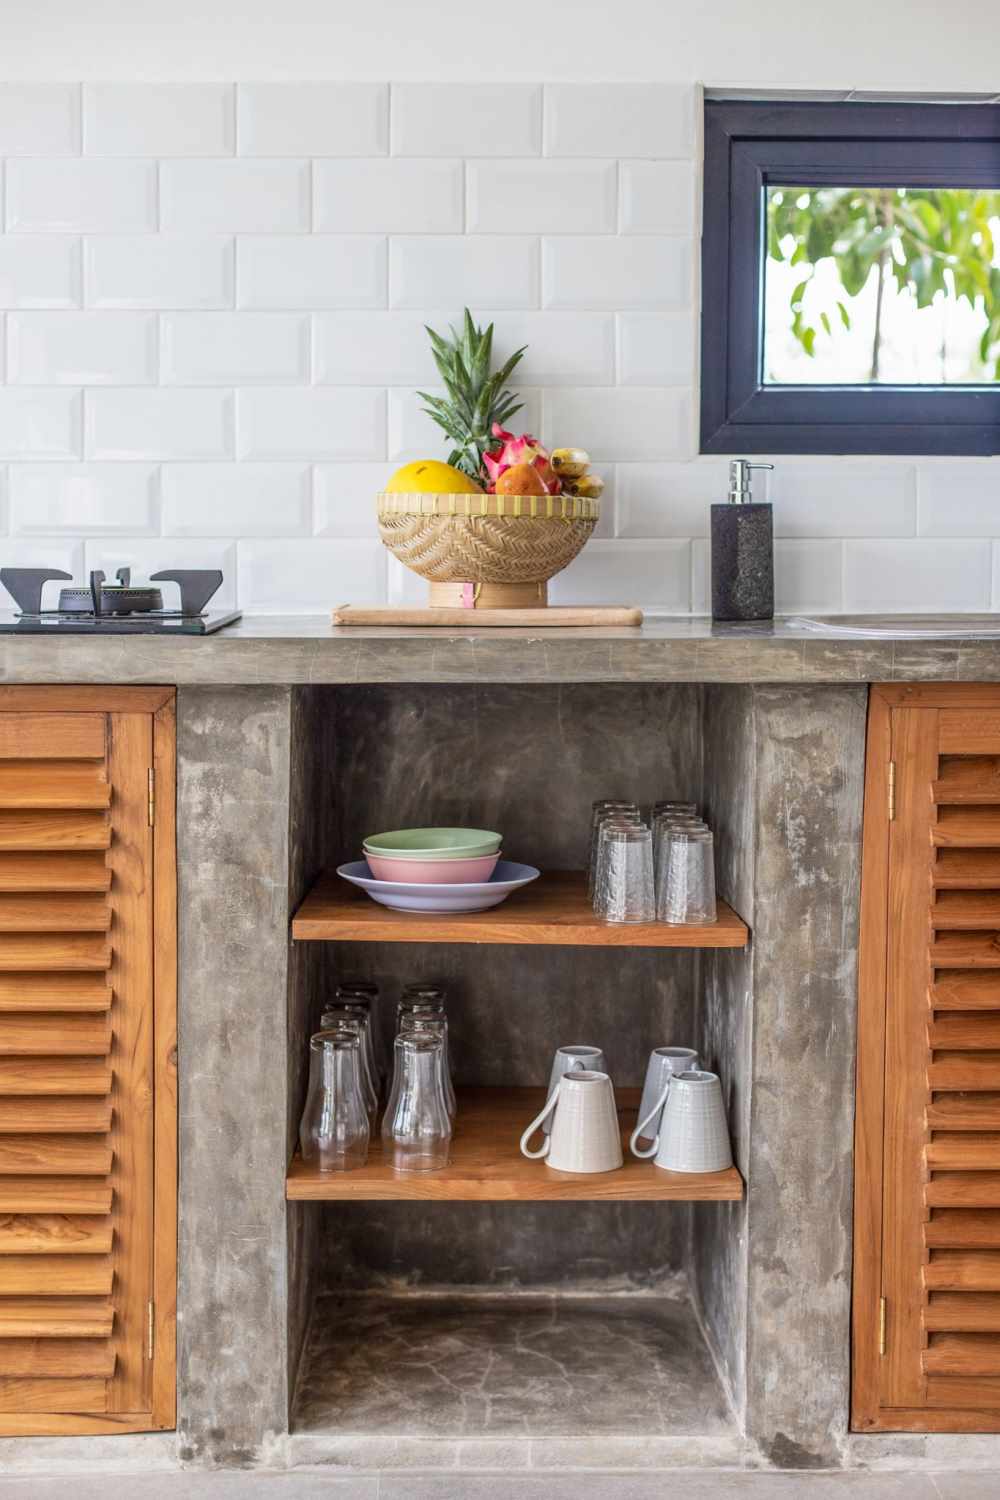
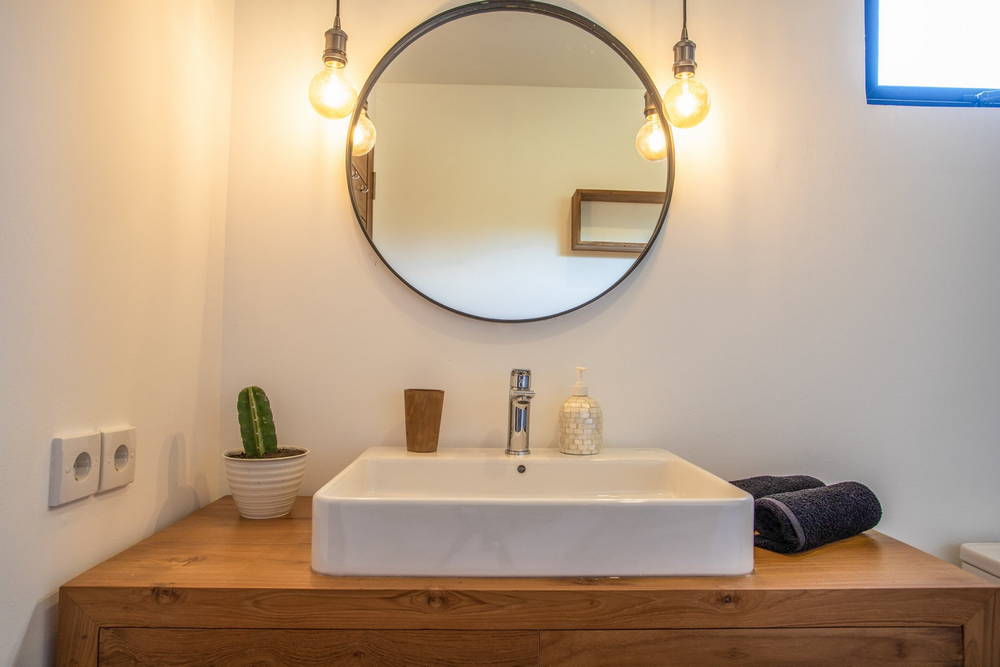
We wanted a simple, modern but comfortable environment. We wanted to balance the relationship between the metal of the external structures of the container and the tropical vegetation. An innovative yet minimal setting seemed to be the best option.
We handled the architecture and interior design by ourselves but collaborated with a Dutch engineer for the construction of the building. The engineer took care of the steelwork to cut, stack, and weld the containers. Then we hired different contractors for specific jobs like mechanical-electrical-plumbing (MEP), wall construction, painting, landscaping, pool, etc.
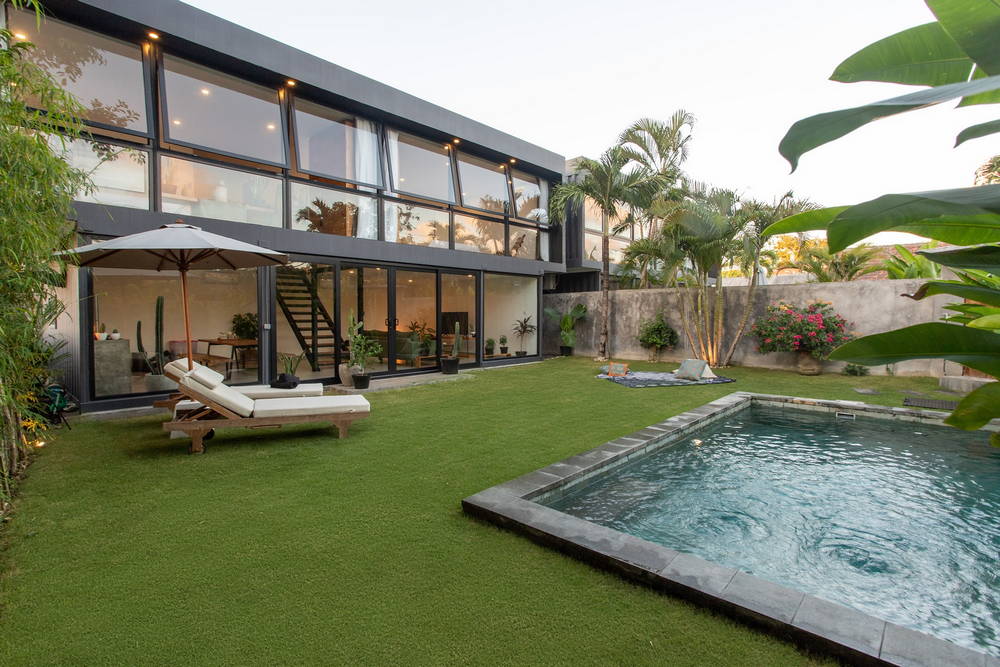
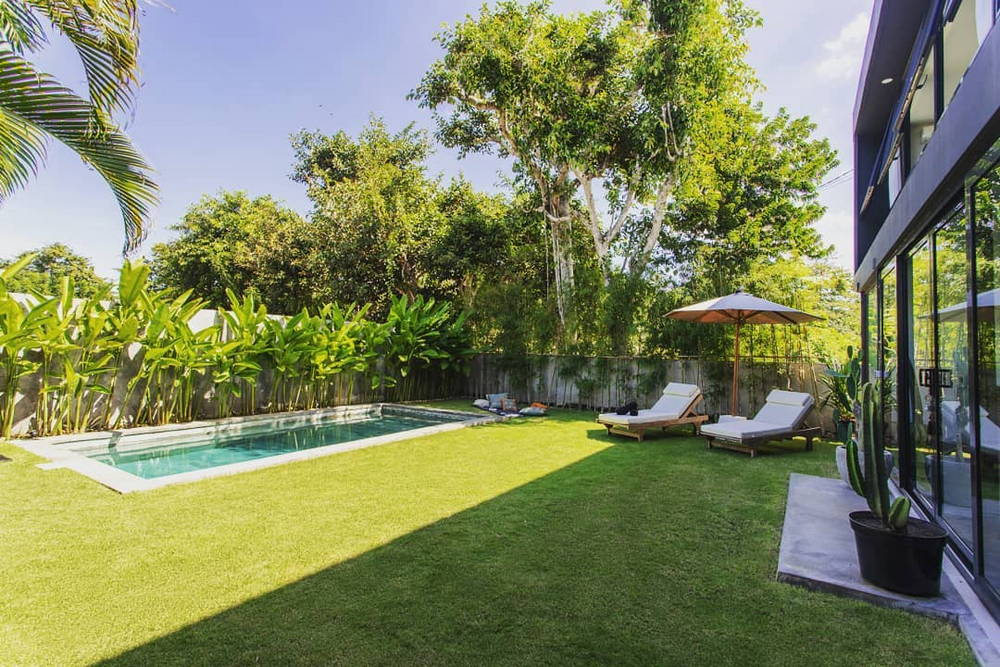
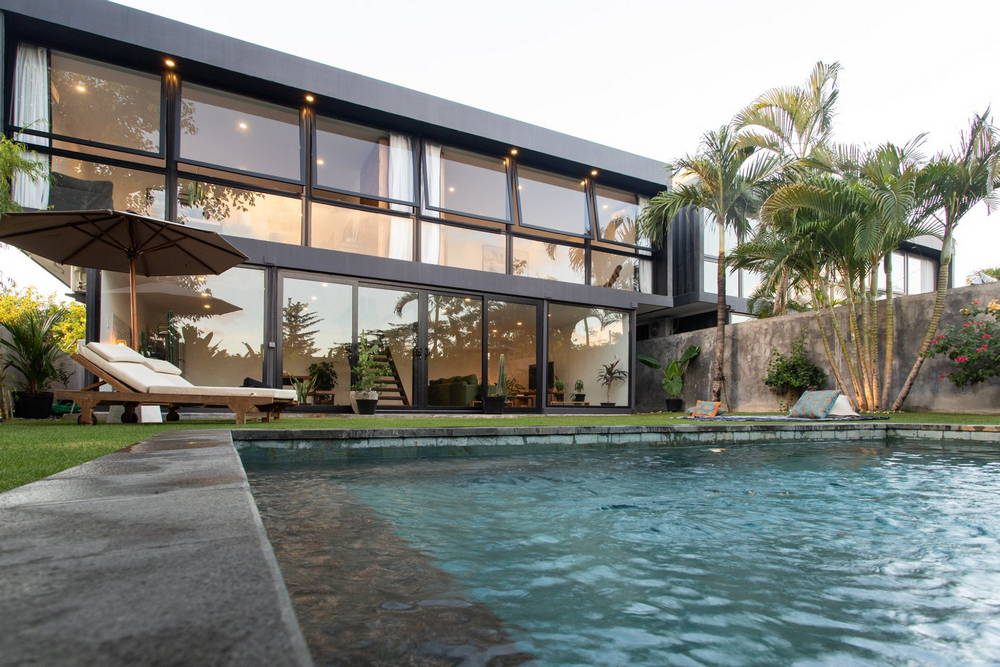
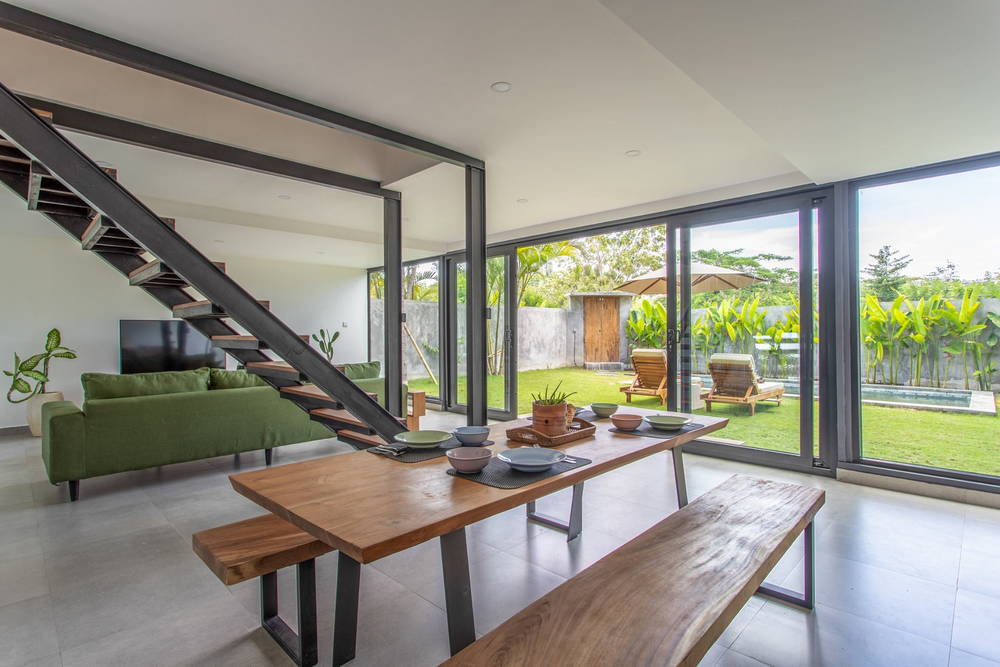
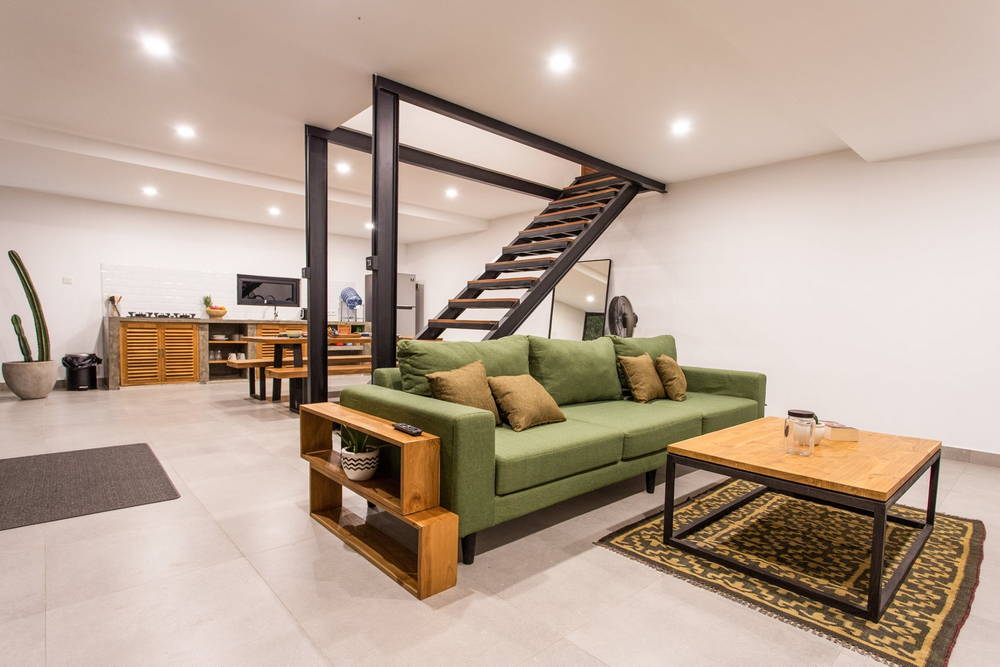
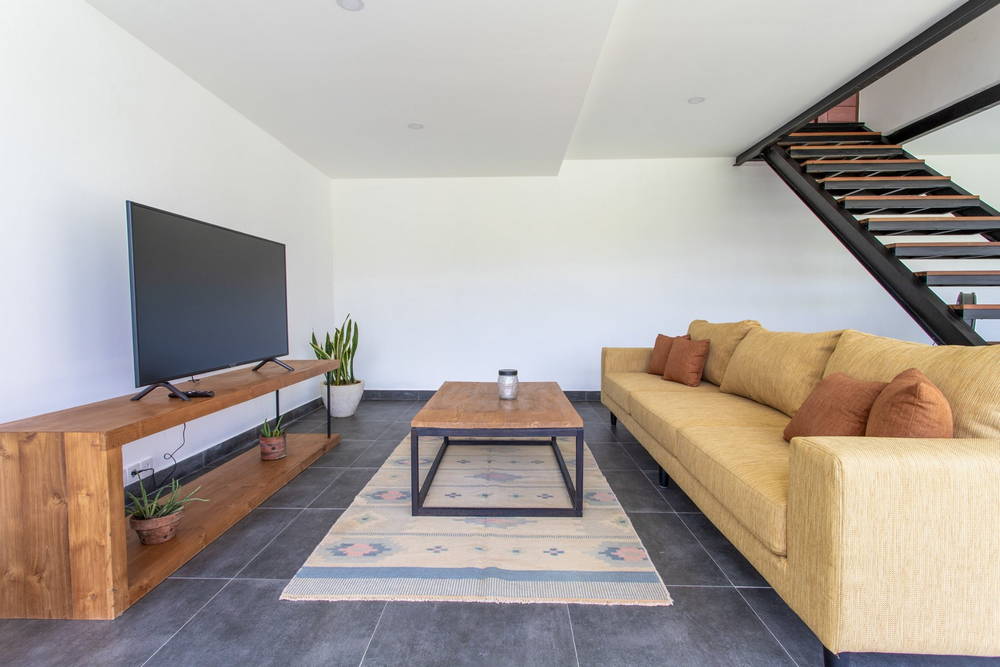
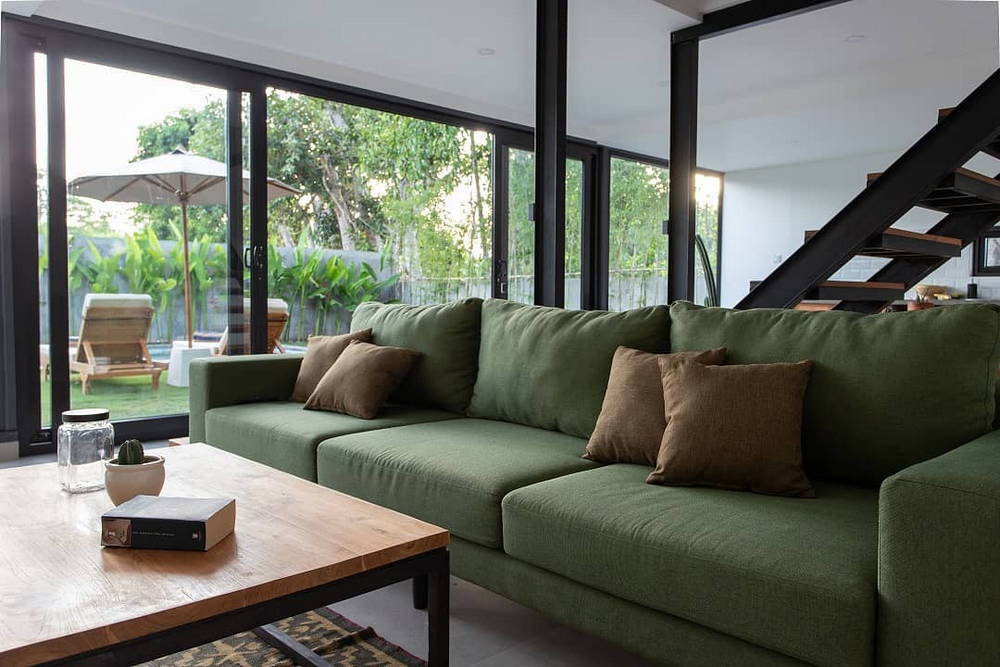
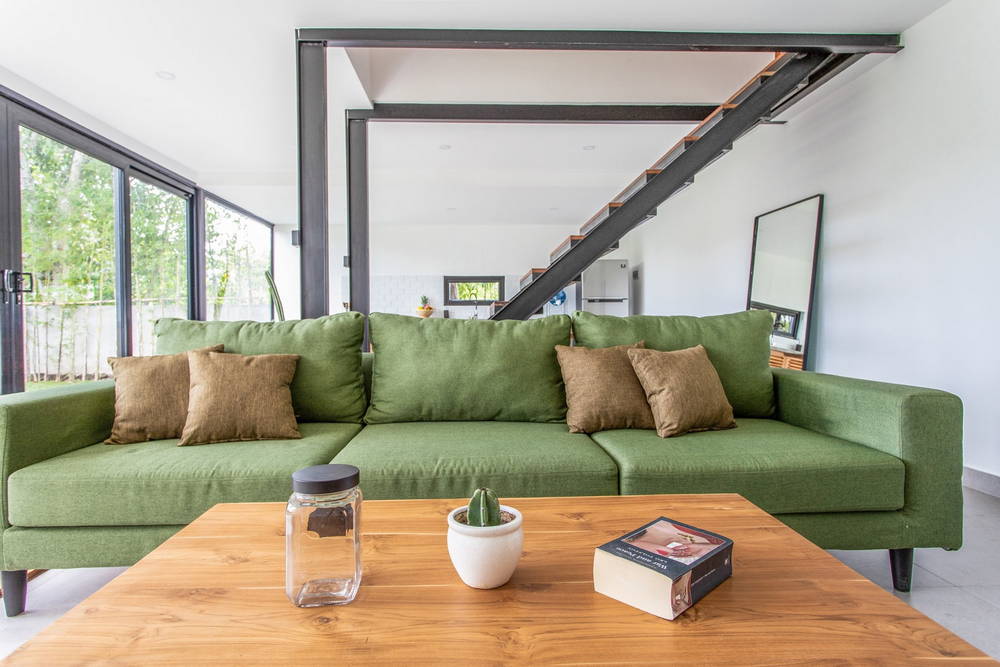
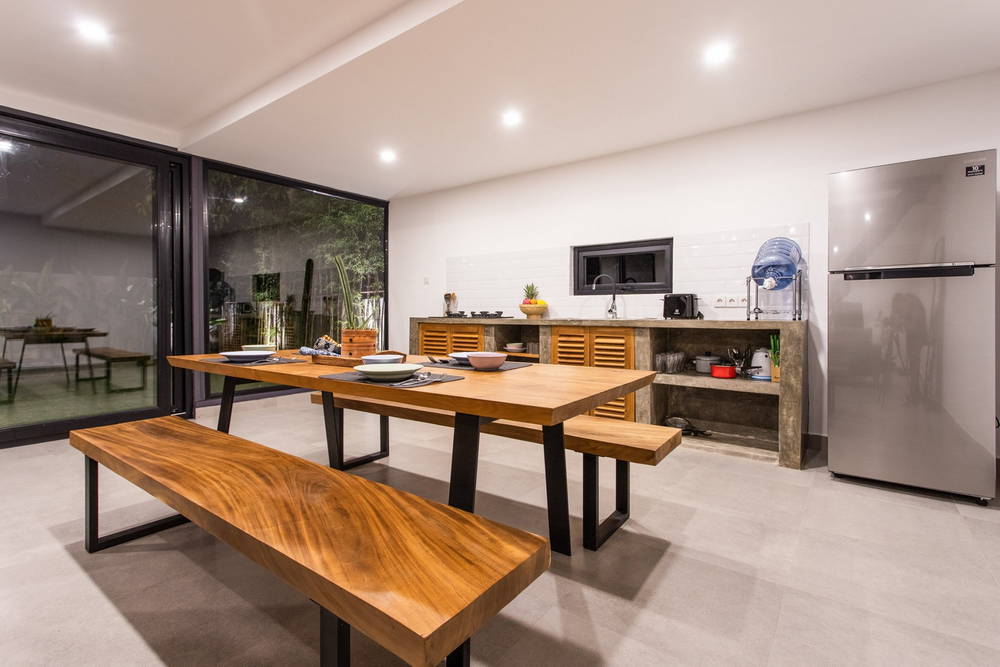
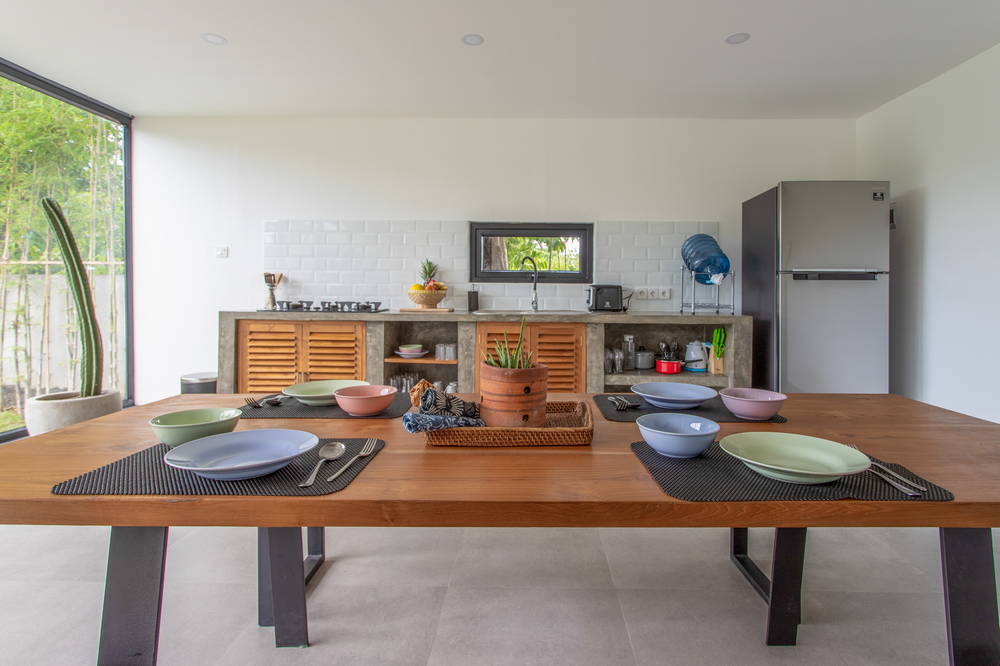
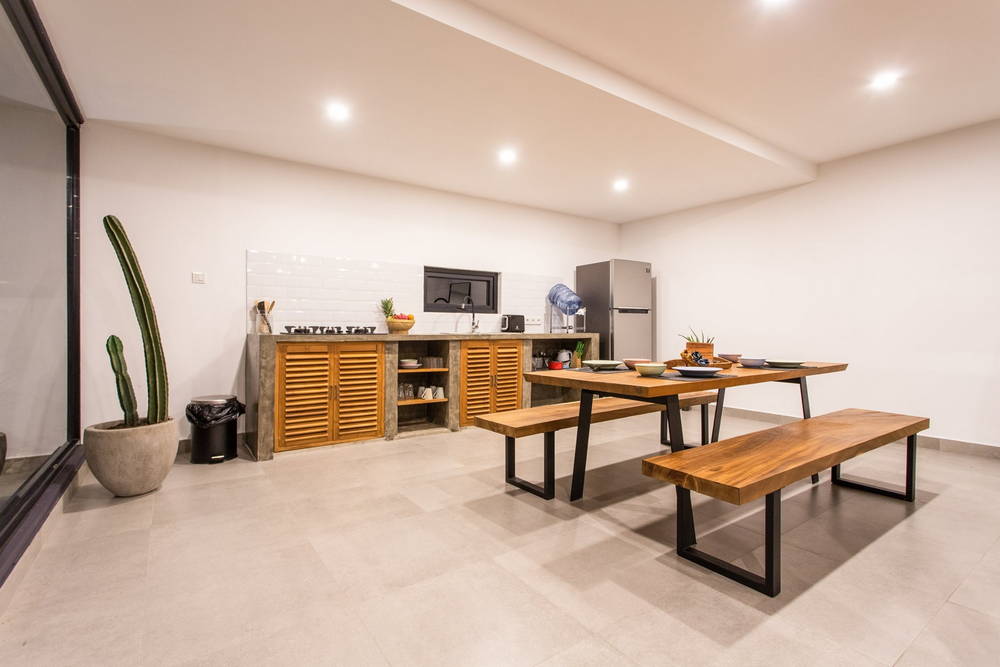
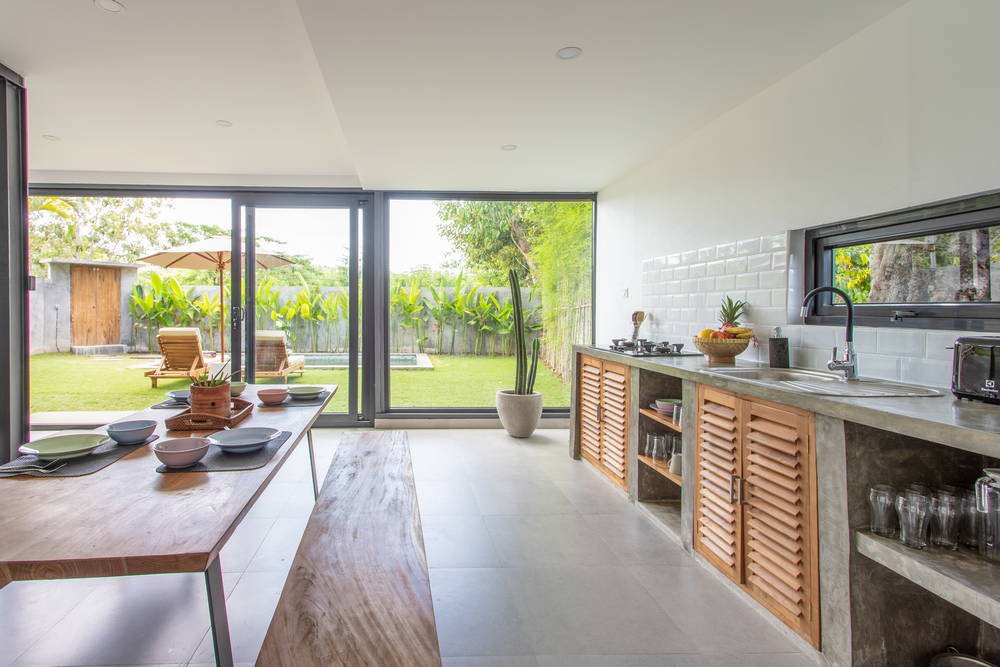
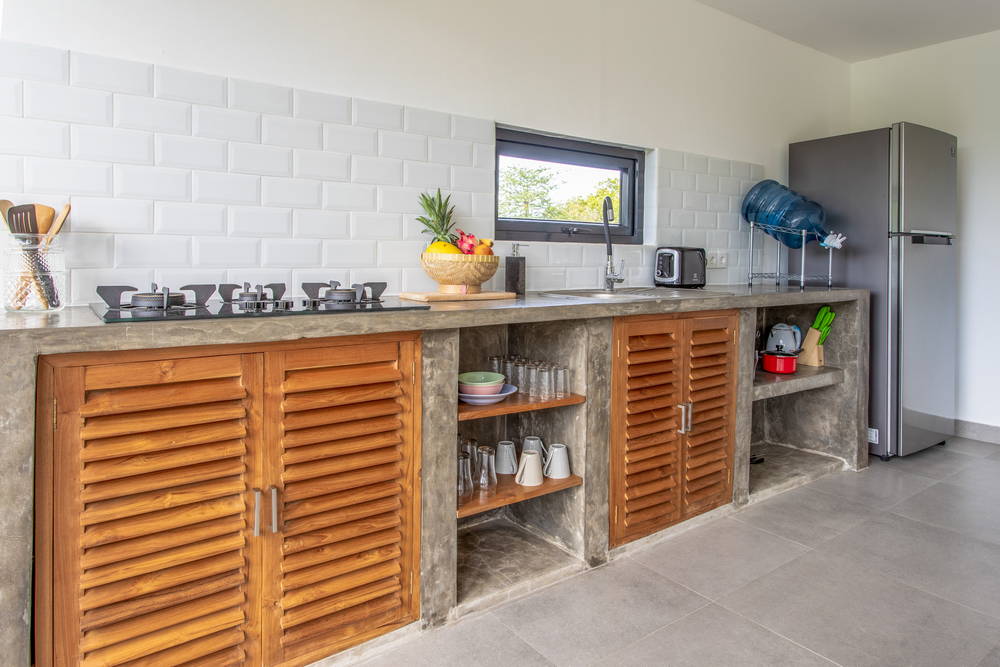
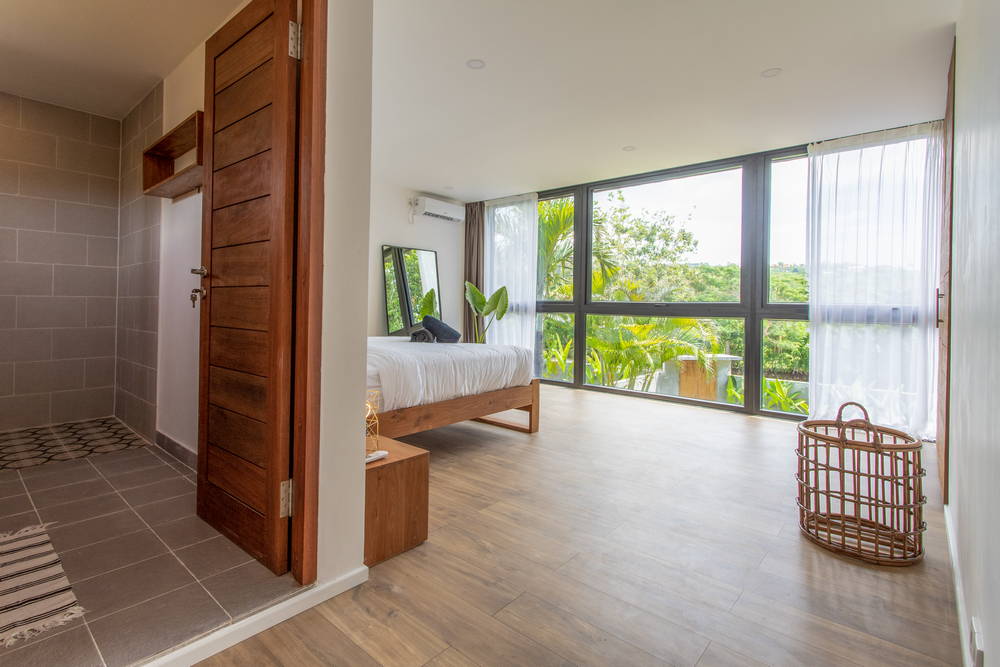
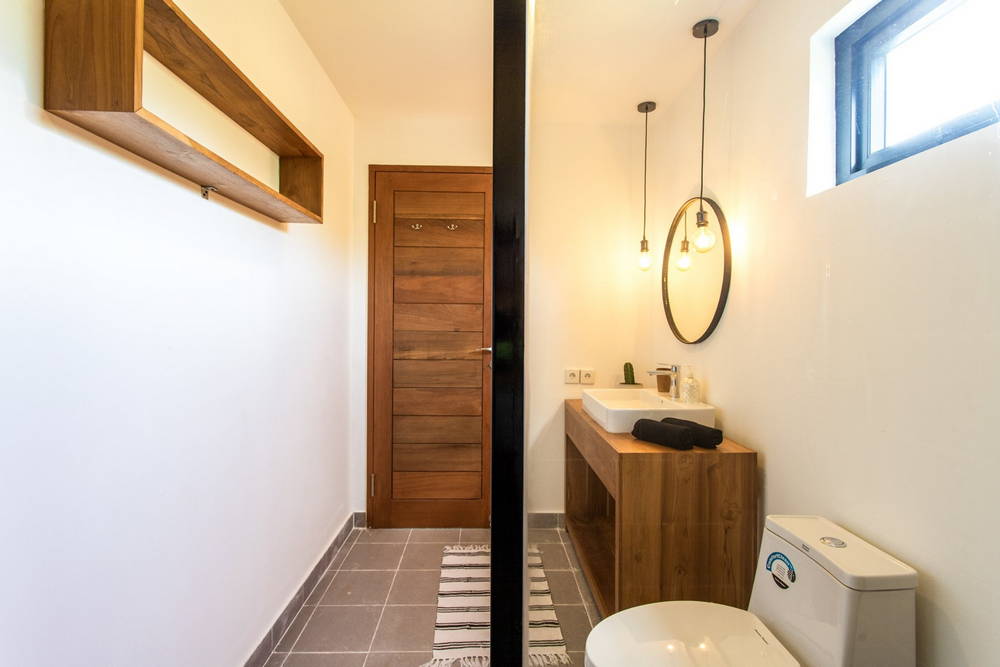
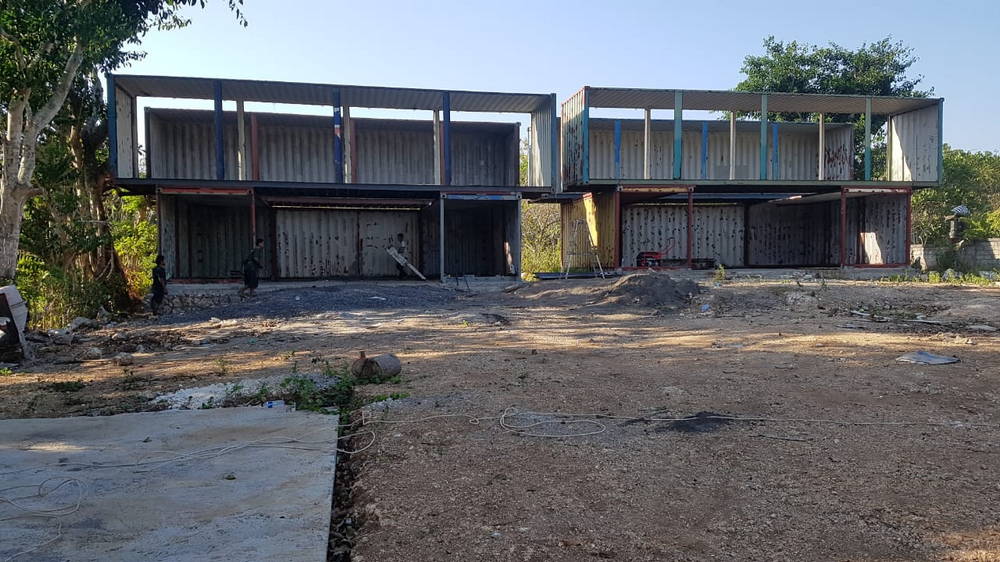
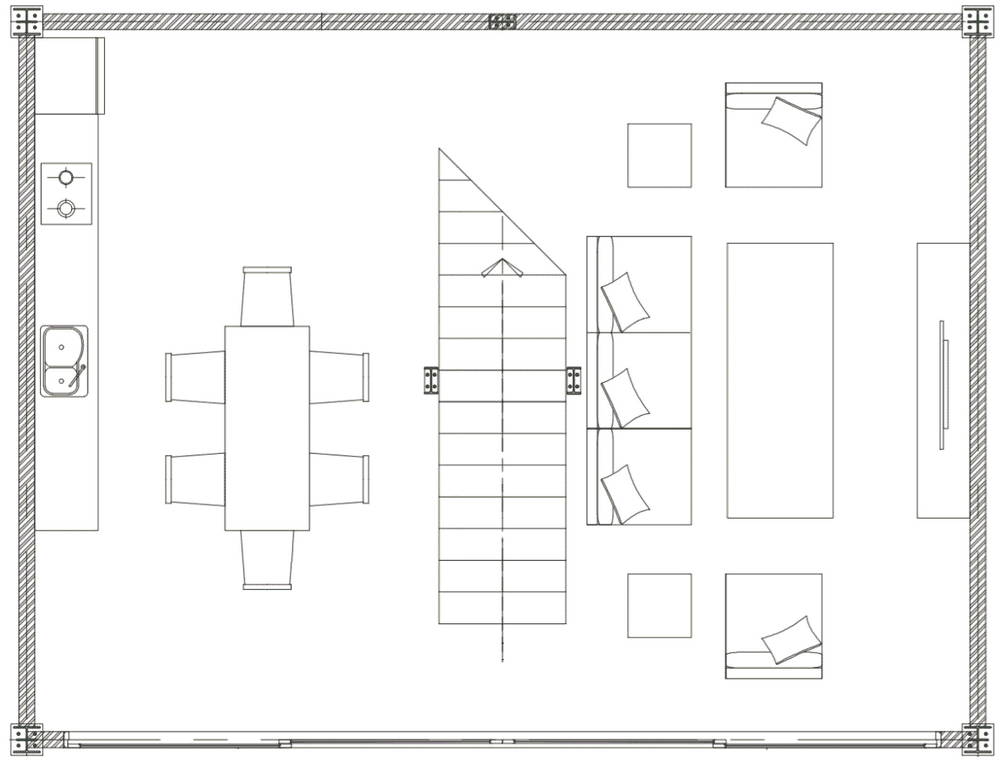
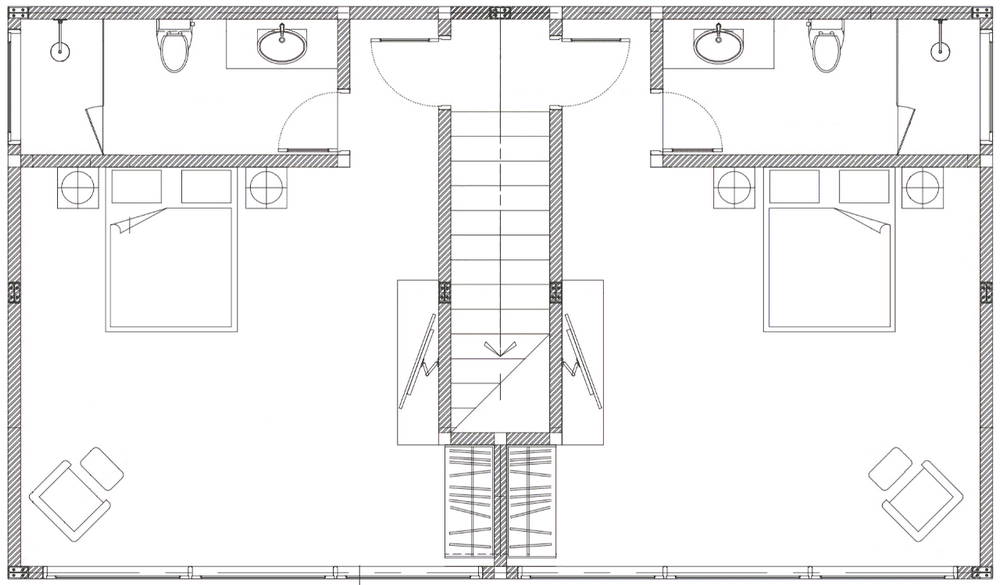
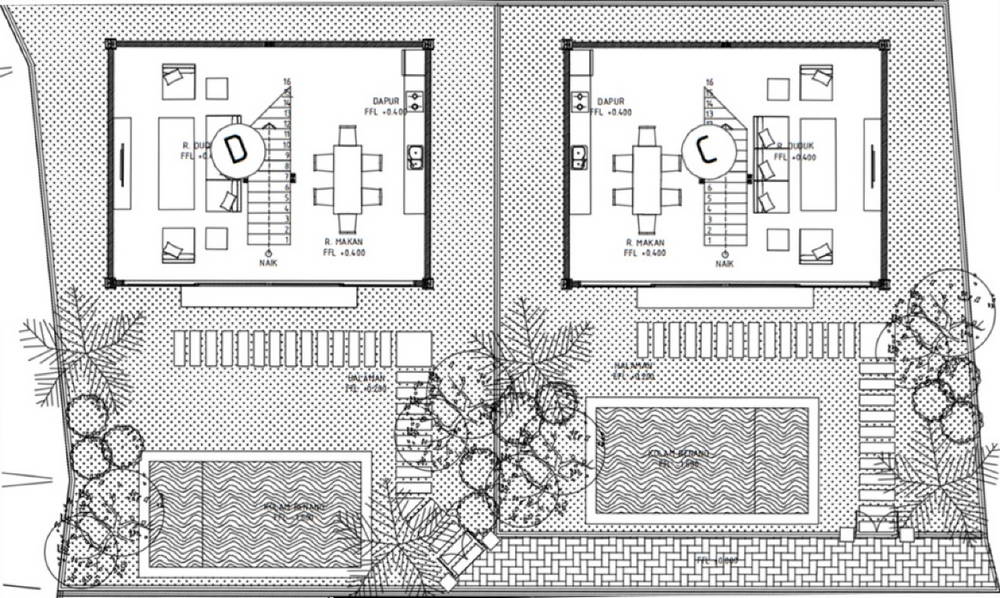
Each villa is about 120sqm (1300 SF) built on two floors, with two bedrooms and two bathrooms in each villa. Downstairs, we used two 20 foot standard containers, separated by about 16 feet. The ground floor is where you’ll find the living room, dining area, and kitchen.
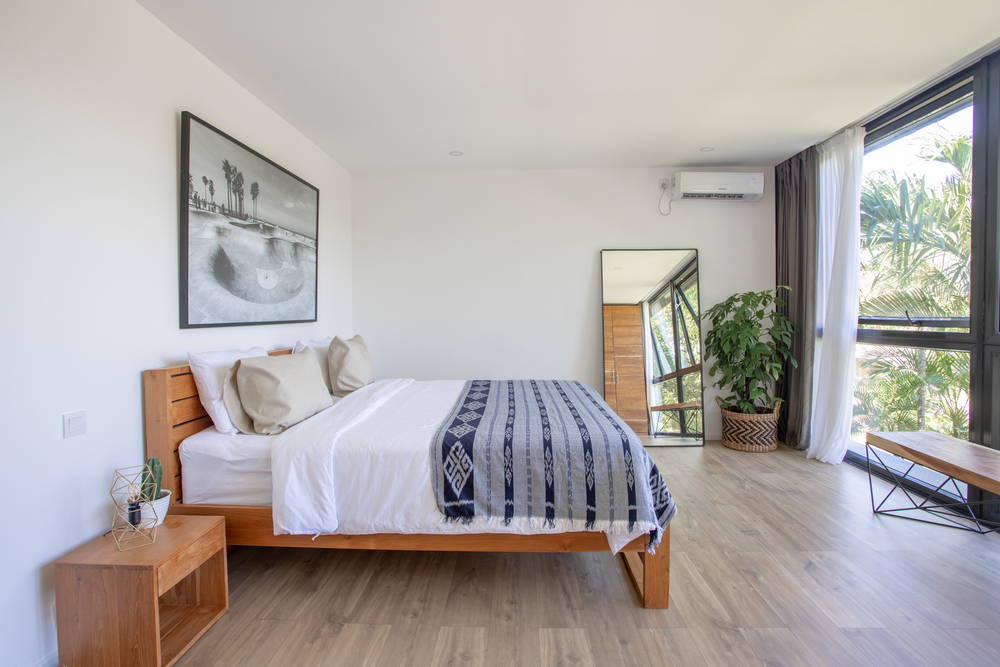
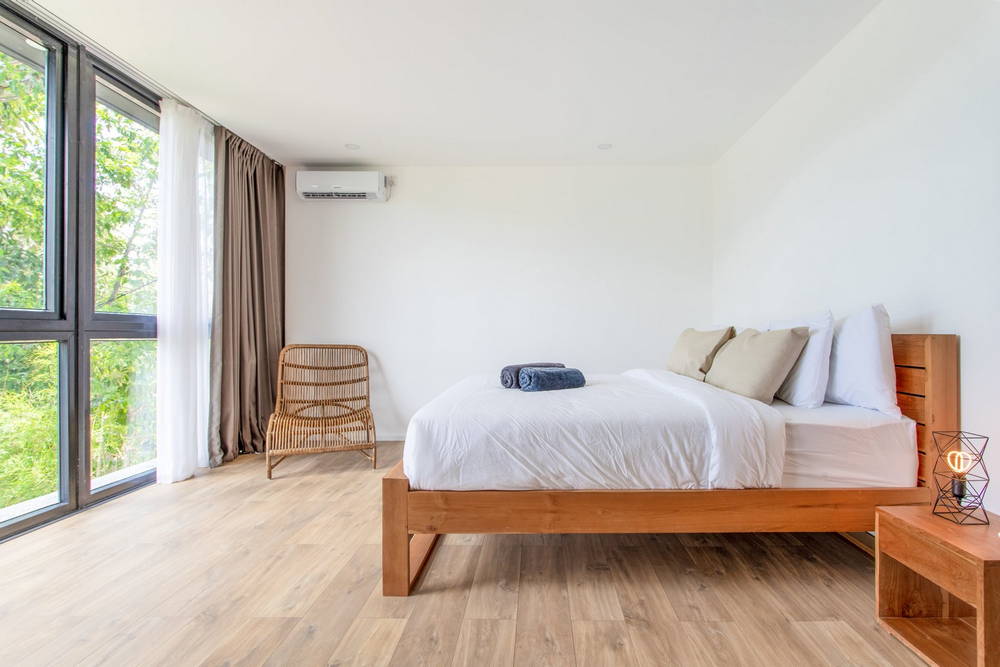
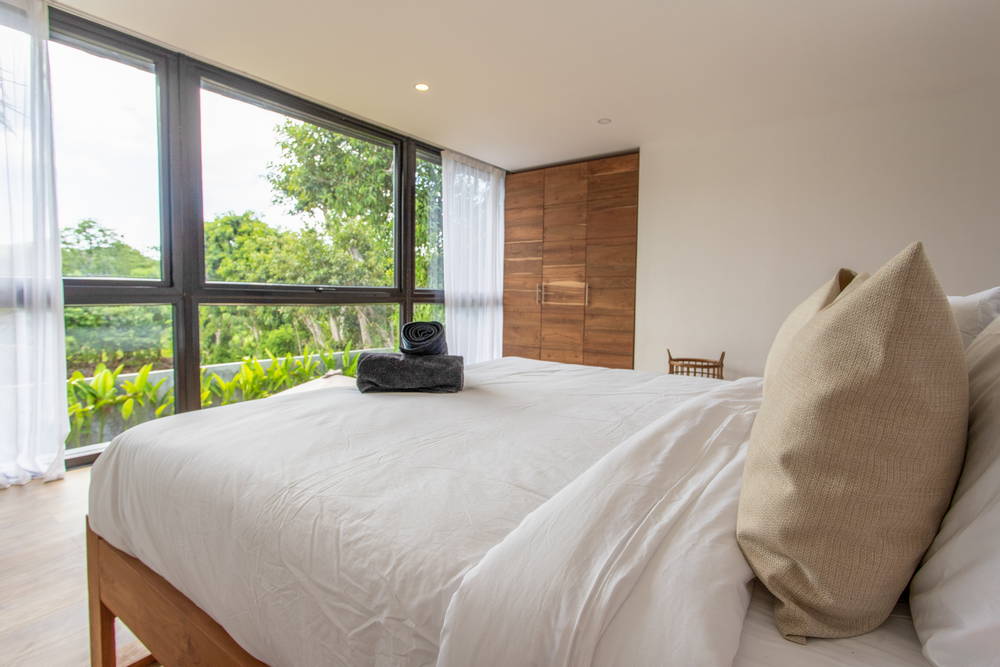
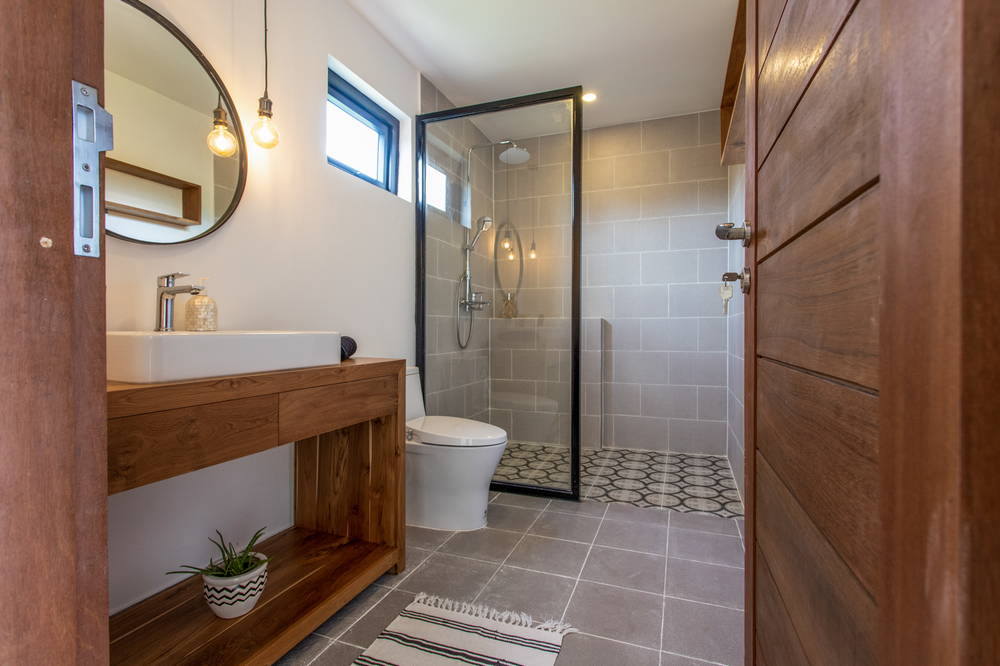
Upstairs we used two 40ft high cube containers, separated by about 6 feet. We cut some of the sides of the containers and reused them to fill these gaps. The second floor of each villa has two bedrooms with ensuite bathrooms.
The volumes of the two homes are quite big so we were not too worried about issues like heat or humidity. Nevertheless, we opted to put glass wool (fiberglass) insulation on every wall to be 100% sure.
Also, we decided to build a roof on top of the containers to avoid having the noise of the rain and to have an airflow between the container and the roof. It helped a lot for soundproofing and also to reduce the heat of the sun (we used reflective metal).
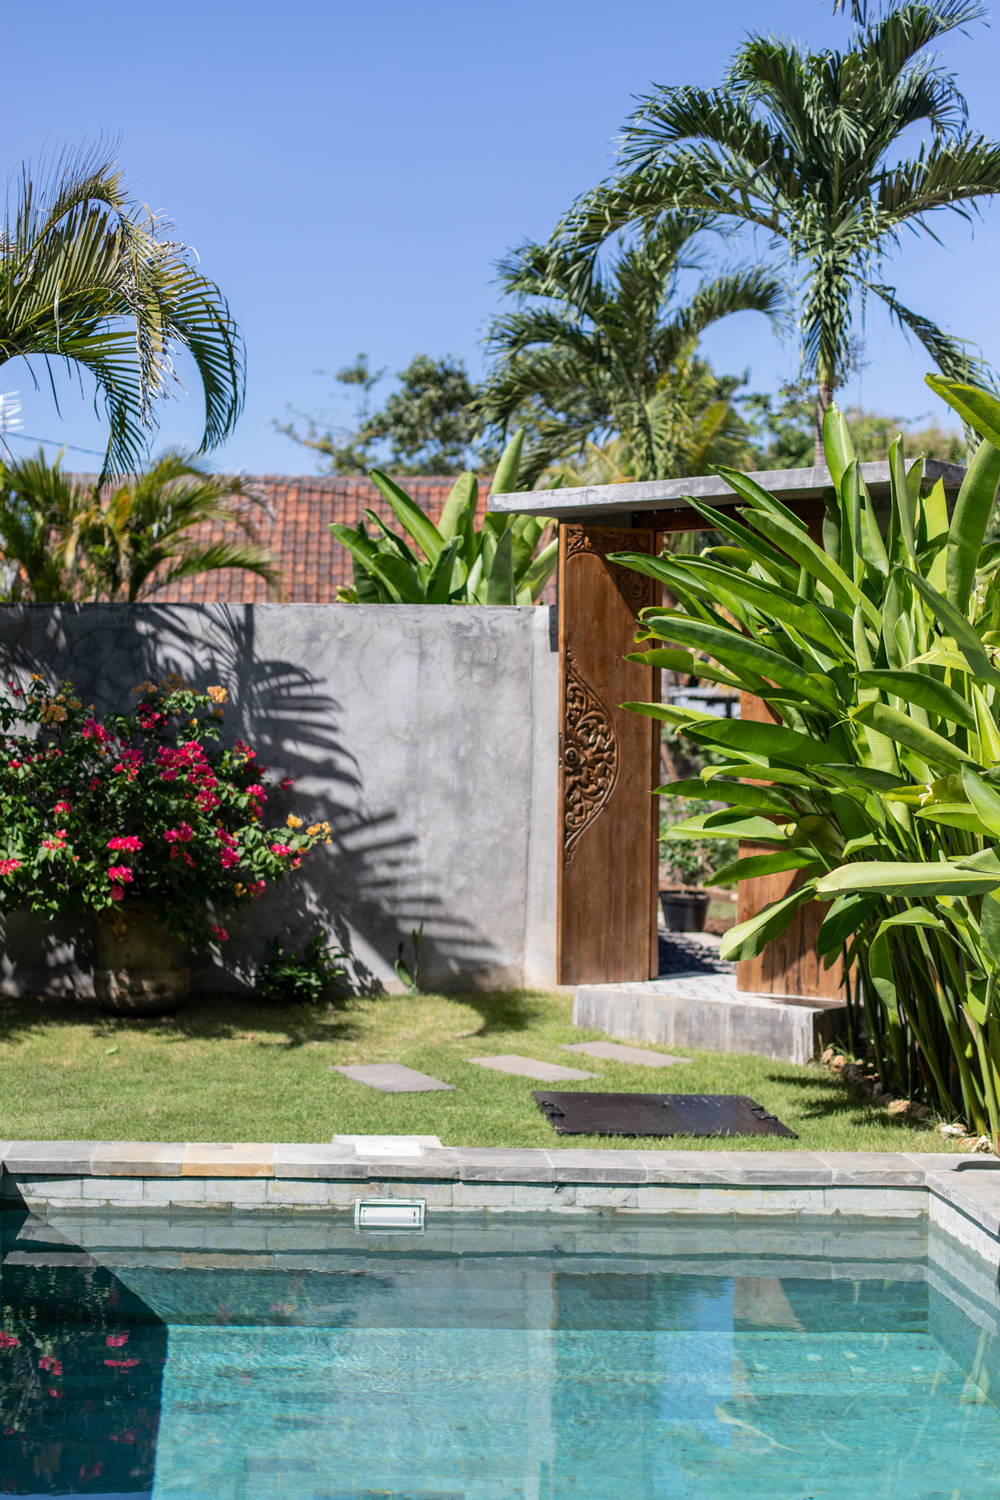
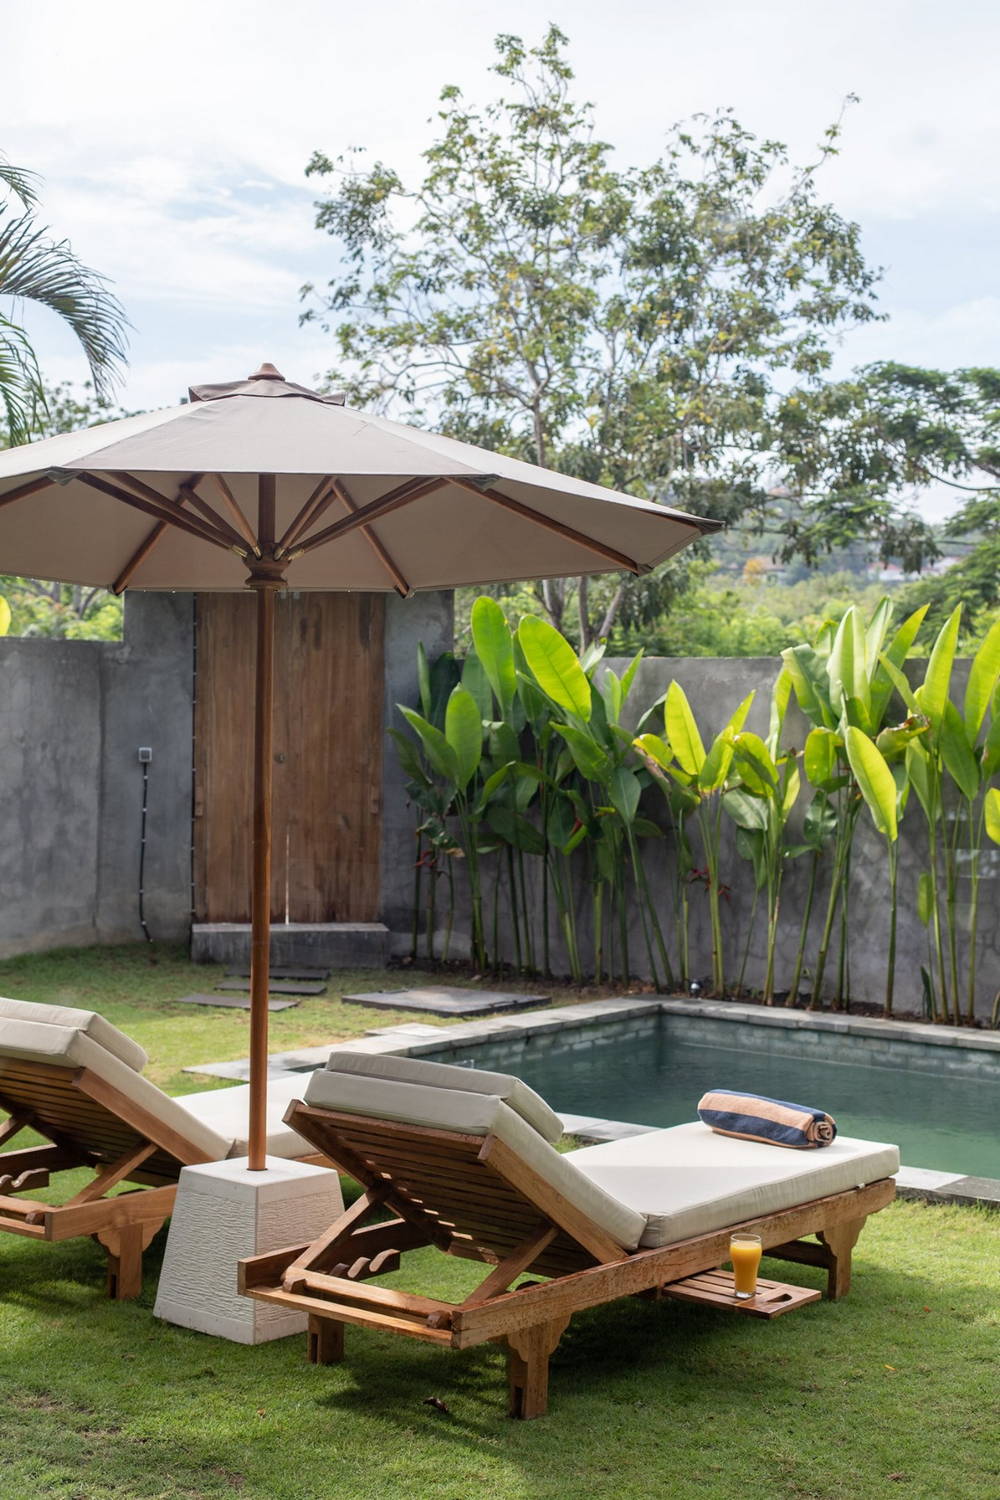
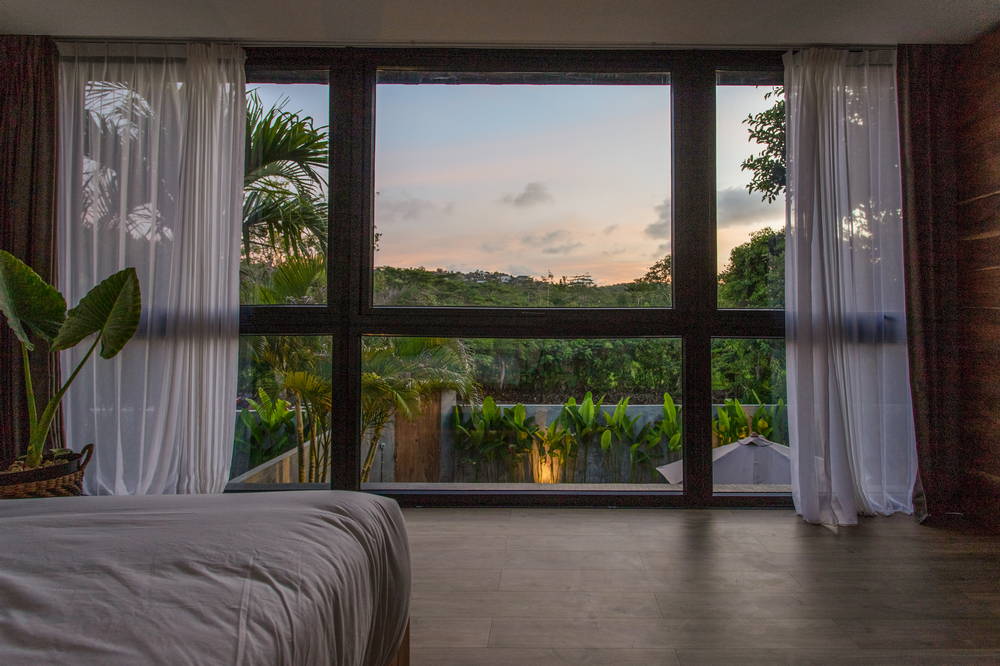
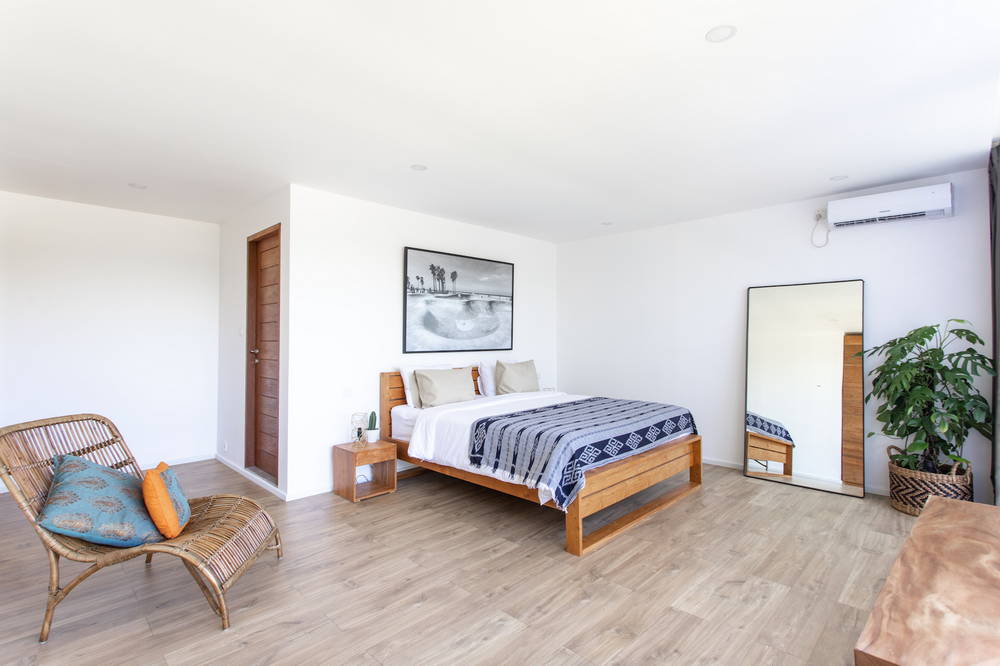
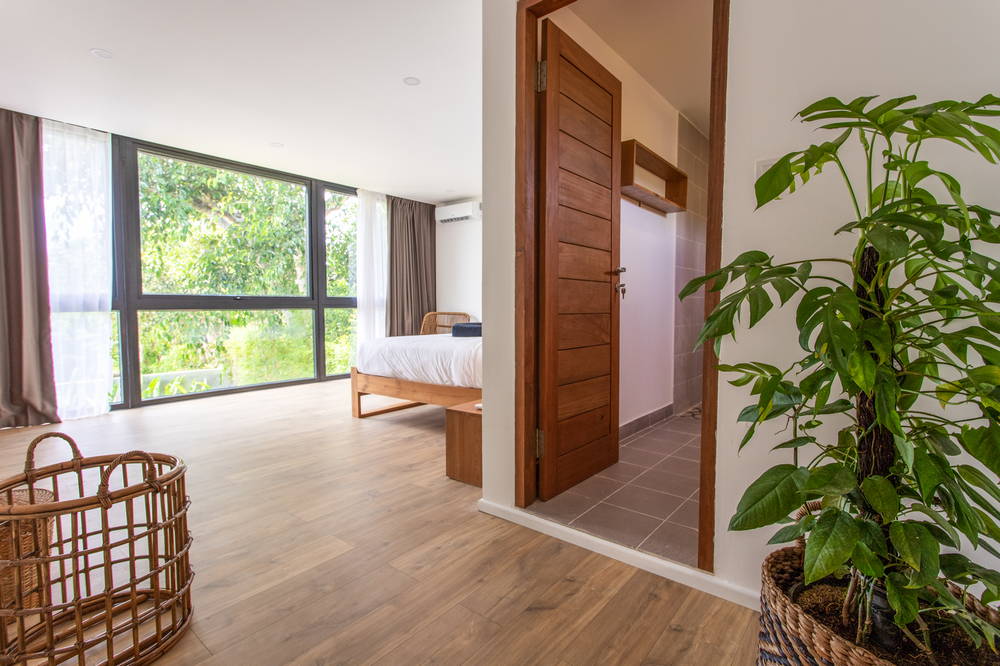
We wanted our guests to forget they were inside a villa made from containers. For that reason, there is little reminder of the containers: no interior exposed metal, floor-to-ceiling windows, and a lot of vegetation. All walls and ceilings are covered with gypsum board (sheetrock).
Downstairs we used tile floors and upstairs we used floating parquet. Only from the side of the villa do you realize it is a container home.
Our timeline for the project was extremely chaotic. It took us a year to fully complete (interior design included) instead of eight months as we originally planned. The main reason for the delay was that our first contractor mentioned above, who was a crook. He ran away from the job after about six months when we uncovered his lies.
Essentially, we paid a large deposit upfront, and he requested an additional payment before the percentage of work corresponding to the first payment had even been completed. In hindsight and in consultation with others, we realized that he underbid the project…there was no way he could have finished the work he promised at the price he gave.
So naturally, he ran out of money and was asking for more, but we got suspicious. He ended up just leaving the project and forcing us to pick up the pieces.
In a perfect world, we would have done closer vetting of the contractor before hiring him by talking to previous clients. Even better would have been using someone who came recommended by people we knew and trusted.
This particular contractor was actually from Jakarta, hundreds of miles and an ocean crossing away. Picking with someone more local may have prevented the disappearing act.
This contractor set us back a few months and a few thousand dollars, but we ultimately did recover and build the beautiful container homes you see. However, we recommend hiring a reputable contractor who has been rereferred to you by someone you know and trust.
Finding land was the easy part as we knew exactly what we wanted, in a specific area of Bali. We started with flattening and doing the topography of the land. Once we had precise measurements, we started drawing our concept. It took us about two months to complete the drawings and agree on the design.
While processing the building permit, we went on to buy the containers on the neighboring island. They were delivered a week later to our building site. We then started cutting and reinforcing them.
At the same time, we built the foundation and concrete slab for both villas. Once ready, we put the containers in place, stacked them and welded them together. Our container home is definitely not a concept where you can move locations later on. The containers are here to stay.
Once in place, we removed any bit of rust we could find on the containers then used rust-proof paint to coat every single part of the containers and ensure the longevity of the metal. We basically welded metal at every corner of the containers to reinforce them. Being in an earthquake-prone region, we needed to make sure the whole building was solid.
As we cut big panels off the shipping containers for the windows and doors, we added steel I-beams to support and reinforce the structure. All the panels we cut were reused to make walls in between the containers (two of them separated by 6m downstairs. And two of them separated by 2m upstairs).
Metal bars then wood were added between the ground floor and the first floor to create their respective ceiling/flooring. After that, we installed a galvanized hollow frame to support the gypsum walls. In areas where it needed to be more solid (to install hanging furniture for example), we used thick plywood. Between the container and the Gypsum/plywood walls a layer of glass wool (fiberglass) insulation was installed.
Once all the above was done, we just needed to paint, do the kitchen then install the furniture. We had all the furniture custom-made with high-quality teak wood. This is one of the perks of being in Bali. Craftsmanship is of a high standard and at a relatively cheap price.
In parallel, we were managing teams to do the pool (6 by 3 m or roughly 10 ft by 20ft), build a roof on top of the villas (to prevent noise from heavy rain during monsoon), and do the landscaping.
Initially, we trusted our contractor and let him do his work. Once he ran away, we had a hard time trusting someone else and decided to handle it mostly by ourselves. So we were very hands-on during the second half of the project. Going there pretty much every day for hours.
If not on site then we were in the shops buying materials. It was tough because we did lack experience in building. But we learned a lot and it helped us save money by skipping the middleman.
Would we do it again by ourselves? Probably not. Our budget was tight and we had to do it this way.
But for our next project, we will definitely hire a professional contractor who will be highly recommended by people we know. We did not do our due diligence and paid the price. Lesson learned!
The whole project (two shipping container villas) cost us about USD $270,000:
Note that this total includes an estimated $15k in payments to the contractor that left our job site with work unperformed (We didn’t keep detailed enough records to know the exact amount he cheated us out of, but it’s somewhere near this amount).
If you take out the cost of the land, pools, and furniture and focus just on the cost to construct the homes, the total is only $148k, or $74k for each 1300 SF villa.
Our STR experience so far has been very short but intense. We inaugurated both container villas in mid-February 2020 and were more successful than we could have dreamed of. Bookings were coming non-stop. And to our surprise, many people were asking for long-term stays, even at STR prices.
A month later, the momentum stopped completely when the lockdown in most areas of the world happened because of the Coronavirus. Most bookings were canceled and we turned towards monthly rentals. Times were tough and the market was extremely down. But, all in all, we did well considering the situation.
In terms of feedback, we can say that all our guests were very pleased with their stay. We only got compliments for the way the villas turned out.
Some guests did not even realize they were staying in a container home and were amazed to hear it. The ones who knew were surprised to see the only reminder of them being in a container home is the outside shape (fairly hidden as you have to go on the side of the building to see it).
Our long term aim wasn’t just STRs, as we are planning to sell the two villas. We love this first project we built together but we are selling in order to build more projects.
Many of our monthly tenants have expressed interest in purchasing a villa. We haven’t sold either container villa so far but it is always very pleasant to get acknowledgment this way.
The novelty of shipping container villas in Bali has helped us tremendously with finding tenants during these difficult times. We know of comparable, beautiful properties nearby who struggle to find tenants at the rates we have been getting.
For the shorter stays typical of STRs, we mainly use Airbnb and Booking.com to find guests. For monthly rentals, we have the most success with local Facebook groups. Each can be extremely powerful for the right type of guest.
We’ve been able to get an advantage over our competition by spending time on these platforms familiarizing ourselves with the pricing, features, marketing, etc used by others. It’s something we would recommend for everyone.
Additionally, hiring a professional photographer is very highly recommended. It is not an expense but an investment that is quickly paid back.
Overall, we are very satisfied with our first container villa experience and would definitely recommend anyone to try it. Take your time to find the right team and containers.
Also, read a lot of information on the internet to have a clear understanding of what container building means and the mistakes to avoid. Everything you need is on the internet, starting with Discover Containers of course.
If it is your very first project and you plan to do more, we highly recommend hiring professionals. You will learn from them and be ready for your next project. It will cost more but will probably save you some money by avoiding mistakes.
If you want to save time, lean toward purchasing new containers or containers in very good condition. That way, you won’t have to do much work on them. It might cost more but your property will be ready for rental earlier.
A mistake we made was to not cut openings into the back of the villa. We should have installed windows on this side in order to allow airflow through the container.
Because of this, we had to install A/C in the living room and kitchen instead of using natural ventilation. It was an extra cost we probably could have avoided with more planning.
Our thanks to Giorgio and François at Villa Mola in Bali for candidly sharing the details of their amazing shipping container houses with us. Modern container homes, tranquil gardens, and relaxing pools, what more could you ask for? Let us know what you think about these cool container villas in the comments below.

Interested in Container Homes? You need our FREE cheat sheets to help decide if containers are right for you!